Introduction
Conviva VSI sensor integration involves passing events and metadata from video player applications to Conviva APIs to report viewer experience and performance data.
Conviva VSI integration begins with obtaining a CUSTOMER_KEY for your Conviva Pulse account.
Conviva provides two accounts: one for test, one for production. Respectively, two keys: for TEST and PRODUCTION environments. You can find your CUSTOMER_KEY here: Pulse - Account Info. Ask your Conviva representative for assistance if you have problems accessing it.
The diagram below illustrates the high-level architecture of Conviva VSI integration and your video application.

Conviva video sensors are implemented in a form of core SDKs, video player modules, ad modules and plugins, supporting wide range of platforms. For popular video players and ad frameworks, Conviva provides the modules or plugins to simplify integration. For the players which have no modules provided, implement Conviva sensor using core SDK APIs to report video / ad metrics and metadata explicitly.
Conviva DPI Sensor Installation and Integration
Lightweight integration of Conviva DPI sensor enables automatic and semantic-less data collection.
Android | iOS | Browser (script tag install) | Browser (npm install) | REACT-Native (npm install) | Flutter | C SDK
Supported application frameworks include:
-
Native Modules
-
Conviva Android Module
-
Conviva iOS/tvOS Module
-
Browser based Modules
-
Conviva JS-SDK NPM package for apps that are built with advanced JS frameworks such as, React, Angular, etc.
-
Conviva JS-SDK script tag-based package.
Note: Browser-based modules support different flavors of JS, such as Typescript, ECMAScript 5 (ES5), and ECMAScript 6 (ES6).
-
-
Roku SceneGraph Module
-
Rust Module
-
C-SDK Module
-
- Hybrid modules
- React Native - Mixture of React Native UI, Android (Native) and iOS (Native) frameworks.
- Flutter - Mixture of Flutter UI, Android (Native), and iOS (Native) frameworks.
For more details to help get started with DPI integration, see:
-
DPI Integration FAQs
For more details and integration steps, see the conviva-<platform>-appanaltyics repos at https://github.com/Conviva.
Conviva VSI Sensor Integrations
Conviva VSI integrations leverage Conviva SDKs and player library APIs for optimized integrations for video stream events. The Conviva VSI supports the following platforms:
-
Android
-
JavaScript
-
iOS/TVOS
-
C SDK
-
Roku
-
Rust
-
Brightcove
-
Xbox MediaPlayer
-
Xbox WinJS
-
Web thePlatform
-
Castlabs Partner Integration
For installation, see the Conviva repo's at github.com/conviva.
At a Glance
Use this summary to get started with Conviva video integration and align the project scope, schedule, and required resources.
|
Planning
|
Integration
|
Validation
|
Launch
|
|
Tools Application Manager |
Tools Application Manager |
Tools
|
Tools Pulse |
| Led by Conviva PM |
Led by Application Dev Team |
Led by Conviva QA |
Led by Application Deployment Team |
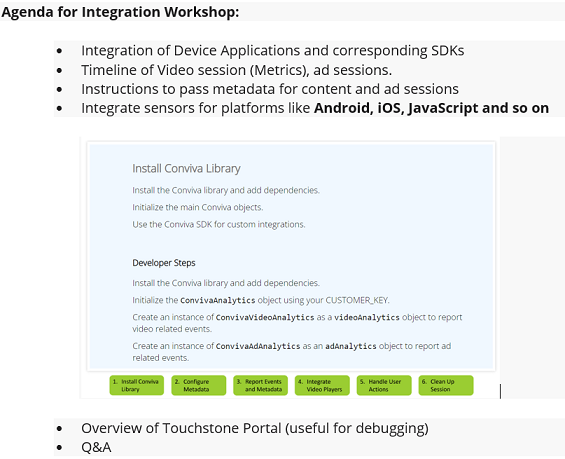
Conviva VSI Sensor Integration Steps
This section outlines the steps to integrating with Conviva's Core SDKs and player library APIs. Variations are covered in specific player integration instructions. (Click the links at the bottom of the page for the platform-based instructions. Use the tabs within each platform page to view the instructions for each of the supported players.)
- Install the library / add dependencies.
- Initialize Conviva analytics using the CUSTOMER_KEY.
- Set Device Metadata (check which fields are required for your platform / player since Conviva auto-detects certain values to make implementation easier).
- Implement metadata and event reporting:
- Report playback attempt request along with metadata (content, workflow, audience, and other relevant metadata).
- Report video events OR pass player object reference to Conviva for auto-detection. Use the tabs within each platform page to view the specific supported player instructions.
- Report ad events (if applicable) or pass the ad object to Conviva for auto-detection.
- Report user actions (backgrounding, user dialogue, etc).
- Report end of playback.
- Perform a sanity check following the test cases in the Stream Sensor Sanity Test Plans spreadsheet. For the full validation test, use the test cases in the Stream Sensor Full Test Plans spreadsheet.
- Use Touchstone in Pulse to debug your implementation, if required.
- Replace your TEST CUSTOMER_KEY with the PRODUCTION key and go live with your application.
Make sure the gatewayUrl for Touchstone is NOT used in Production! - Done! Analyze your data in Pulse and improve your viewer experience - let's make video experience better!
Conviva monitoring shall be started immediately after the user initiates video playback, by either hitting "play" button, or in auto-play mode.
It shall be implemented using the following guidelines:
- Only once per video playback attempt.
- Before requesting and connecting to the video stream.
- Before errors that could prevent playback might occur.
- Before any DRM checks or other stream authentication logic.
- Before playing ads.
Plan, Integrate, Validate, Launch Process
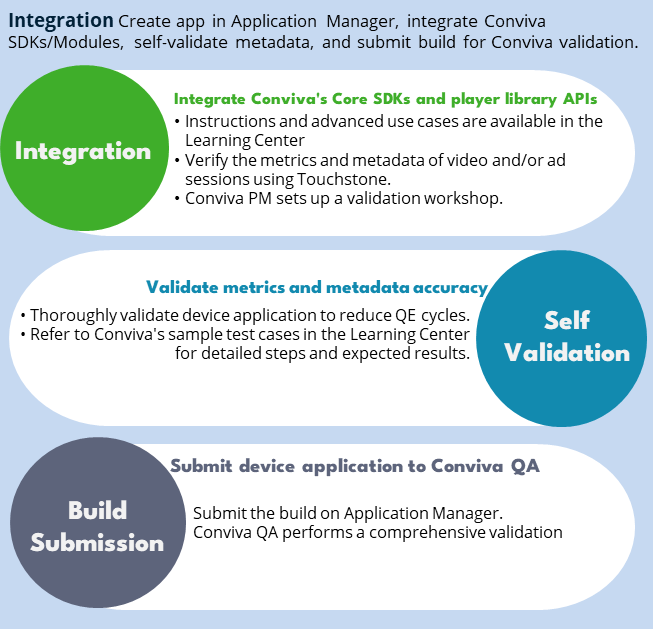
Integrating Conviva's services with a video application is a four-step implementation process that requires careful planning, Conviva sensor integration, Device Application validation, and Device Application launch:

-
Planning
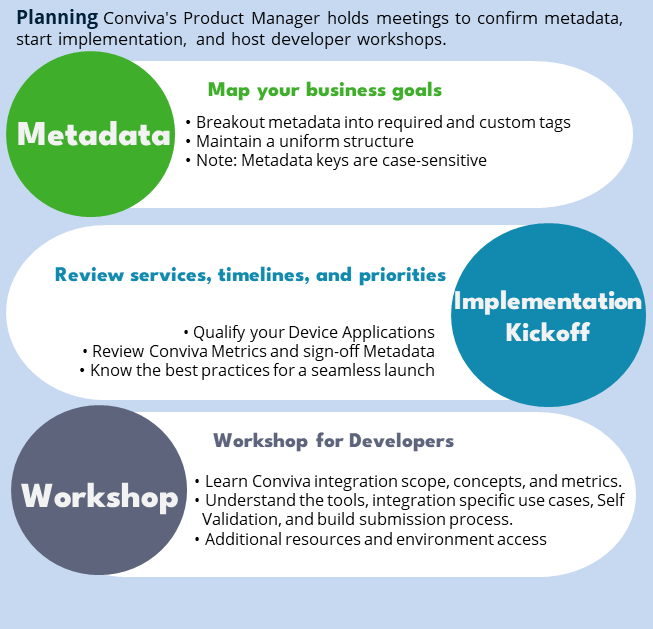
The Planning Phase is led by the Conviva Project Manager to ensure that both parties are set up for success. In this phase, we confirm that key stakeholders, technical scope, timeline/prioritization, and metadata strategy are clearly identified and signed-off before beginning the Integration Phase.
Metadata Strategy
Mapping your business needs to metadata tags is called the Metadata Strategy. Your metadata strategy is part of your business acceptance criteria. A successful implementation not only validates that your video application passes the correct metadata tags to Conviva's analytics platform while fulfilling your business needs. For example, to measure the viewers' quality of experience with live content versus video-on-demand (VOD) content, you must pass a metadata tag that identifies whether the content is "Live".
Important points about Conviva metadata:
- Metadata is broken out into required tags, which fulfill Conviva product use cases and have custom tags that fulfill your unique business needs
- Metadata must be structured uniformly and consistently across all integrated Device applications.
- All properties, metadata keys, and values are case-sensitive.
Implementation Kick-off
We begin every kickoff meeting by reviewing the Implementation Services lifecycle, identifying timelines and priorities. Next, we take a deeper dive into qualifying your Device Applications to capture all relevant technical information and limitations that may impact the integrations – resulting in the identification of the Conviva Library/SDK that should be leveraged for integrations. In addition, we do a high-level review of Conviva Metrics and sign-off on Required/Custom Metadata Strategy. Finally, we share our Best Practices for a seamless and successful launch.
Integration Workshop
The Conviva Implementation team organizes an Integration Workshop for your player / application development team(s). The workshop provides your developers and opportunity to partner with our Integration Engineers to better understand the technical concepts of sensor integration, and raise any outstanding questions they may have. The topics covered are:
- Integration scope & concepts
- Metrics
- Tools
- Integration specific use cases
- Self-Validation
- Conviva QA submission
- Additional resources and environment access
-
Customer Integration
The Integration Phase is led by the customer's application development team, with support from the Conviva Project Manager and Integration Engineer. In this phase, Device Application developers download the latest Conviva SDK/Library and leverage the tools and resources provided by Conviva to integrate Conviva sensors.
Customer Tools and Resources
-
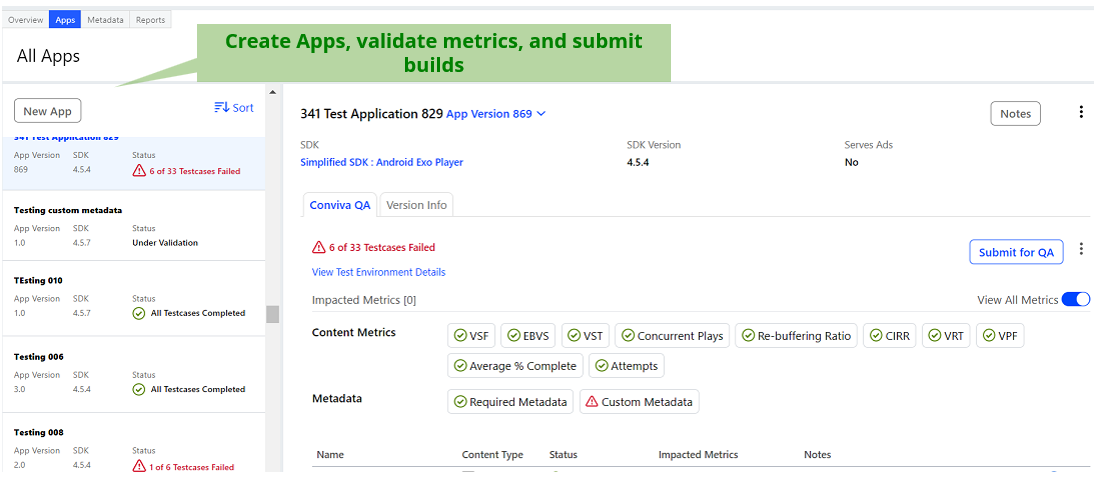
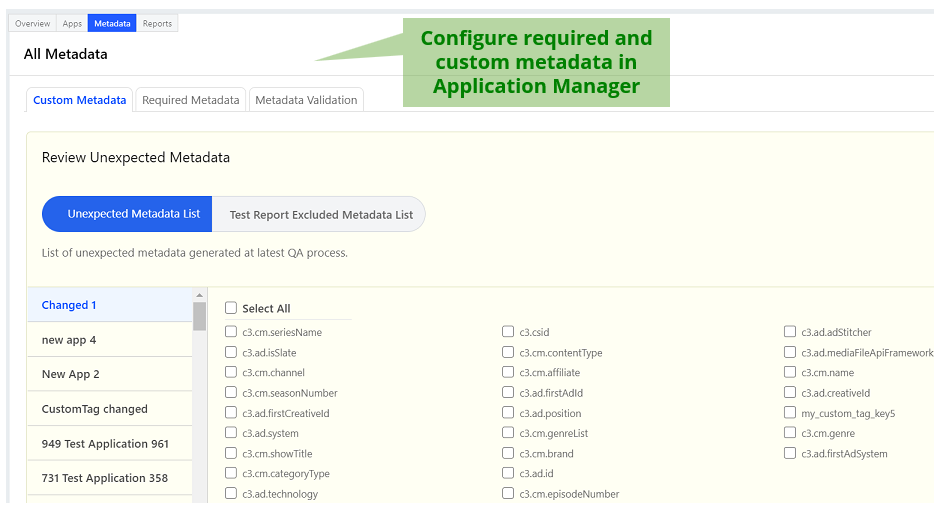
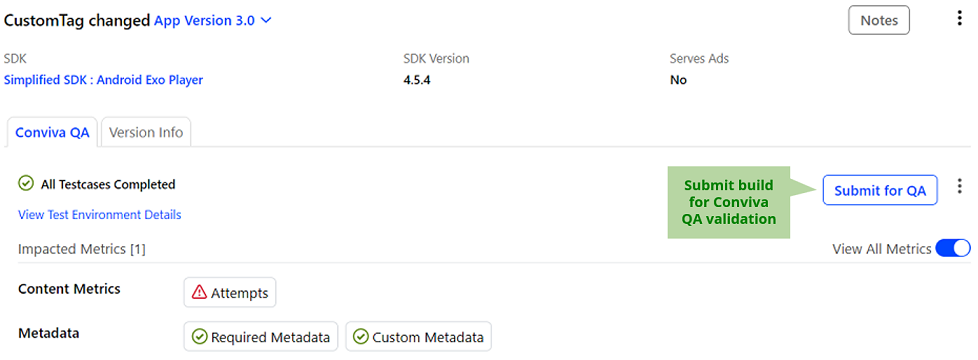
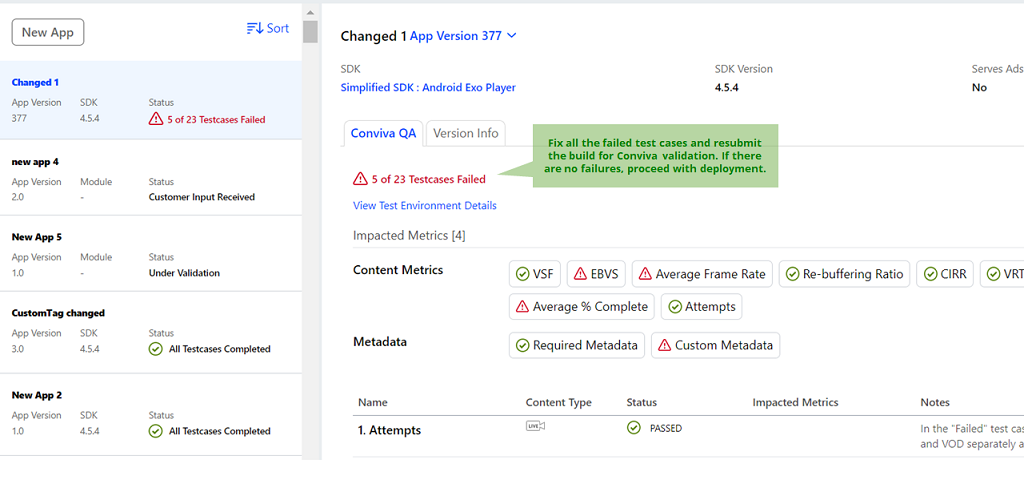
Application Manager: Application Manager is a proprietary tool created by Conviva to provide our Clients a single source of truth for customer metadata strategy, and the integration and validation of their device applications. The tool facilitates:
-
Qualifying device applications and library/SDKs used for integration
-
Capturing, maintaining and exporting metadata strategy
-
Submitting device applications for validation by Conviva
-
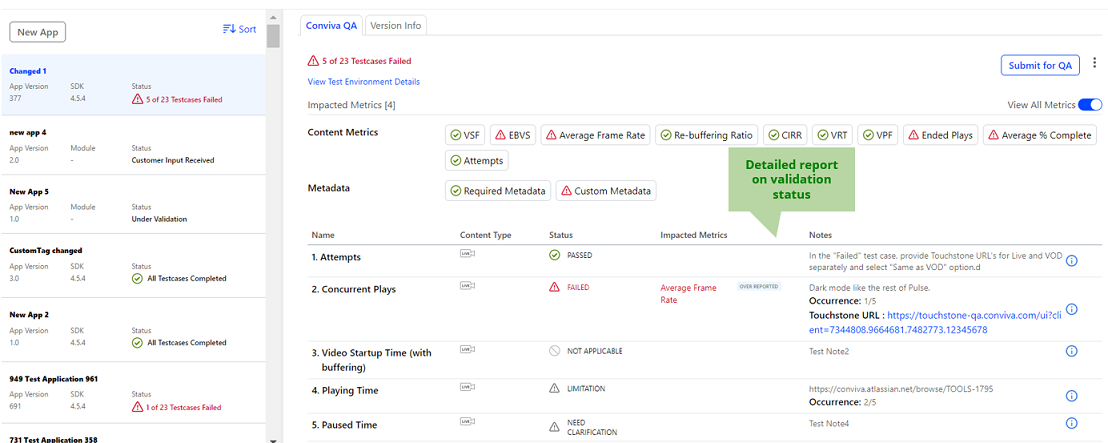
Reviewing and exporting validation results (Excel & PDF)
-
A historical reference of previous validation results
-
-
Touchstone: This tool is available in Pulse and enables seamless debugging and self-validation of Conviva's video sensor integration with the streaming applications/platforms. It tracks user actions within the integrated devices and subsequently transmits session summaries, metrics, and metadata for debugging purposes.
-
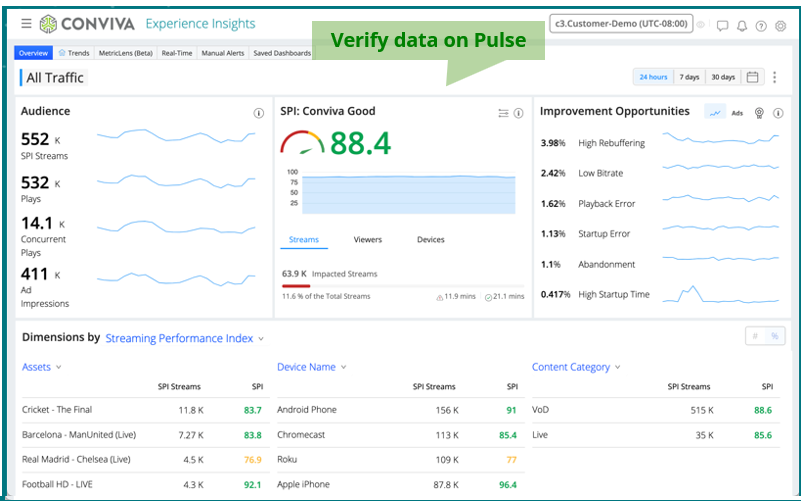
Pulse: Conviva's real-time dashboard which allows monitoring of device applications integrated with Conviva sensors. Please note, the integrity of the data flowing into Pulse directly correlates to the successful integration of Conviva sensors!
-
Conviva Integration Instructions: These pages provide developers detailed integration instructions as well as access to download links for Conviva SDKs/Libraries and sample apps. In addition, they provide access to sensor APIs and information on self-validation.
-
Conviva SSO: Conviva leverages SSO (single sign-on) for access to Application Manager, Conviva Developer Community, Pulse and Touchstone. As such, the credentials are the same for all tools/resources. If you require access to a specific c3.account, you will need to contact your internal Conviva Administrator or Conviva Solution Consultant.
-
Network Traffic Shaping Tool: To aid testing devices that do not allow proxy setup, you can use a script to simulate various network conditions.
Customer Advanced Use Cases
Developers can use the Conviva SDK for various advanced use cases, such as:
- Reporting program changes during live or live linear streaming
- Reporting video changes in playlist
- Reporting once when playback does not recover
- Reporting multiple errors due to retry when playback does not recover
- Reporting when playback recovers from a fatal error by switching to a different asset URL
- Reporting when playback recovers from a fatal error by switching to a different CDN
- Reporting a warning when playback is not impacted
- Handling user actions, such as user dialogues, backgrounding, and foregrounding
To learn more about these advanced use cases, see here.
Customer Self-Validation
Upon completion of your integration, and before submission to Conviva QA team, developers should complete a comprehensive self-validation test pass of each Device Application.
Conviva provides sample test cases with detailed steps and expected results.
Developers should be checking for both metric and metadata accuracy. Based on our experience, comprehensive self-validation can reduce your QE cycles, saving your costly project time.
For more information about self-validating the builds, downloading the test cases, and viewing sample validation videos, refer to the Self-Validation page.
Build Submission for Conviva Validation
Once you have successfully completed the self-validation, you may submit your Device Application to Conviva QA for comprehensive validation testing through Application Manager. For more details about the build submission, refer to Submitting Device Application for Validation.
-
-
Validation
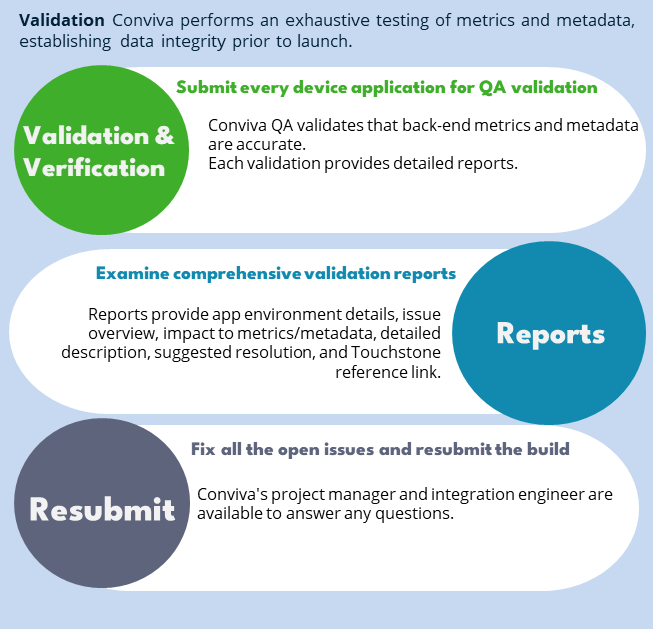
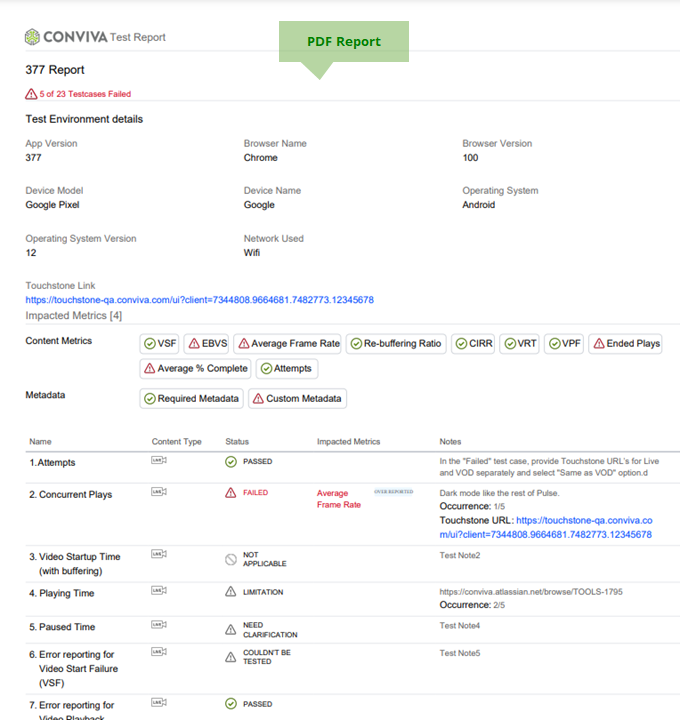
Conviva once again takes the lead in the Validation phase, completing exhaustive testing of both metrics and metadata, establishing data integrity prior to launch. Comprehensive validation reports are shared upon completion for review, and additional support is provided by Integration Engineers in the event that issues are identified.
Conviva Validation and Metadata Verification
Conviva's Validation team provides Customers exhaustive and custom validation testing to establish data integrity. It is highly recommended that every Device Application is submitted to Conviva for exhaustive testing prior to launch. Conviva QA validates that back-end metrics and metadata are accurately reported on Conviva's analytics. Each validation round provides Customers with a detailed report that provides:
- Environment details
- Issue Overview
- # of Occurrences of issues
- Impact to metrics/metadata
- Detailed description
- Suggested resolution, and
- Touchstone reference link
If you were unable to pass validation within the first round of testing, Conviva Integration Engineers will review all identified issues with your developers and walk through the suggested resolutions. Once all issues have been fixed, we recommend returning to the self-validation and re-submission.
To reduce blocked Validation submissions, ensure that you have completed the following before submission:
- Whitelist the following Conviva IP addresses: 12.119.238.122, 199.127.192.0/24, 2620:10b:7000::/48, 87.242.135.100, 14.143.29.150, 182.156.244.50 for geo-location and additional access restrictions.
- For pre-production/staging distribution applications like HockeyApp, Appcenter, TestFlight, Crashlytics and others, access must be provided to team.devices@conviva.com.
- For browser-based Device Applications, include URL with active streams available for testing/staging location.
- Host and share the URL to the build at a location of your own choice (e.g. Dropbox, Google Drive, FTP server, etc.).
- Provide login and password credentials, if required for testing.
Your Conviva Project Manager and/or Integration Engineer can assist you with any questions you may have.
-
Launch
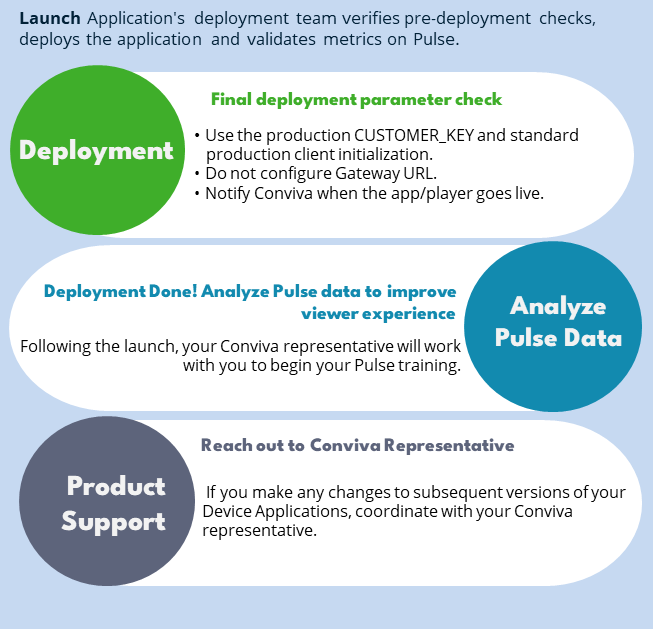
The final phase, Launch Phase, is again led by the Customer with support from your Implementation Services team. We highly recommend coordinating your launch dates with Conviva so that we may support you on your launch day.
Deployment
After validation and before releasing your Device Application to production, please complete the following steps:
- Configure the app to use the production
CUSTOMER_KEY. - Confirm that the app uses the Standard / Production client Initialization.
- Confirm that Touchstone is NOT enabled.
- Notify Conviva when the app/player will be released to general public.
- Provide the production URL for browser-based players, or share the production application details.
- If the content or the application/player is continued to be geo-blocked, to allow us to play videos during the validation process, for production builds whitelist the following Conviva IP addresses: 12.119.238.122, 199.127.192.0/24, 2620:10b:7000::/48, 87.242.135.100, 14.143.29.150, 182.156.244.50.
Post Deployment Checks
Your Conviva Project Manager can partner with you post-launch to submit exhaustive or sanity validation passes, if you choose.
Support Handover
After launch, our support team assumes responsibility for your ongoing requests. If you make any changes to subsequent versions of your Device Applications, whether they are related to Conviva or not, please coordinate with your Conviva representative to know in advance so they can check the integration.
For any production issues, please contact support@conviva.com, providing your Conviva C3 account ID, integration platform and framework.
- Configure the app to use the production
 Metadata Concepts
Conviva Metadata
Conviva categorizes metadata tags into three buckets:
- Pre-defined tags that must be reported as part of contentInfo for all videos.
- Device related tags that are automatically detected by Conviva backend and do not require integration updates.
- Custom tags that are reported based on business requirements, specific to each customer.
Updating metadata or setting metadata late, after the monitoring of content has started, is subject to certain limitations. See the specific player instructions for details.
 Metric Events
Conviva Metric Events
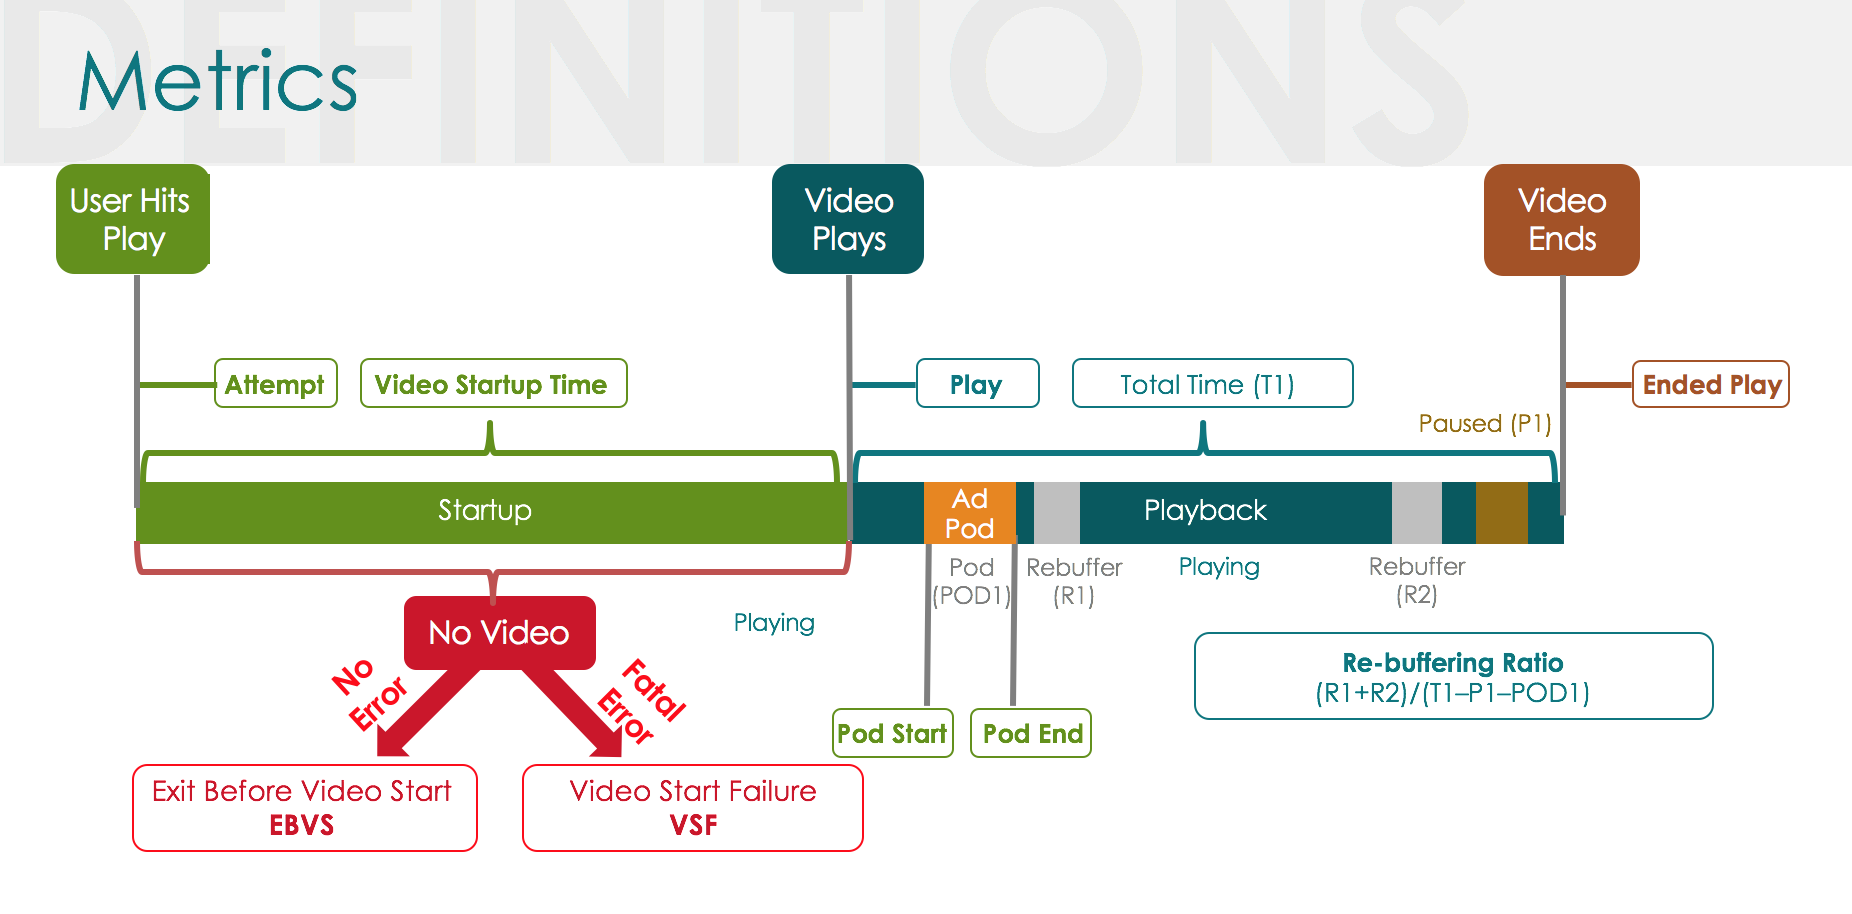
The exact Conviva monitoring session flow depends on many factors, including ads, DRM, and stream authentication usage. This diagram depicts the life cycle of a video stream, with the associated events, errors, and metrics reported by the Conviva platform.
The below diagrams depict the life cycle of client-side and server-side ad sessions, with the associated events, errors, and metrics reported by the Conviva platform.
Client-Side Ad Insertion (CSAI)
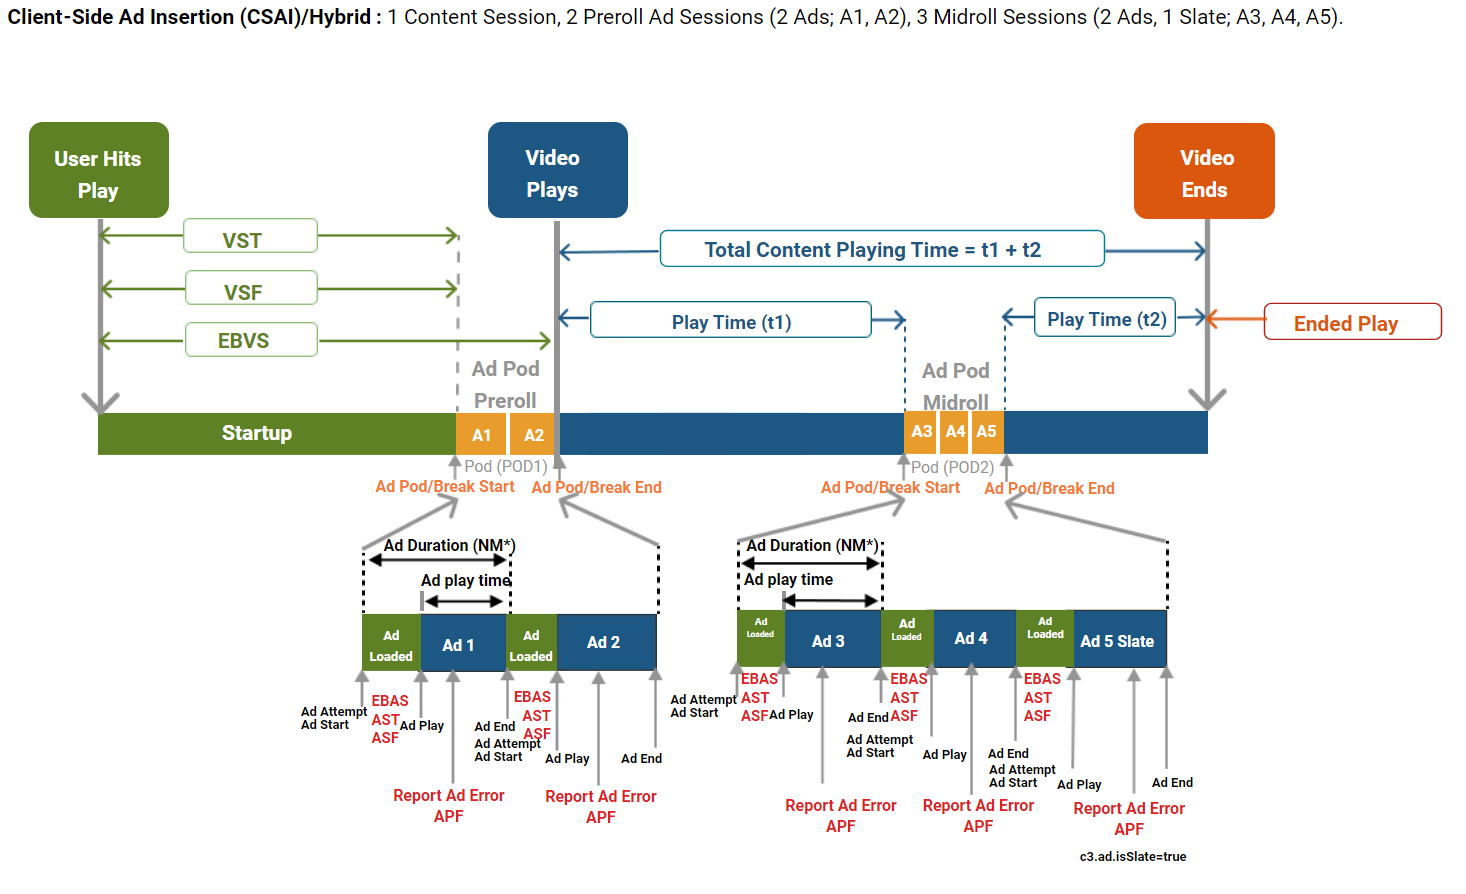
- NM* - During the Non-monitoring state, while the ad plays, the main video is not tracked. However, the ad metrics are tracked in Ads and reported in Pulse ad metrics.
- Ad Session is Ad Attempt to Ad End. Ad Actual Play Time is Ad Play to Ad End. Total Ad Duration is Ad Start to Ad End.
- Reporting Ad Pod/Break Start and Ad Pod/Break End can provide additional insights about ad pods in the Conviva VSI Overview dashboard Improvement Opportunities data.
- VST typically includes the time it took to buffer the main video before the pre-roll ads. Note that the pre-roll duration is not included in VST. However, in rare cases, if buffering exists after pre-roll, it will be included in VST.
- EBVS - If user exits during the pre-roll ad, the content session will be marked as EBVS.
Server-Side Ad Insertion (SSAI)
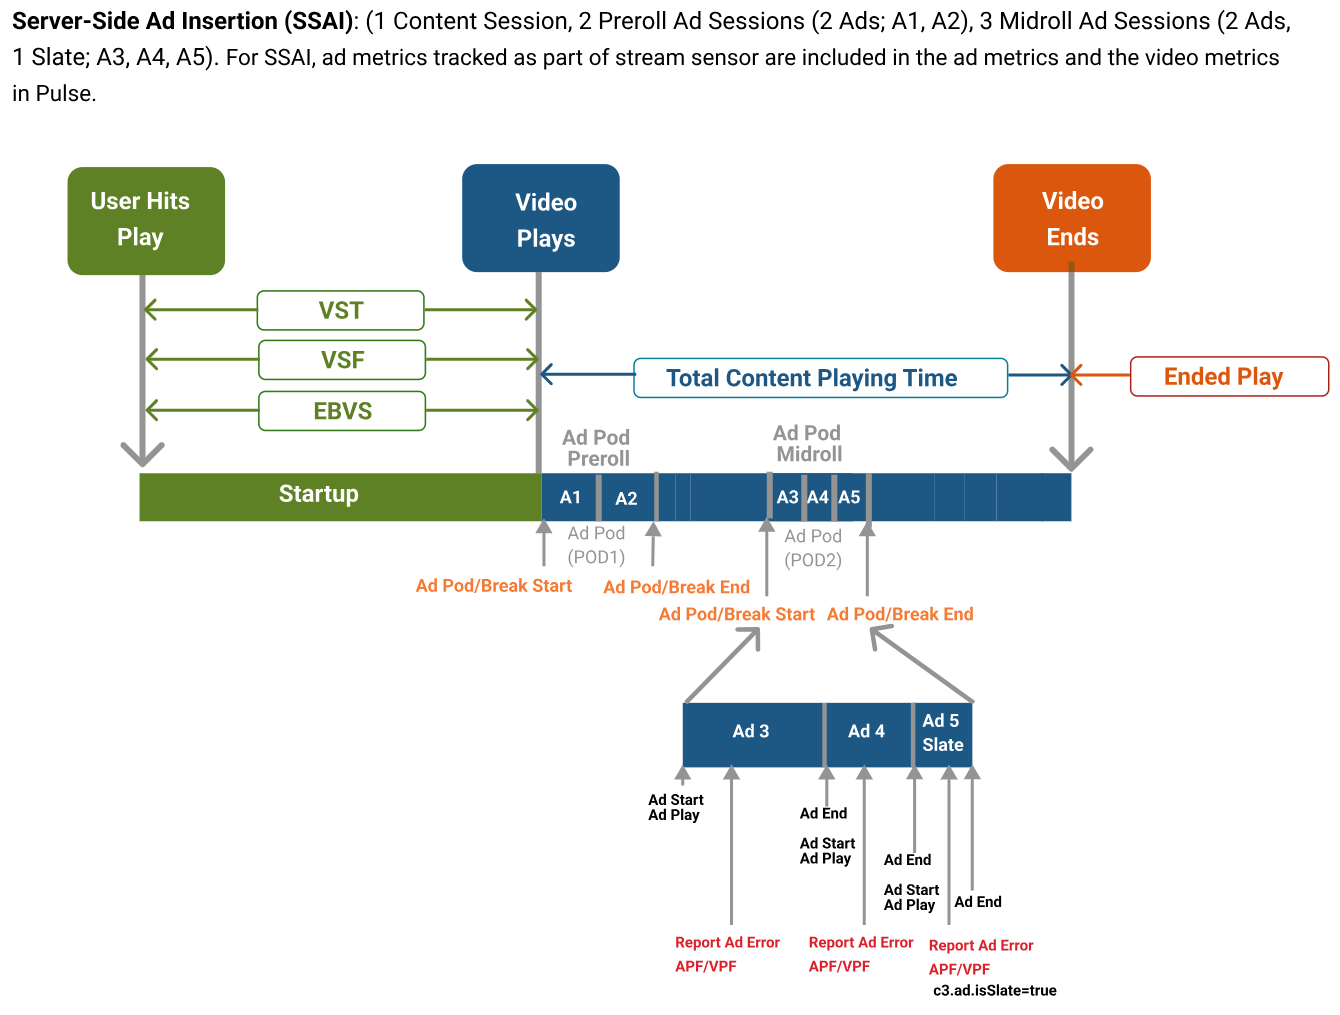
- Stitched ad events are included in the video stream tracking.
- Ad session is from Ad Start to Ad End.
- Ad Actual Play Time is from Ad Play to Ad End.
- For SSAI because AST is short, Ad Duration typically equals Ad Actual Play Time.
- Ad errors are reported in both video sessions and Ad sessions.
- Reporting Ad Pod/Break Start and Ad Pod/Break End can provide additional insights in the Conviva VSI Overview dashboard Improvement Opportunities data. Ad metrics are also tracked in Ads and reported in Pulse ad metrics.
See the Metric Dictionary for more details about the Conviva metrics.
VSI Integration Instructions
Conviva VSI sensor integrations typically take at least 4-8 hours, along with follow up validation and deployment testing.
To access Conviva sensor instructions, login to Pulse or reach out to your Conviva representative for access.
|
Android |
JavaScript - HTML5 - Video.js - Chromecast v2 (Deprecated) - Chromecast CAF - Tizen - Trilithium - WebMAF - Custom Integration - Google IMA - Google DAI - Custom Ad Manager |
iOS/tvOS - AVPlayer/AVQueuePlayer - Brightcove - Custom Integration - Custom Ad Manager |
C Rust |
Roku - Roku - Google DAI - YoSpace Ad Management SDK - RAFX SSAI Adapter - RAF (CSAI) - Custom Ad Manager |
| Web Brightcove | Web thePlatform | XBox One/Windows 10: MediaPlayer/MediaElement | XBox One/Windows 10: WinJS | Castlabs Partner Integration |
