Nexa Getting Started
Welcome to the Nexa – Ask simple, natural-language questions to uncover actionable insights and identify anomalies.
Nexa is Conviva’s conversational AI interface, which accepts natural language prompts to perform multi-level and nested queries, manages multiple dimensions, and instantly generates dashboards while also summarizing results and suggesting next steps. Additionally, it identifies and highlights key trends across user experience (quality of experience or QoE), audience, and engagement.
Capabilities
-
Identify Issues faster and Simplify Reporting
Nexa accelerates anomaly detection and simplifies reporting. It quickly identifies irregularities in data, enabling faster root-cause analysis and resolution. Additionally, Nexa produces clear, structured reports that facilitate monitoring, informed decision-making, and ongoing performance evaluation.
-
Explore Your Data using Natural Language
Nexa uses a large language model (LLM) to convert plain English prompts into structured queries and to generate dashboards, summarize the results and identify anomalies,
Enabling Nexa
Prerequisite: Verify the User has the Admin role and AI enablement admin permission.
Only Admins with this permission can view and accept the AI policy through Pulse, which displays a brief message with a link to the policy document. Administrators must accept the policy on behalf of the entire team.
For Nexa permission details, see User Management.
Non-administrative accounts receive a message instructing them to contact their administrator to enable Nexa.
-
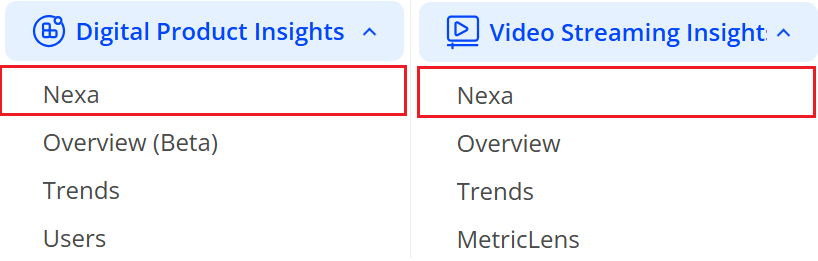
Navigate to the Left Navigate pane and click VSI or DPI.
Image: Nexa
-
Click Nexa on the navigation to see the Nexa page.
Image: Nexa homepage

-
On the Nexa screen, click Enable Nexa for My Team to enable Nexa for the team.
Image: Nexa Counter

Understanding Tokens – Monthly Token Limit
Nexa employs large language model (LLM) technology to process prompts and generate sites. While knowledge of the underlying technical details is not required, it is essential to understand that LLMs operate on a token-based system. Tokens provide a standardized measure of Nexa’s processing workload. Nexa structures its free and paid plans around token usage.
Token Display in Nexa
Token usage in chat provides insight into the number of tokens consumed by prompts. Nexa displays token usage by default.
Nexa uses Token when it:
-
Reads the input
-
Think and process
-
Builds the output
Larger and more complex websites or applications require more tokens to generate.
Note: Conviva provides 50 million free tokens each month. The counter refreshes at the start of every month (UTC zone), and unused tokens do not carry over. Once the free tokens are utilized, contact Conviva Support for additional access.
For more information on Tokens and LLMs, see: Nexa -- Concepts and Context.
Note: If Nexa is not used for 30 days, the conversation history will be removed.
User Timeline Sessions
Nexa enables real-time, user-level experience analysis, allowing Customer Support teams to instantly view session histories, performance issues, and user journeys.
For example, “Show issues for user 12345” or “List the last five sessions for client xyz,” teams get immediate, context-rich insights without switching dashboards.
The new User Timeline Dashboard consolidates session data, errors, and performance anomalies into a single, intuitive view. By combining performance telemetry with experience metrics, Nexa accelerates troubleshooting and improves ticket resolution. Overall, this capability helps teams understand user impact more clearly and deliver faster, more effective customer support.
For more information on user timeline, see User Timeline.
Example prompt and response:
"What were the last five sessions for client ID 1158818?”

Flow Auto insights
Analyze any flow in Nexa and Nexa shows additional insights and recommendations for the flow.
Example prompt and response:
"Show details on application launch flow for the last week?"

Accuracy
LLMs can generate inaccurate or outdated outputs for several reasons:
-
Training set age: LLMs train on large datasets but cannot access information created after the training process concludes. When building software, developers must recognize that the LLM may not be aware of the latest versions of tools and frameworks.
-
Hallucination: LLMs operate predictively rather than deterministically. They may return different outputs for identical prompts and occasionally generate false information.
Analysis Templates
Nexa allows saving session conversations as reusable analysis templates for future reference. This capability standardizes workflows, improves efficiency, and promotes consistent analysis practices across teams.
Nexa supports three categories of analysis templates, hosted on Nexa homepage:
-
Recommended Analyses: consist of templates curated and maintained by Conviva. These templates represent best-practice analyses and are available exclusively to Nexa Admins to ensure controlled usage and governance.
-
Saved Analyses: include templates created and stored for individual reference. These templates enable quick access to frequently used analysis patterns without affecting team-wide visibility.
-
Team Analyses: comprise templates explicitly marked as Team. These templates are shared with the team, enabling consistent analysis approaches and knowledge reuse across collaborators.
Together, these template types provide flexible options for individual productivity, team collaboration, and administrator-recommended best practices within Nexa.

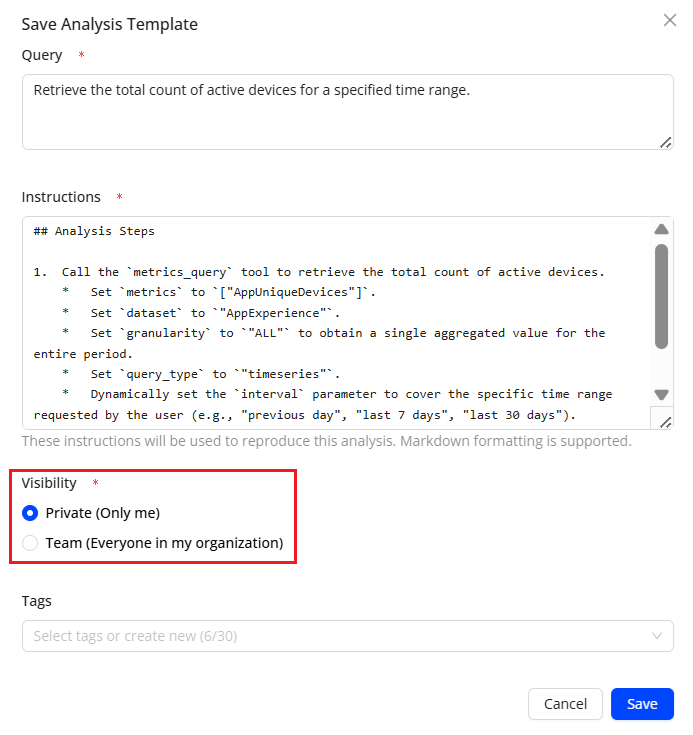
Save Sessions
To save the sessions,
-
After asking the query, click the Save Analysis icon.

-
Select the Visibility criteria.
-
Click Save and see the entry in the Nexa home page and in All Sessions page.
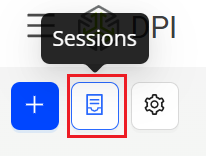
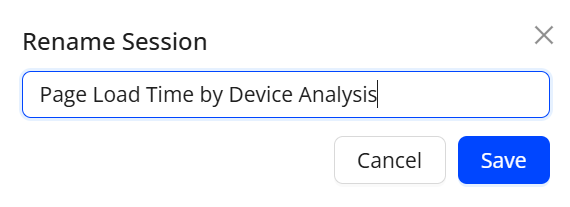
Renaming Sessions
Nexa provides an option to rename saved sessions, making it easier to identify, organize, and retrieve them over time. Clear session names improve context tracking and keep your workspace easy to navigate.
To rename a session,
-
Click the Sessions icon to see All Sessions.
-
Click the Kebab icon adjacent to the saved session which needs to be renamed.

-
On the Rename Session pop-up, update the name for the session and click Save to save the updated session.
Note: Saved sessions are retained for 30 days from the date they are saved.
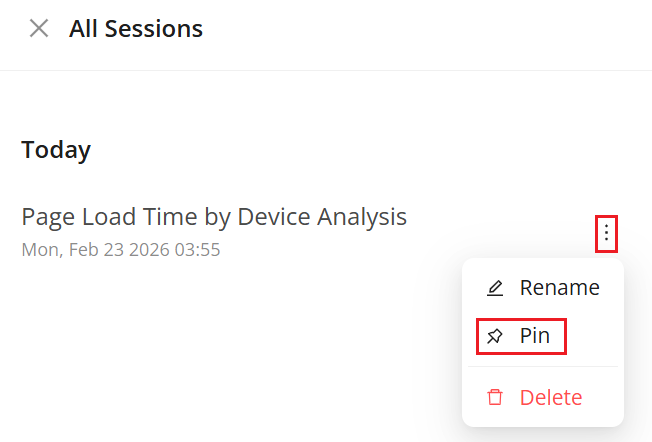
Pinning Sessions
Nexa enables pinning of a session to ensure prioritized visibility and quick access. Pinning keeps the selected session prominently displayed within the workspace. This functionality supports efficient session management and streamlined navigation.
To pin a session,
-
Click the Sessions icon to see All Sessions.
-
Click the Kebab icon adjacent to the saved session which needs to be pinned.
-
The pinned session is displayed in the pinned section of All Session page.
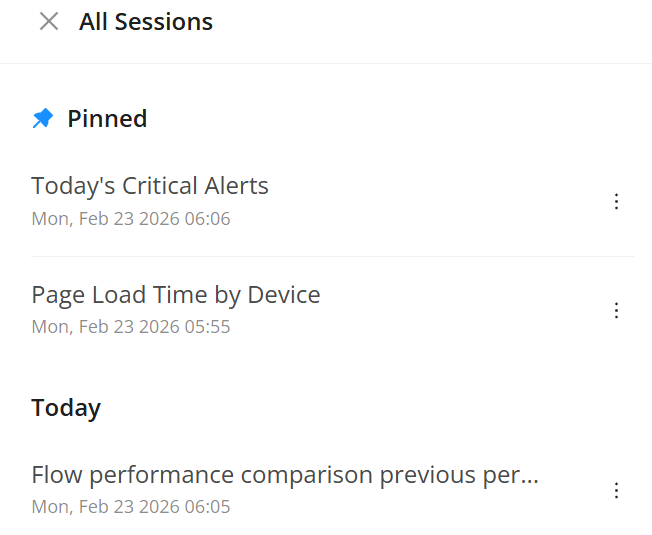
Note: Pinned sessions do not expire and cannot be deleted. Nexa allows a maximum of 10 pinned sessions at any given time.
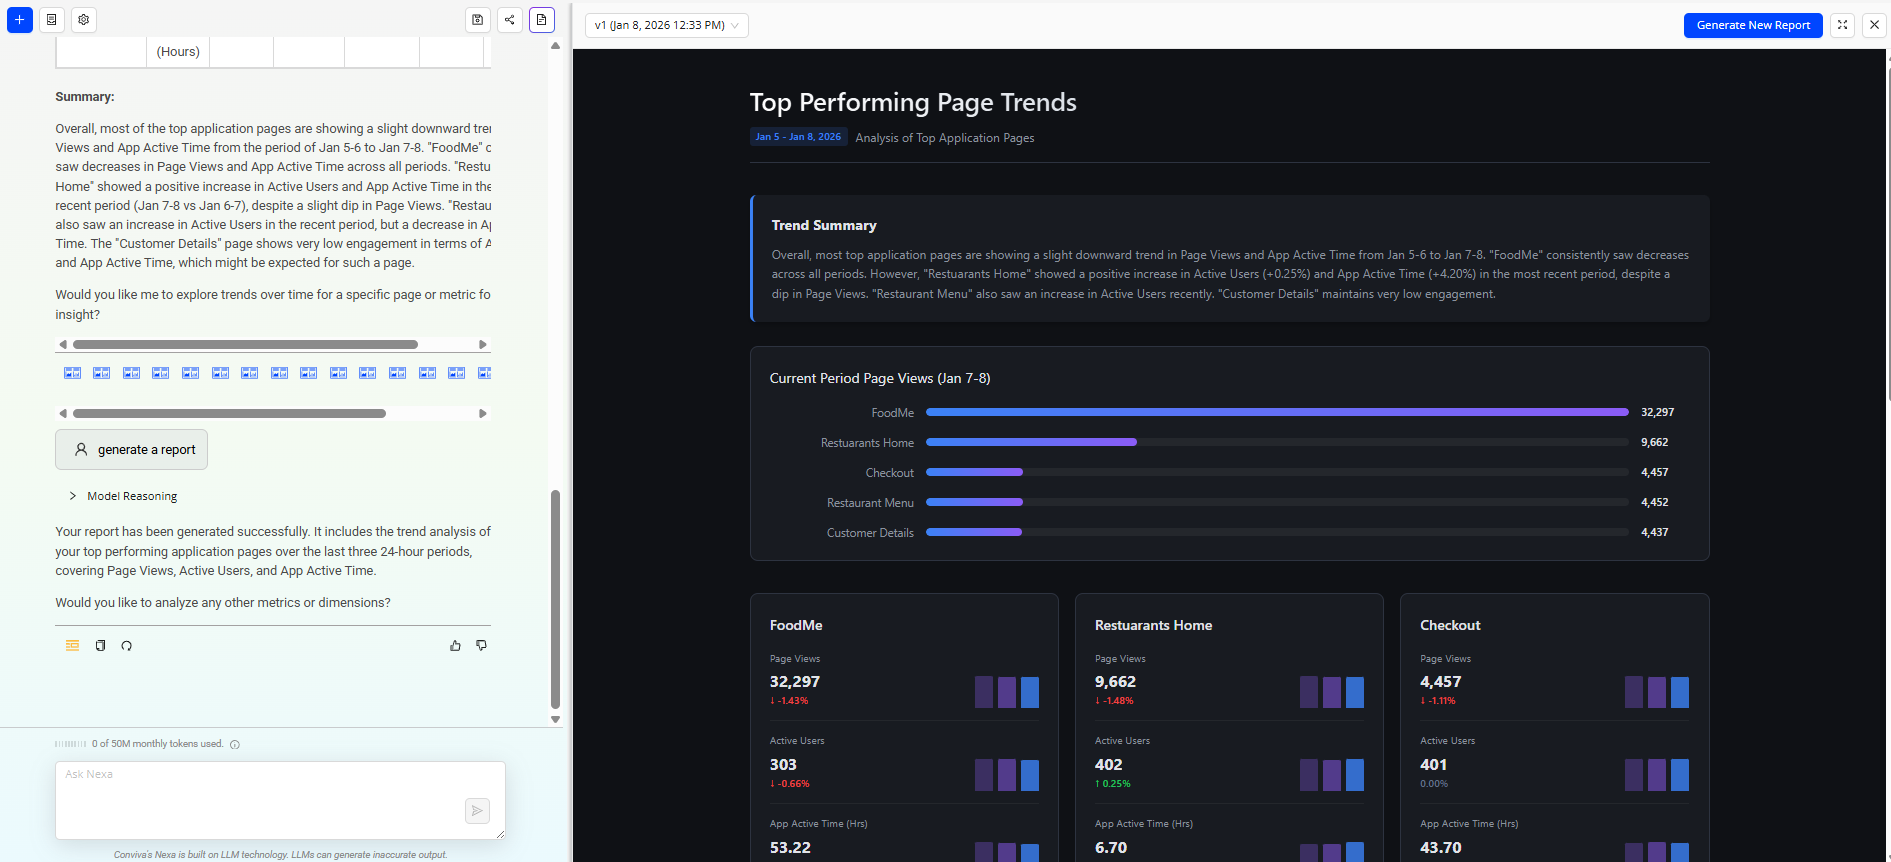
Reports
Reports provide a visual representation of the provided analysis.
-
Click the Reports icon to see the report page.
-
Click the Generate Report icon or type Generate Report to see the visual representation of the generated analysis.
-
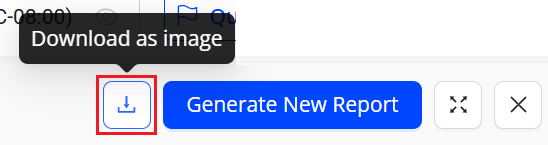
Click the Download icon to the download the report as an Image.
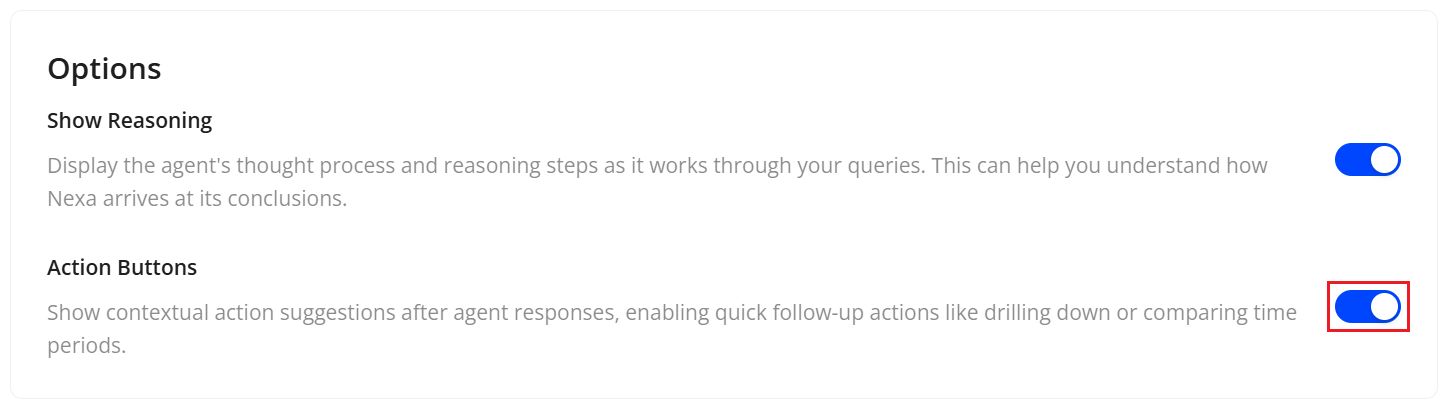
Action Buttons
The contextual action buttons appear alongside agent responses to provide intelligent, task-relevant follow-up suggestions. These buttons dynamically surface recommended next steps based on the agent’s output, enabling efficient continuation of analysis without manually formulating additional queries. The action buttons support common workflows such as drilling down into specific dimensions, refining filters, and comparing time periods. By presenting these contextual options in real time, the feature reduces interaction friction, accelerates decision-making, and enhances overall user productivity. This enhancement strengthens guided analytics capabilities by embedding actionable intelligence directly within the conversational experience, ensuring a seamless transition from insight to deeper exploration.
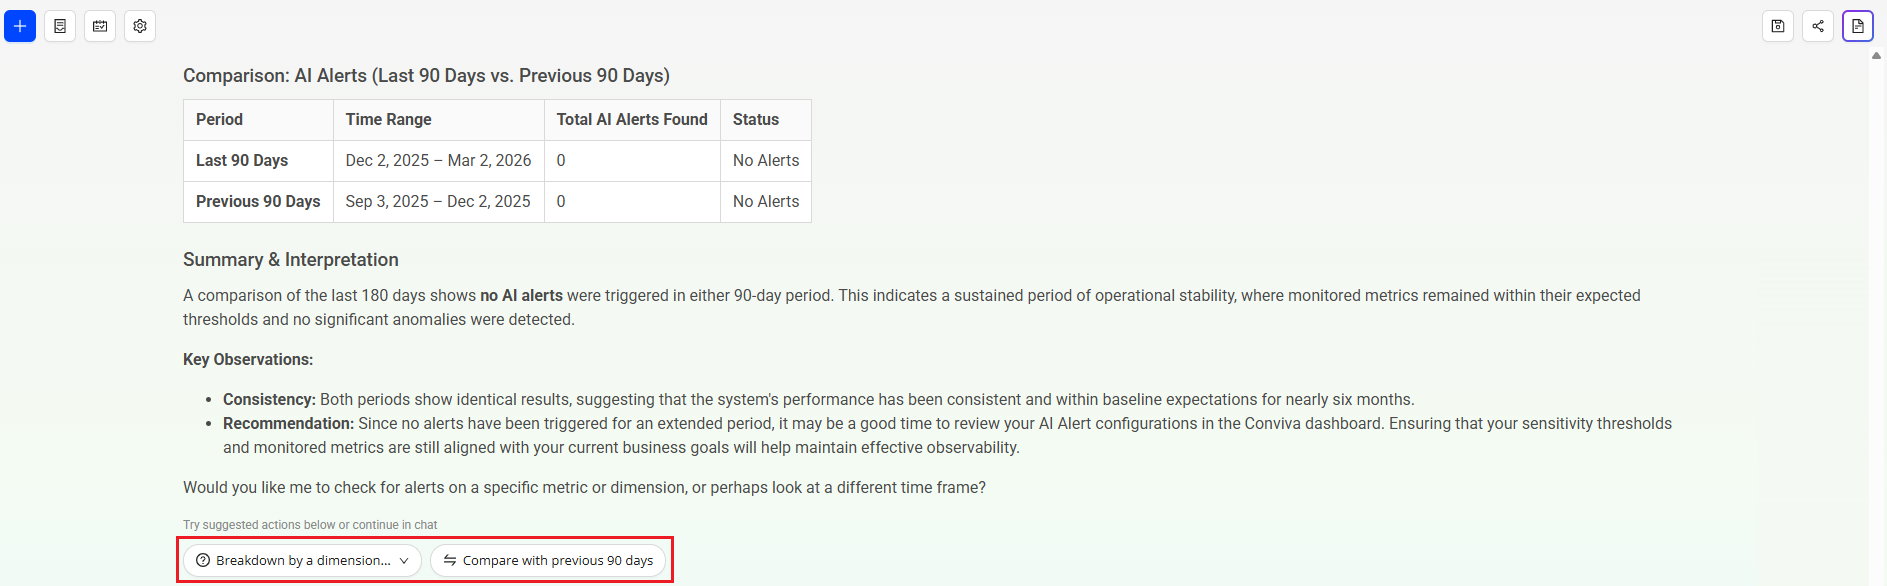
To see the action buttons,
-
Click the Settings button, select Options from the dropdown.
-
On the Options screen, switch on the Action Buttons toggle.
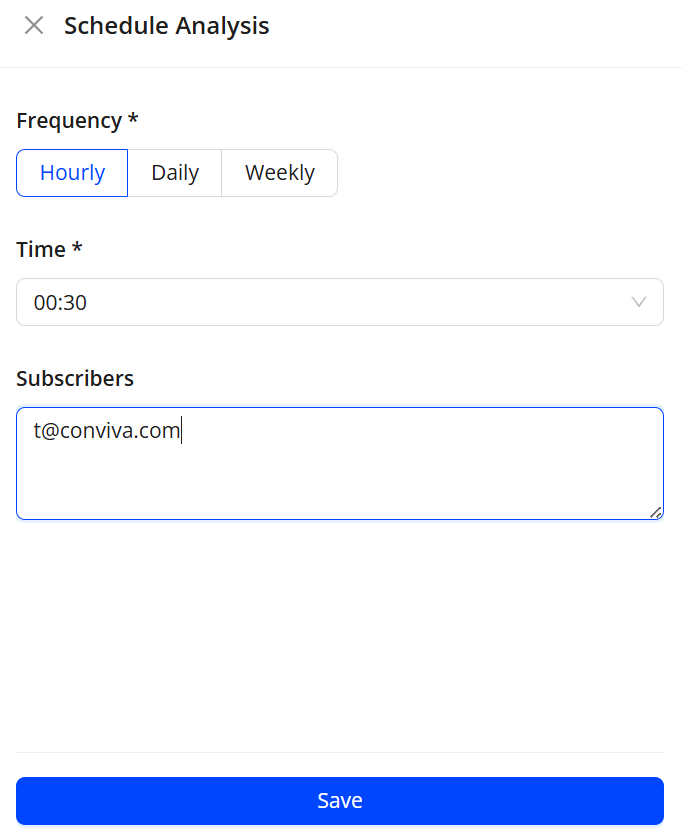
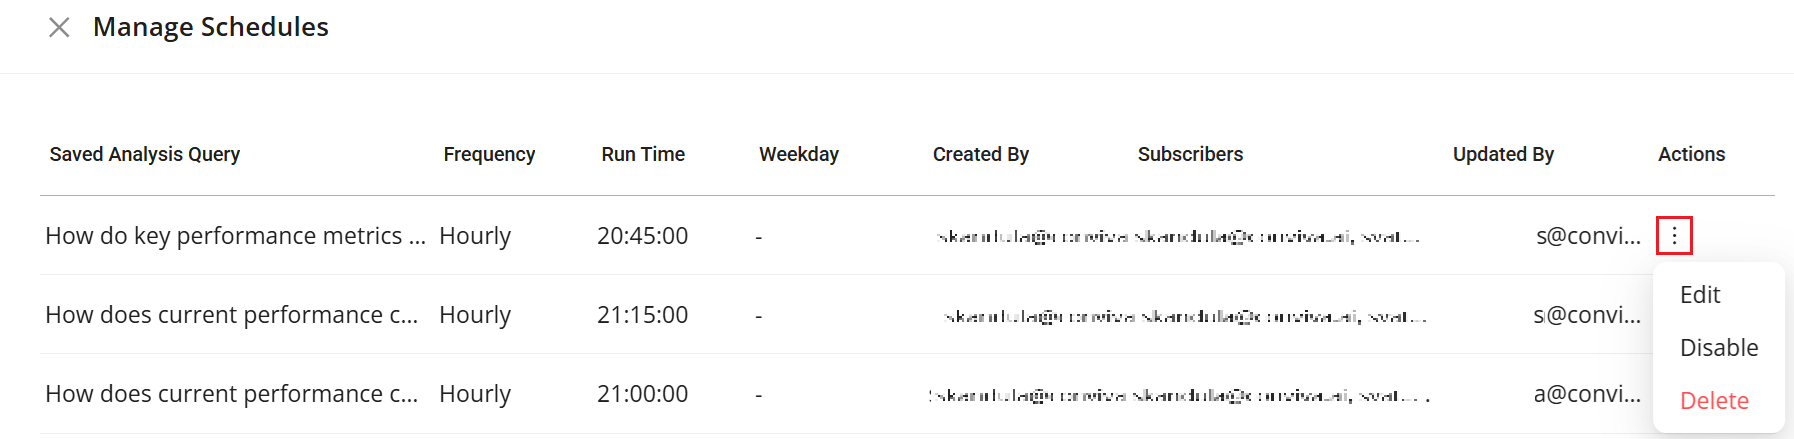
Manage Schedules
The Manage Schedules feature automates the execution of saved analysis queries at predefined times and frequencies. It runs queries at the configured schedule and generates the corresponding reports without manual intervention.
The interface displays key schedule details, including query name, frequency, run time, weekday, creator, subscribers, and last updated information. Scheduled reports are delivered automatically to designated subscribers, ensuring consistent and timely access to analysis results.
To create a schedule,
-
Click the Settings button, select Manage Analyses from the dropdown.
-
On the Manage Analyses screen, click the Schedule icon next to the saved analysis entry to see the Schedule Analysis screen.
-
On the Schedule Analysis screen, select the frequency, time and subscriber details and click Save.
To manage a saved analysis schedules,
-
Click the Settings button, select Manage Schedules from the dropdown to see the entries.
-
On the Manage Schedules screen, click the kebab icon next to the entry to Edit Disable, or Delete the schedules.
Interacting with Nexa
| Nexa in DPI | |
| Nexa in VSI |
Frequently Asked Questions
This section includes a series of frequently asked questions on topics including Nexa usage, compliance, data processing, privacy, and more.
-
Does Nexa send data to a 3rd party LLM service?
Yes, the data is sent to Gemini AI.
-
Does Nexa use the data for training?
The data sent to Gemini AI will not be used to train the Gemini AI. For more information, refer to the Gemini AI guidelines.
-
What is the Gemini AI model used in Nexa?
Model used in Nexa: Gemini-2.5-flash
Nexa Tokens LLMs Tokens prompt Context Nexa