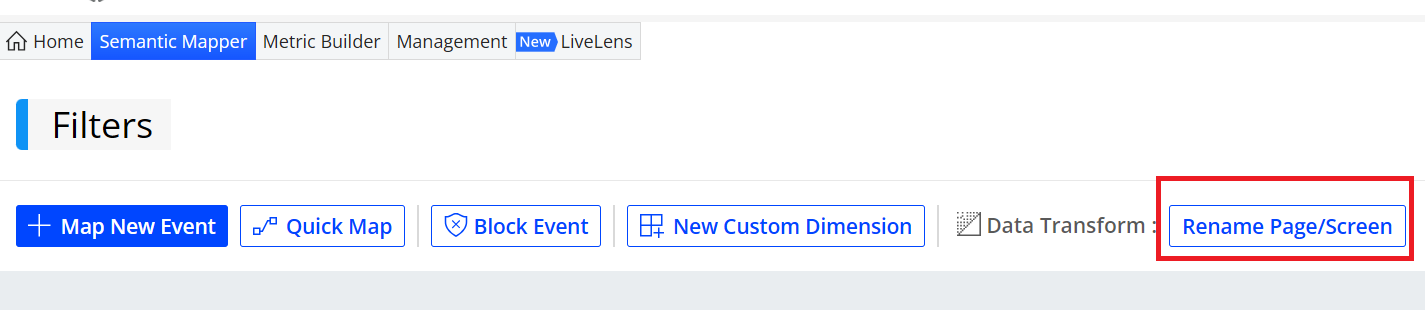
The Semantic Mapper tab provides functionality to map raw events to clearly identifiable user behaviors , block unnecessary events from the sensor, create custom dimensions with values extracted from events, and semanticize page/screen titles. For example, map raw events using tag key/values, such as the screen_view raw event with tag key screen_name and tag value login_page, to build meaningful specific events for metric creation, and create custom dimensions to track user types or device categories.
Note: When mapping video events to track video metrics, be aware that a single app session in Conviva DPI may have multiple video attempt and/or video play events due to recurring pause and play actions. As a result, several video metrics compiled from Conviva DPI events, such as plays and attempts, will show different metric values from the Conviva Video metrics. For more details, see DPI Events and Video Metrics.
Map New Event
This option provides a comprehensive mapping process, enabling you to define and configure semantic events step by step. It offers flexibility and precision in mapping events based on your unique needs.
Explore the Events
The Semantic Mapper page allows you to view common events and explore which events require mapping. To optimize event management, Semantic Mapper displays only high-volume events. Other less frequent events can be mapped manually.
Note: If you have a clear understanding of the events that need to be mapped and the corresponding tag key and tag value, skip the exploring process.
-
To access the Semantic Mapper page, from the DPI application, select Activation.

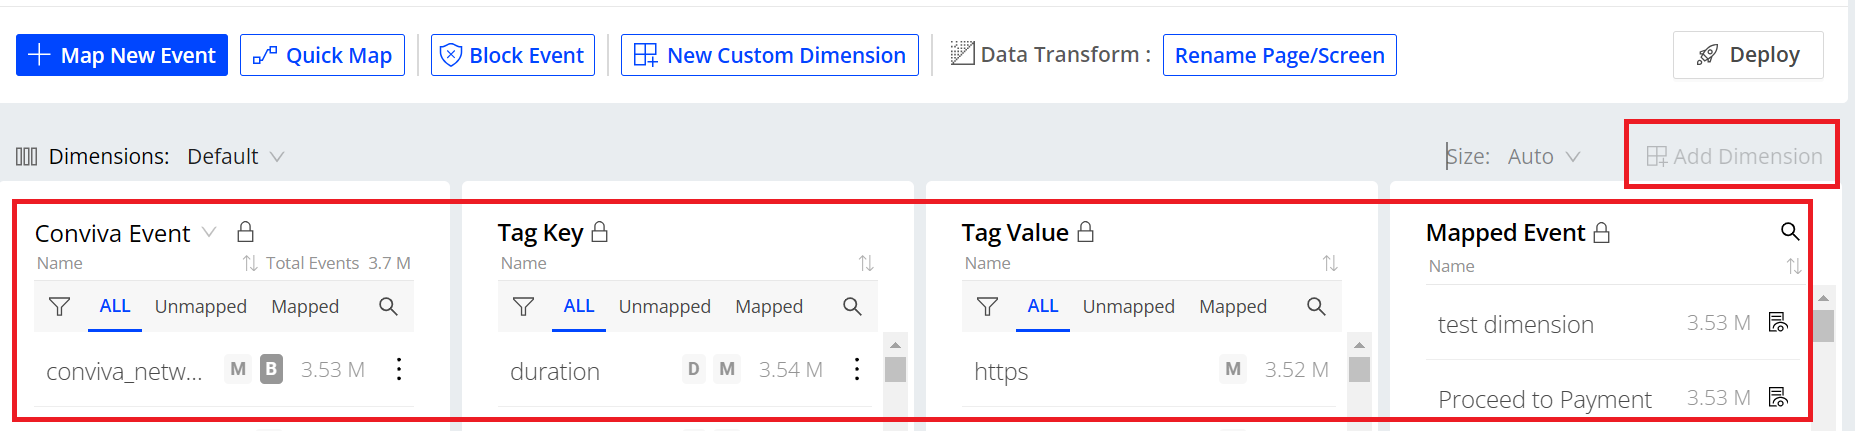
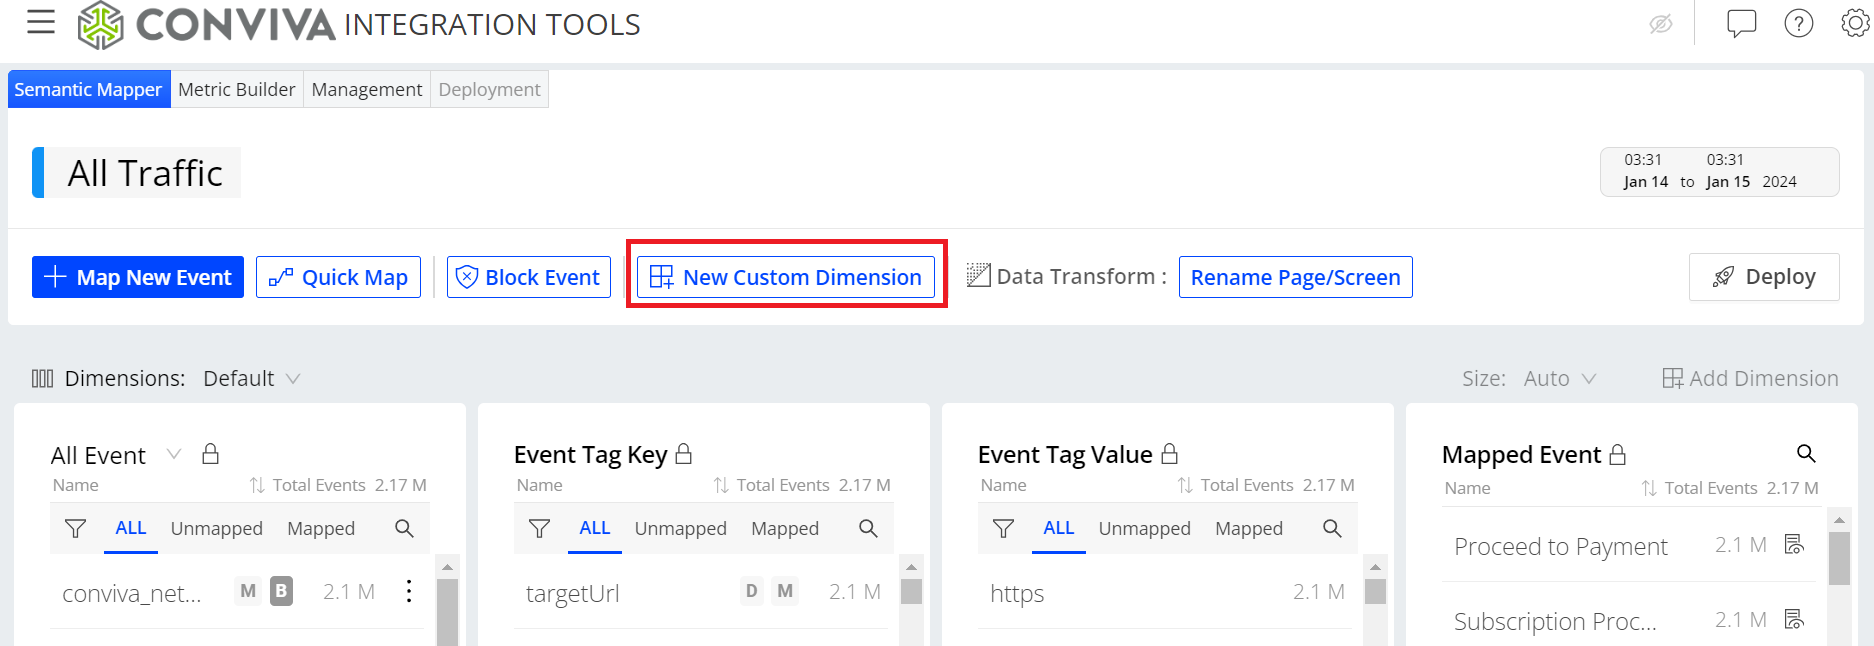
Under the Semantic Mapper tab, drop down lists display on the page and allow you to view all events, event tag keys, event tag values, and mapped events. Click Add Dimension to add dimension drop down list to help you explore events.
-
To view the unmapped events in the specific time range, in the time range bar, select your desired time range, such as May 24 to May 26.
-
Check the unmapped events and confirm which unmapped event requires mapping based on these points:
-
Consolidate event names to simplify event recognition.
-
Group related events to optimize event presentation and correlate app activities.
-
-
Confirm the event tag key and event tag value for the event you want to map.
-
To filter all data related with the event, from the dimensional list, click the event. For example, double click screen_view.
-
From the drop-down list, select Event Tag Key, and then click the specific item of tag key. For example, you want to map screen_view to a clear event that shows which kind of screen viewers viewed. You need to click screen_name.
-
From the drop-down list, select Event Tag Value to view all the tag values of the event tag key, and confirm the event tag values.
For example, for the event screen_view with the screen_name tag key, the event tag values are login_welcome, login_username, login_link, and so on. You want a single mapped event that indicates viewers viewed login screen, so the event tag values is login_welcome.
-
For example, the event screen_view does not indicate which kind of screen viewers viewed. Map the event with the tag key screen_name and the tag value login_welcome to Login Screen View. This mapping assists in clearly identifying and analyzing a viewer behavior when the viewer views the login screen. This mapping assists in clearly identifying and analyzing a viewer behavior when the viewer views the login screen.
When using Semantic Mapper to map events displayed in LiveLens, keep in mind that some event tag keys names may have slight variations as shown below.
|
Predefined Tag Key Name in LiveLens |
Tag Key Name in Semantic Mapper |
|---|---|
| Button Click Element Text | buttonClickText |
| Button Text | conviva_button_click / elementText |
| Duration | requestDuration / duration |
| Screen Title | pageTitleAndScreen / conviva_screen_view |
| Page Url | pageUrl |
| Page Title | pageTitle / conviva_page_view / page_title |
| Link Click Element Target | linkClickTarget |
| Link Target | conviva_link_click |
| Target Url | requestTargetUrl / targetUrl |
| Previous Screen Title | previousScreen |
| Network Request Response Code | requestResponseCode / responseStatusCode |
Note: If you use requestSize as a tag key, note that the request size is determined by the Content-Length header in the HTTP request, which defines the size of the HTTP body.
Set Mapping Rules and Deploy Mapped Events
After confirming the event that needs to be mapped, and the related event tag key and event tag value, you need to set mapping rules for mapping events.
-
To access the page, click +Map New Event from the main page.
-
Fill up the fields in Set Mapping Rules by using one of the options:
Note: If the event rule matches an existing one, a reminder message appears. Click Yes to apply the duplicate rule to the new event mapping. Click No to cancel the mapping.
-
If you have previously explored events using the mentioned steps, click Map This to set the rules automatically.
When setting the tag value, you have several conditions and rule options available, such as "contains", "not contains", "equals", "not equals", "is empty", "is not empty", "starts with", "ends with", and "match pattern", as well as "or" and "and" rules.
Note: Is not empty: Indicates the string contains at least one character. Is empty: Includes cases where the string is either empty (contains zero characters) or null (has no value).
For "match pattern", the asterisk (*) wildcard represents one or more characters, depending on the data, and must be used with other characters, such as v*/livestreams to represent v1/livestreams or v2/livestreams. A standalone asterisk as a match pattern is not supported. The metadata names, including Cities, Countries, and States, do not support the match pattern operator.Example:
For the event _user.login with the event_action tag key, the event tag values are Success and success if you want to a mapped event that indicates the success login. Use one of the options.
-
Option A: Set the tag Value to contain uccess.
-
Option B: Set a tag value to equal Success, click “Add OR Rule” and then set the tag value to equal success.
-
-
If you have a clear understanding of the events that need to be mapped and the corresponding tag key and tag value, follow the step:
-
From the drop-down list of Event Name, Tag Key and Tag Value, select the event name, tag key and tag value, or fill them out directly. For example, select screen_view, screen_name, and login_welcome.
Note: You have multiple conditions and rule options at your disposal when configuring the tag value. Refer to the previous note for further details.
-
-
-
Select a suitable category and type the event name in the Set Mapped Event field. For example, use Login Screen View as the mapped name and select Login/Logout.
-
Click Save.
-
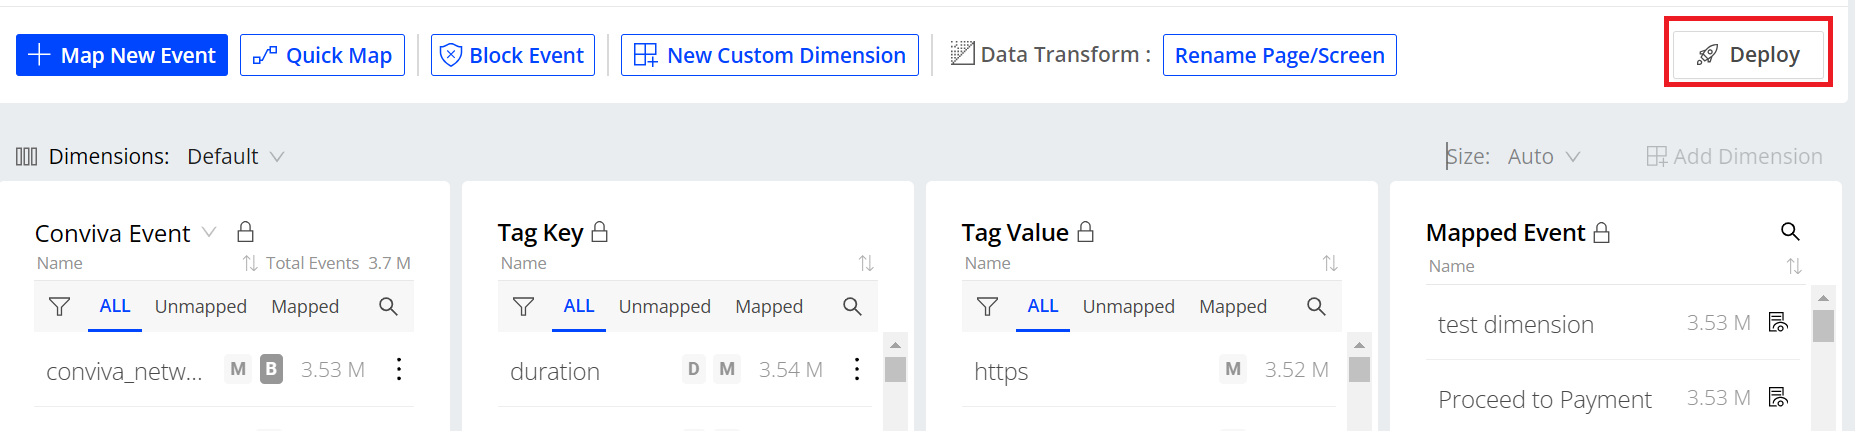
On the Semantic Mapper page, click Deploy, select the specific items on the Deployment Confirmation page, and click Deploy.
-
After deploying, you can check the total number of the mapped events on the Semantic Mapper page and also use the mapped events as dimension values on the Trends page.
Note: Conviva DPI applies event mappings to only newly initiated sessions. Updates to on-going sessions and sessions that restart within the 5-minute inactivity period appear after the next session starts.
Quick Map
Quick Map allows you to quickly convert the events that do not require any mapping rules to mapped events. This feature enables you to perform rapid mapping for multiple events simultaneously, saving you valuable time and effort.
-
To open the map page, click Quick Map from the main page.
-
On the Quick Map page, from the drop-down list on the left, select all the events that you want to map.
-
In the Quick Map field, select suitable category and set mapped names.
-
To complete the mapping, click Map Selected Events.
Block Event
Block Event allows you to efficiently prevent the reporting of irrelevant or meaningless events from the sensor, ensuring the accuracy and relevancy of your data.
-
To access the Block Event page, click Block Event from the main page.
-
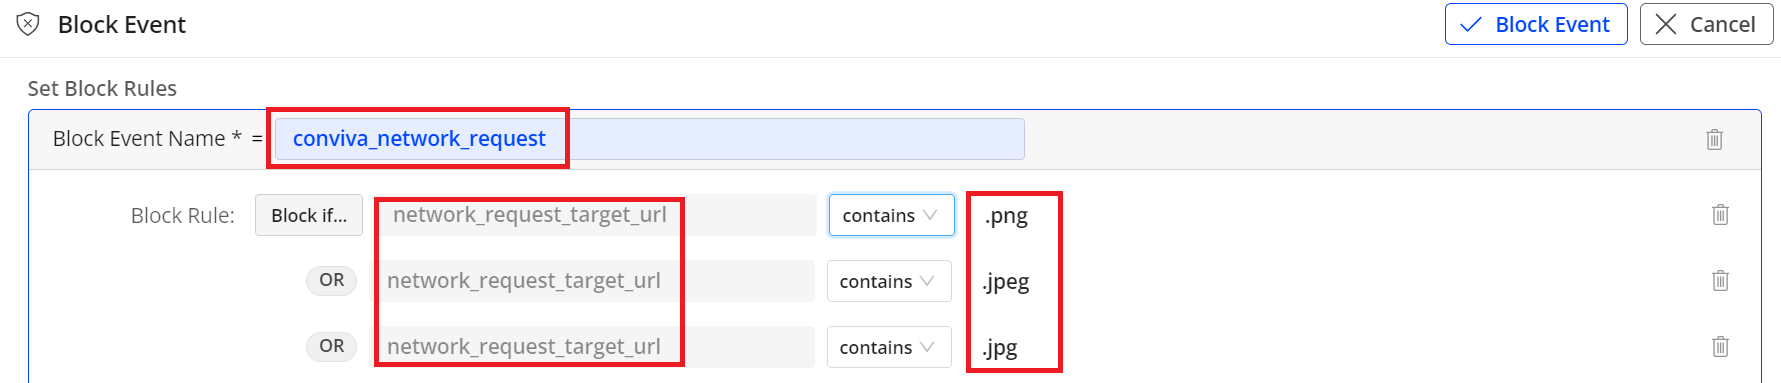
On the “Set Block Rules” section, from the “Block Event Name” drop-down list, select the event that you want to block. For example, choose conviva_network_request.
-
To set block rules, choose one of the options based on your requirements.
-
To block all the events that you selected in step 2, select Block All.
-
To block the specific events that are based on the events you selected in step 2, select Block if…, and fill out the key values that the specific event owns. You can add multiple block rules for different specific events by clicking Add OR Rule.
For example, if you want to block the conviva_network_request event that triggered when loading images, select Block if…, and fill out the key values as .png, .jepg, and .jpg.
-
-
To apply the block rules that you set, click Block Event from the top right corner.
Custom dimensions are extracted from event keys to provide enhanced levels of dimensional analysis in Trends dimension tables and AI alerts. With custom dimensions, analyze application performance and user behaviors more efficiently and flexibly.
Create custom dimensions with values extracted from events to enhance your analysis of application performance and user behaviors, such as a dimension value extracted from only the play start and play end events.
Manage custom dimensions along with events in the Management page.
For example, create a custom dimension based on the Player Name event tag key and select mapped events to determine the dimension values. This new dimension enable the analysis of application player performance across different player dimensions in the Trends dashboard.
-
Click New Custom Dimension.
-
Select a tag key from the drop-down list or enter it directly.
The label next to the tag key indicates how it is collected:
-
Event-Specific Tag: The tag is only reported by certain events.
-
Global Tag: The tag is reported on all events as part of the global context.
For more details of event-specific tag and global tag, see Event-Specific Tag and Global Tag.
Note: If the tag key you enter is not in the drop-down list, after entering it, you must select the event type which is either global or event-specific.
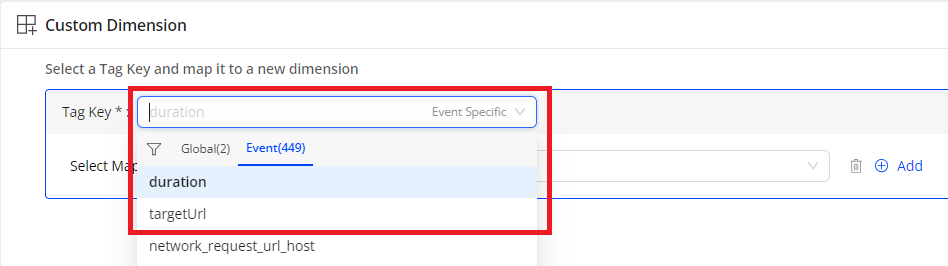
Note: When creating a custom dimension and entering a tag key name, the Tag Key list displays up to 500 matching tag keys. If the desired tag key is not listed, locate it in the Tag Key table, click the kebab icon next to the tag key name, and select New Custom Dimension to add the tag key to the Tag Key field in the Custom Dimension area. Alternatively, use the global filter in the Semantic Mapper to find the tag key in the Tag Key table.
-
-
Configure tag keys based on tag type.
Global Tags:
For persistent tag keys, select the tag key collected as global context to treat the tag as a global dimension.
Note: No event scoping is required. The dimension is automatically computed across all relevant traffic.
Event-Specific Tags
For tag keys collected only on specific events:
-
Select All applicable events to compute the custom dimension value using every event that reports the tag key.
-
Select Specific Mapped Event to compute the custom dimension value using only explicitly selected mapped events.
Note: Selecting a broader event scope increases the volume of computation and may impact cost.
Advanced Option: Promote Event Tag as Global Dimension
For event-specific tag keys, enable Promote as Global Dimension to treat the tag as a global dimension.
When enabling this option:
-
The tag key is treated as a global dimension for all incoming traffic going forward.
-
The dimension value is derived from the earliest occurrence within a session.
-
After setting the tag key as a global dimension, the value remains the same for the duration of the session and does not update until:
-
A new session starts, or
-
A new flow record begins.
For example, the AccountStatus tag key is reported on account-related events. After enabling Promote as Global Dimension, the system treats AccountStatus as a global dimension and enables analysis of all related events within the session as dimension values, such as page views, clicks, and purchases, based on the account status value including upsell, silverPlan, and goldPlan, captured at the earliest point in the session.
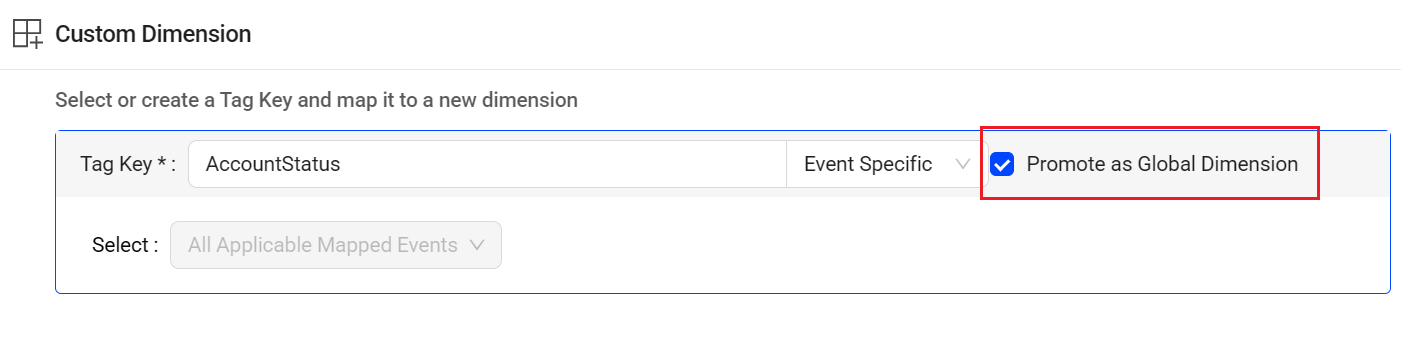
Note: Promotion applies only to future data and does not retroactively update historical records.
-
-
-
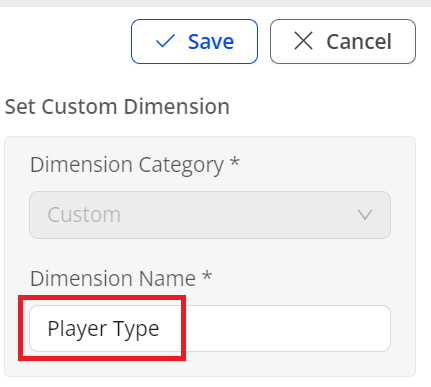
In the Set Custom Dimension field, set the dimension name.
-
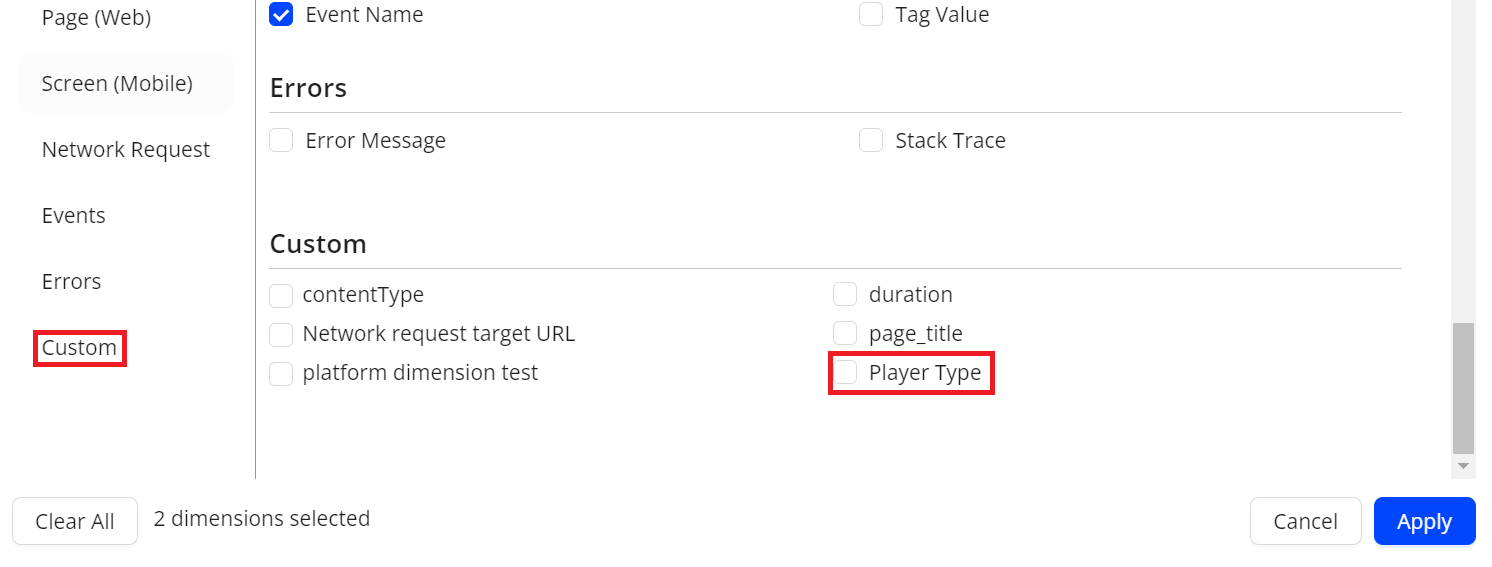
In the Trends dashboard, click + Dimension from the Dimension table, and check whether the created dimension is in the Custom list. Select the check box to apply the new dimension to the dimension tables.
-
(Optional) To edit a custom dimension, choose either:
-
Go to the Management tab, edit the custom dimension from the Custom Dimension table. For more information, check Management.
-
Go to the Semantic Mapper tab, select the desired custom dimension from the dimension drop-down list, click edit, and make necessary updates.
Event-Specific Tag and Global Tag
DPI automatically collects a list of events and corresponding metadata. For example, elementText for Click events is an event-specific tag collected when an element is clicked, while Device Name is a global tag reported across all collected events during the session.
Customers can pass additional events and corresponding tags, either as event-specific tags or global tags, to enrich the collected data and enable more granular analysis.
DPI provides a list of out-of-box offerings, including pre-defined events and dimensions. For events and metadata not included in the OOB offering, in Activation enable event and tag collection from that point onward. For tags reported as event tags can also be promoted as global dimensions in Activation, after which the tag will be computed as a global dimension for incoming traffic.
Note: When an event tag is promoted as a global dimension, its value is fetched from the first occurrence in the session and persists until a new session starts or a new Flow instance begins. The value persists within only the current session with no backfill behavior. These displayed global dimension values are derived from the latest valid value within the selected time range. If a session ends within the selected time range, the last valid value at session ends is used. If the session is still active within the selected time range, the most recent valid value available in that time range is used.
Global Tag: Commonly used for user-level or contextual data whose value remains the same across the current session and applies to all future events until updated or cleared by the session or Flow instance.
Example Global User-level Tags:
First_Visit_Date, User_ID, Acquired_Channel, Customer_Segment, Campaign_Source
Example Contextual Tags:
Page_Type, Page_Title, cust_Device_OS, cust_App_Name
Event Tag: Used for the specific action of a given event that applies to only that single event instance. Especially useful for payment analysis with specific event values for tracking of each payment transaction.
Example Event-Specific Tags: Order_ID, Revenue_Amount, Currency, Payment_Method
-
Rename Page and Screen Titles
The Edited Page Title and Edited Screen Title are two preset dimensions offered by Conviva, helping you aggregate data using rules to improve the usability and quality of dimensional analysis results. These dimensions are especially helpful when the collected data contains variations, such as 'Home' and 'home' referring to the same concept but appearing as two different values, or when values are not easily readable, like '/ai_alert'. The two preset dimensions allow you to clean up or standardize values based on custom rules, ensuring consistent data for actionable insights.
-
Click Rename Page/Screen.
-
Select an option based on your condition:
-
Page Title Rename: for renaming web page titles.
-
Screen Title Rename: for renaming mobile screen titles.

-
-
Select an item from the Metadata Name drop-down list, specify the condition, enter the value, and add the necessary rules based on your conditions. Enter the new name in the Set New Name field and click Save.
For example, if you want to aggregate page titles containing "Home" or "home," select Title, choose "equals Home," click Add OR Rule, and use "equals home."
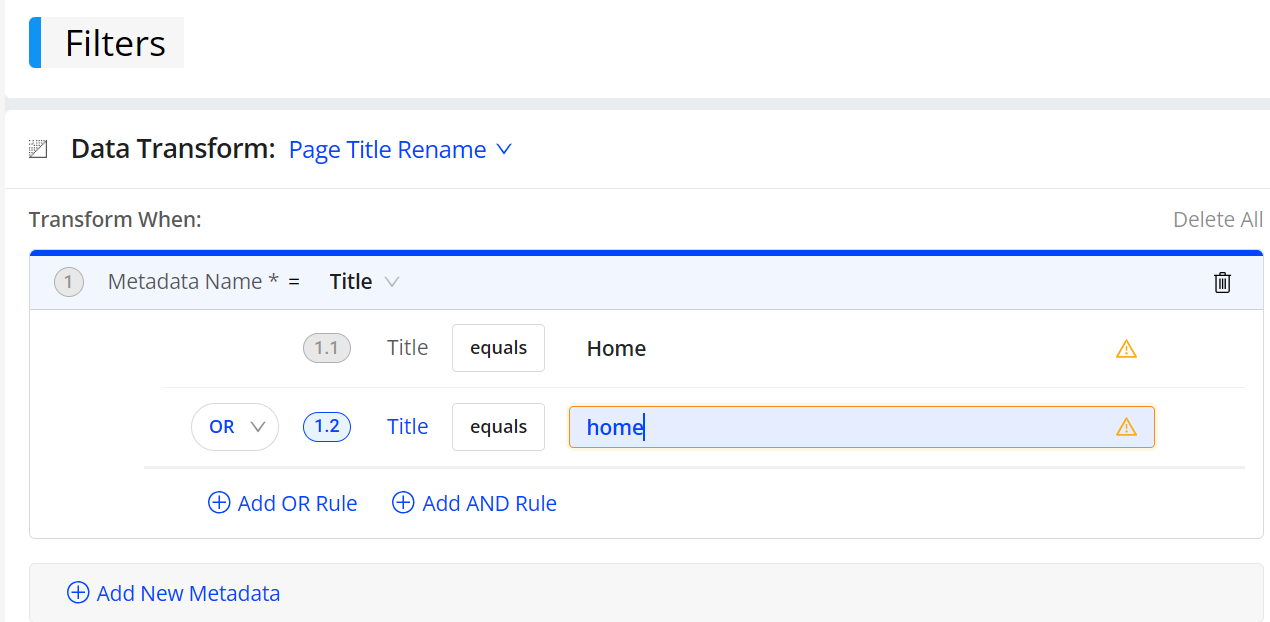

Note: To add more logical algorithms, click Add New Metadata and fill in the required fields.
-
Click Deploy, find the dimension, review the changes and Click Deploy. The deployed changes take effect within minutes, depending on the data volume. After deployment, you can start using the updated dimension in the DPITrends dashboard.

Map New Event Map New Event semantic mapper semantic mapper quick map quick map block map block map mapped events mapped events blocked events blocked events Create Custom Dimension