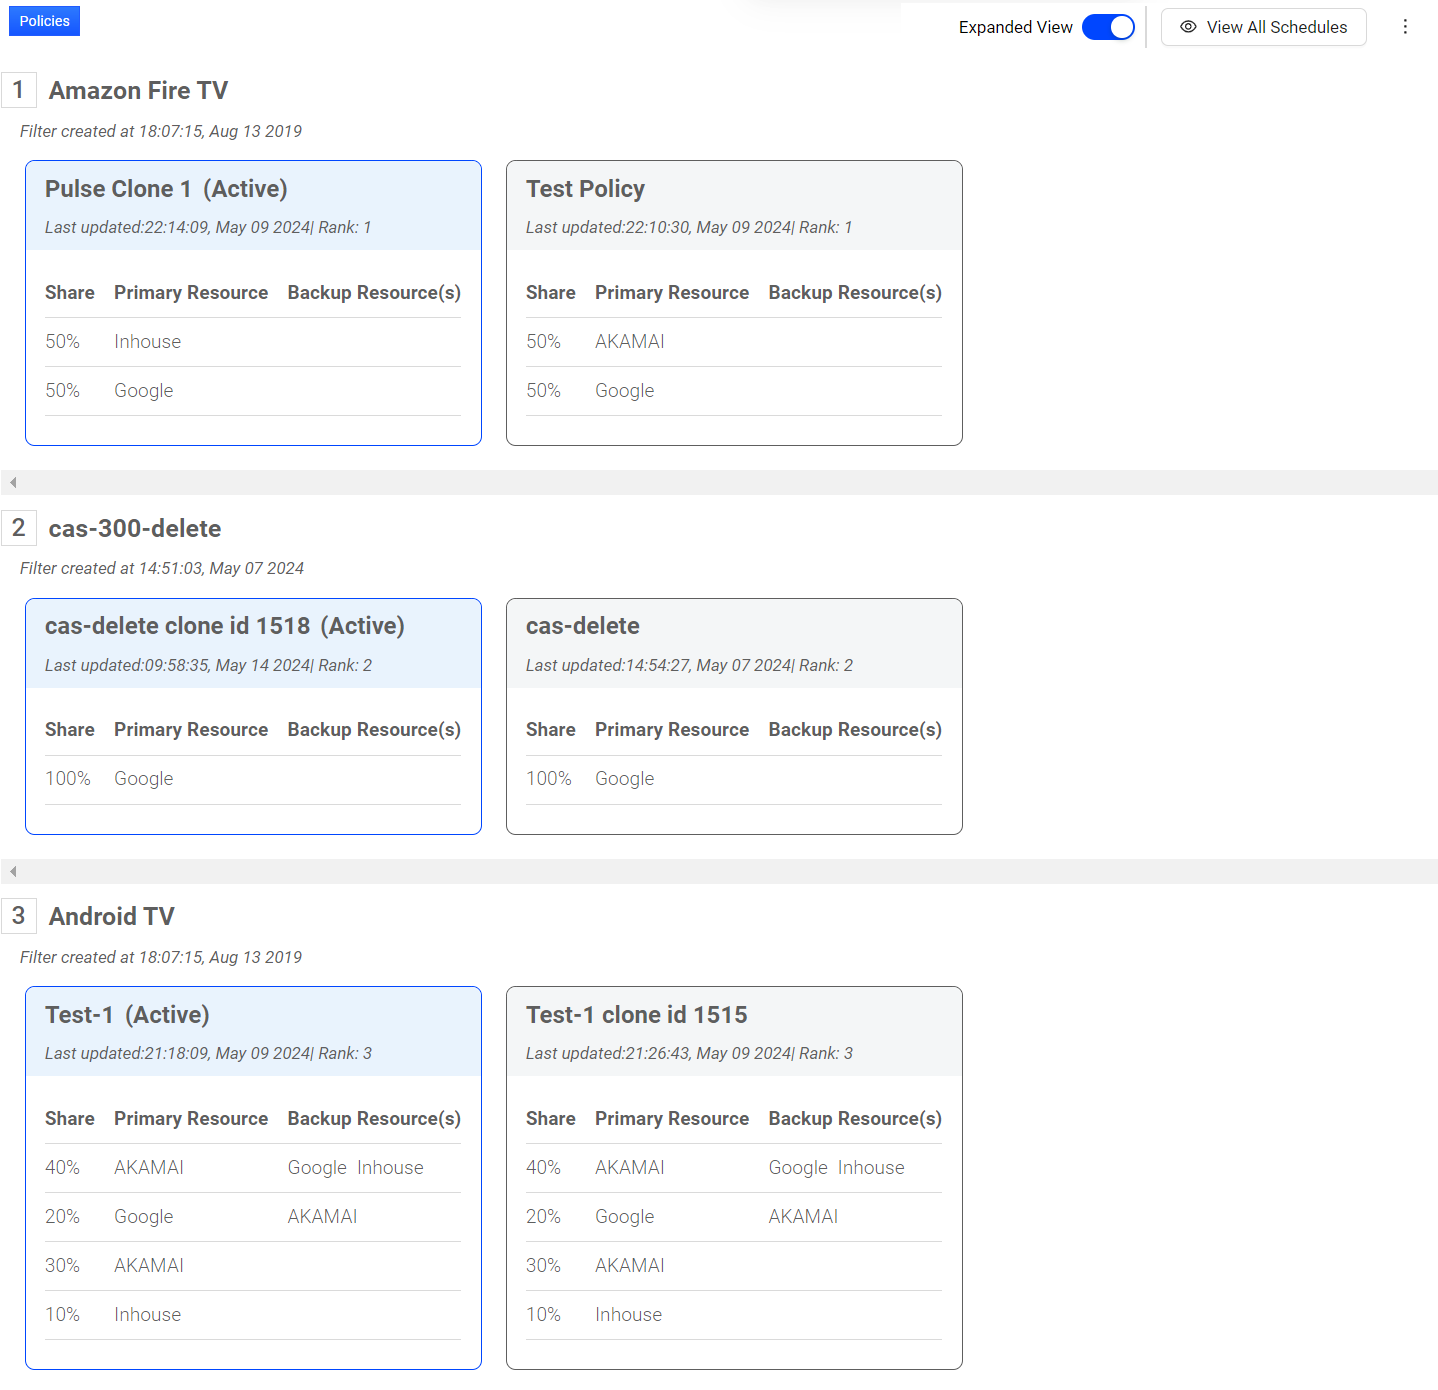
The Policies dashboard displays the distribution and bitrate Precision policies that have been defined for your account. For each policy, see the information about the policy (name, the filter and its definition, and when the policy or its filter were last updated).
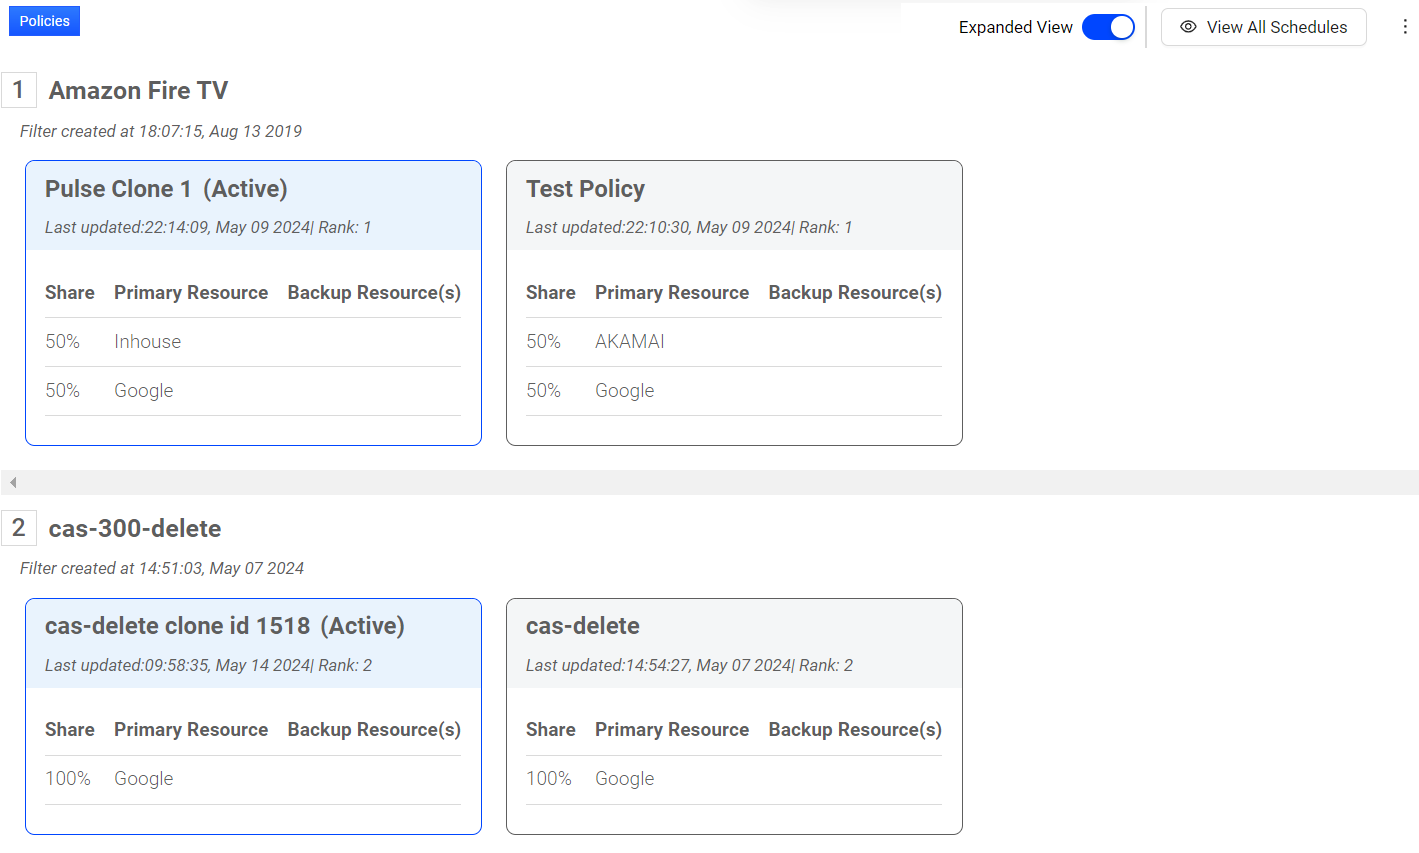
Distribution policies provides an option to divide traffic among the CDNs configured for your Conviva account based on relative total shares defined. With a distribution policy specify the percentage of traffic that should be directed to each CDN and the quality considerations that might affect that allocation.
For more information about distribution policies, go to the Policy Tracking page and click one of the policy links in the All Policies widget. See Policy Drill-Down for more information about individual policies.
Activating Distribution Policies
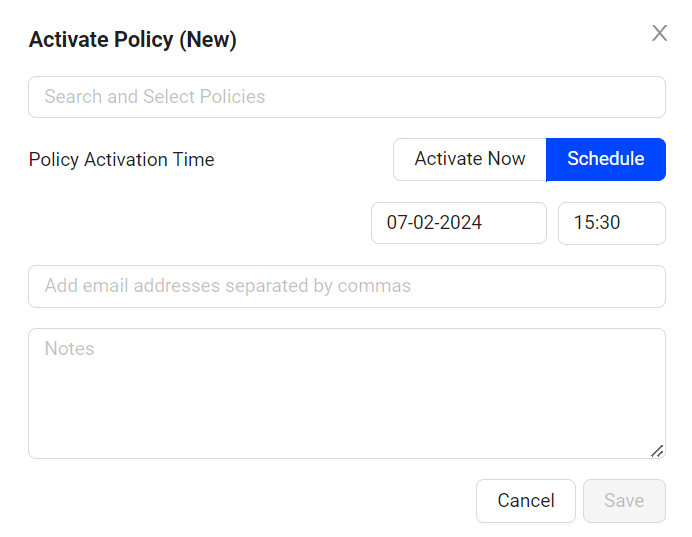
Selected Administrators can activate single or multiple Precision distribution policies immediately or at a scheduled time.
Activating Single or Multiple Policies Using Policy Scheduler
To activate single or multiple policies:
-
In the Policies dashboard, click Activate Policy. The Activate Policy (New) dialog box appears.
-
From the Search and Select Policies drop-down menu, select one or more policies to activate.
-
To activate the policies immediately, click Activate Now. To activate them at a specific date and time, click Schedule and set the date and time.
Note: Schedule policies to be activated from 15 minutes up to 90 days in the future.
Note: Precision supports the activation of up to 15 policies (1 primary policy and 14 backup policies). For example, during live events, activate up to 15 policies immediately or at a scheduled time.
-
In the Add email addresses separated by commas text field, enter one or more email addresses. When the schedule is changed, a notification is sent to these email addresses.
-
Click Save.
Viewing Scheduled Distribution Policies
Use the View All Schedules button to view all the scheduled distribution policies for your c3.account.

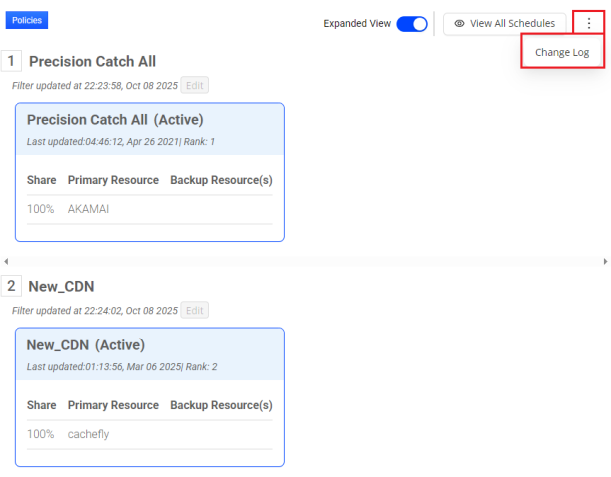
Collapsed View
When the expanded view toggle is switched off, see all the polices in the collapsed view.

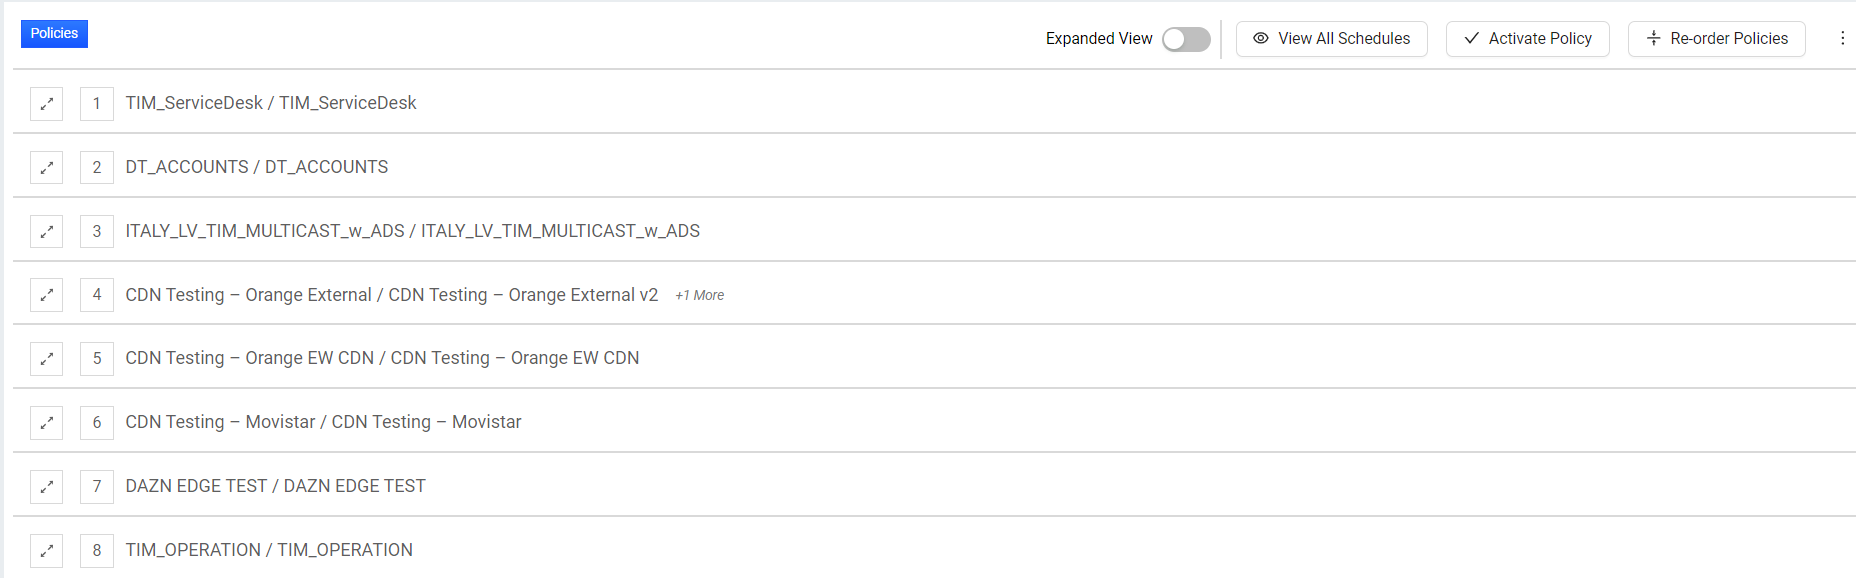
Hover the policy to see the policy filter rule.

Click the expand button next to the policy name to see the expanded view of the selected policy.

The expanded view of the selected policy is displayed.
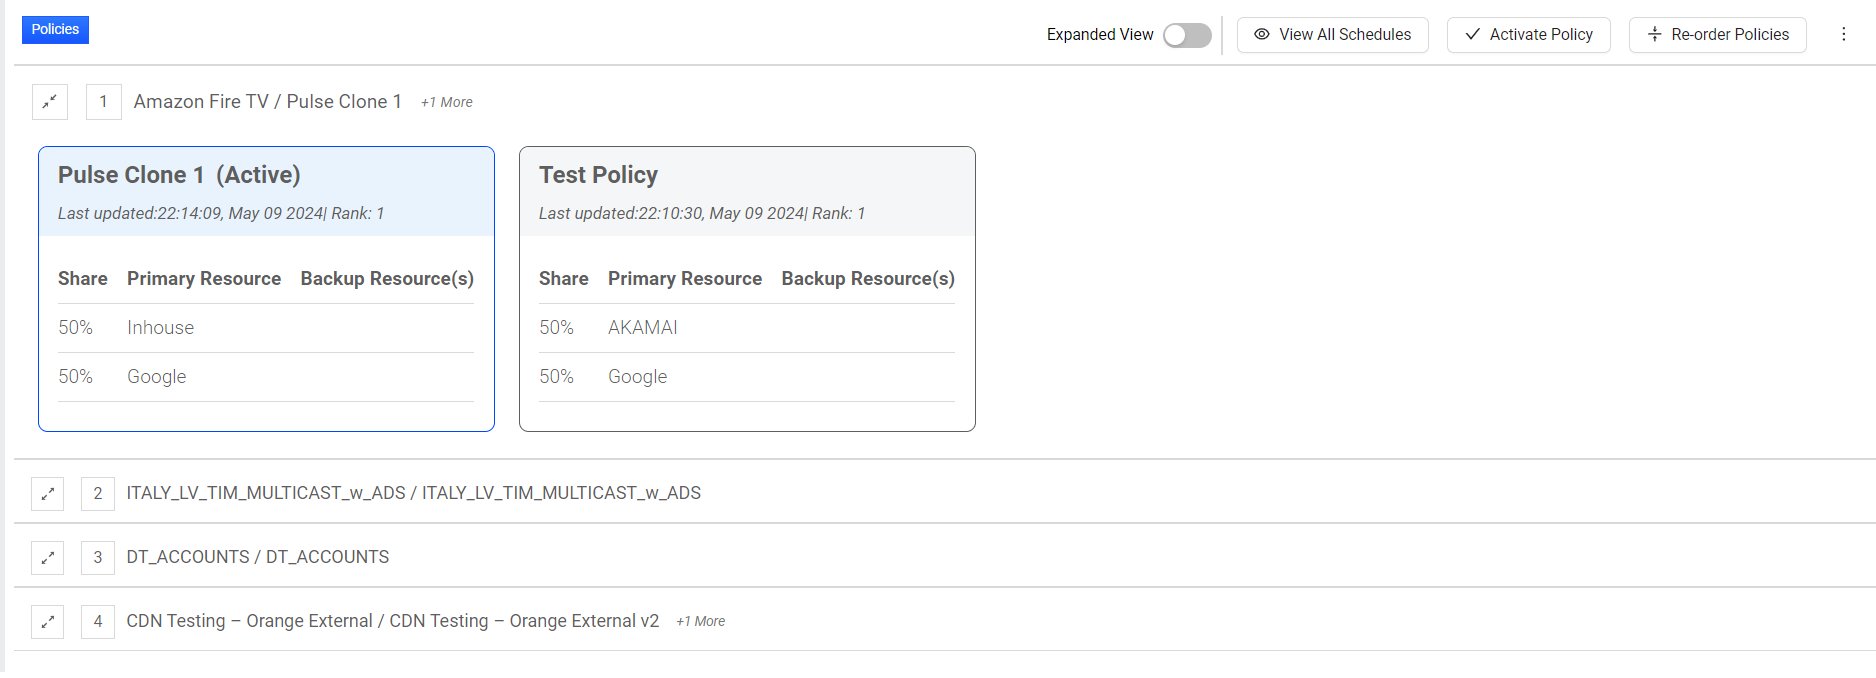
Expanded View
Click the toggle button to see the policies in the expanded view. This is the default view.

Schedules
The Schedules page displays the list of scheduled policies, triggering date and time, notes, and schedule status.
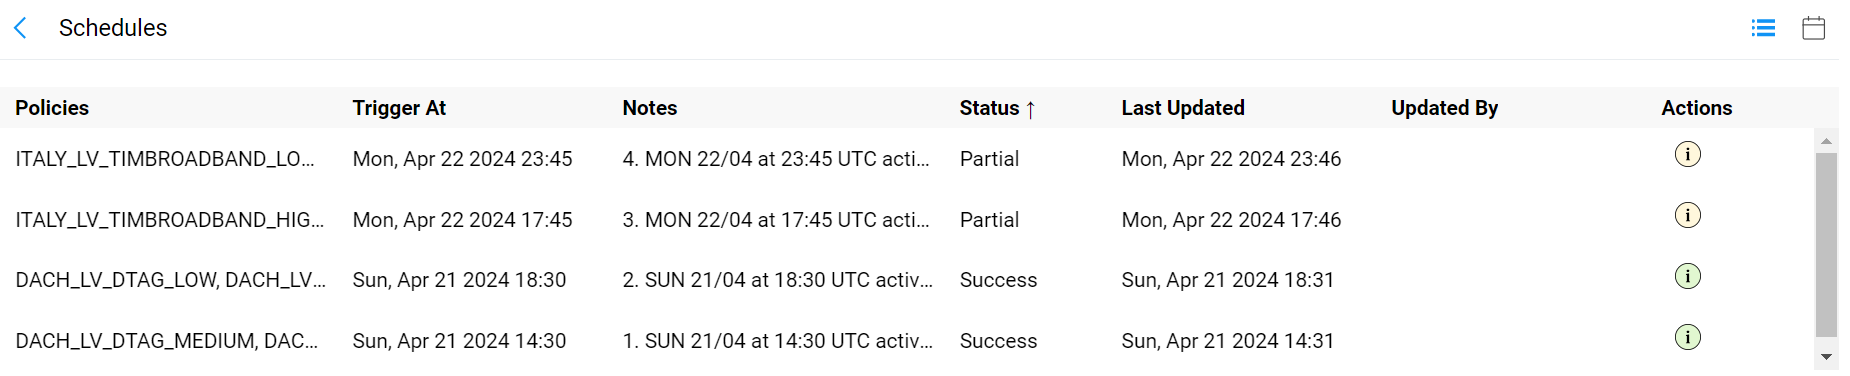
| Column Name | Description |
|---|---|
|
Policies |
The names of all the scheduled policies. |
|
Trigger At |
The date and time of activation. |
|
Notes |
The notes that were added at the time of policy scheduling. |
|
Status |
The status of the policy schedule. There are several schedule statuses. When policies are scheduled to be activated, the initial status is Pending. When Precision tries to activate the scheduled policies, the status changes to Success, Partial, or Error based on the outcome. Pending - The scheduled policies are waiting to be activated at a scheduled date and time.
|
|
Actions |
Use the |
Reorder Policies and Schedules
Note: Only the Admins have the permission to reorder the policies
To reorder the policies,
-
Click Re-order Policies

-
Drag and Drop the policies to reorder as required.

The reordering can also be done in collapsed view as well.

Once done, the earlier positions are displayed adjacent to the policy name.
-
Click Save Changes to see Reorder Policy (New) popup screen.

-
Click Save to save the policy reorder changes.
Schedule the reordered policies
Reorder the policy schedules based on the priorities.
After reordering the policies,
-
Click Save Changes to see the Reorder Policy (New) popup screen.

-
Click Schedule, and select the date and time to schedule the reordering of the policy.
-
Provide the email Ids and notes (if any) for individuals who need to be notified after the
-
-
Click Save, to create the schedule.
See the sechduled policiles in the Schedules page under the Policy Reorder tab.
-
Click View All Schedules to see the schedules page.
-
Click Policy Reorder to see the reordered policy schedule details.

-
Click the Edit icon in the Actions column of a policy to see the Reorder Policy (Edit) page and change the schedule details.

-
Change the schedule date and time, add or remove the email ids, and edit the note based on the requirement. After editing, click Update to save the changes.

Use the ![]() icon to view all the scheduled policies and their schedule status in a calendar view.
icon to view all the scheduled policies and their schedule status in a calendar view.

Here the schedules displayed in,
-
Green= schedule was successful
-
Red= schedule had an error
-
Blue = Upcoming schedule
Editing Distribution Policies
Note: Only an Admin who holds Precision Policy Admin access grants Precision Policy Edit permissions. General Admins who do not have this specific access cannot perform this action.
Selected Administrators can edit the Precision Distribution policies – specifically the resource share rows under "Resource Sharing and Sequencing". Use the kebab icon to edit a policy.
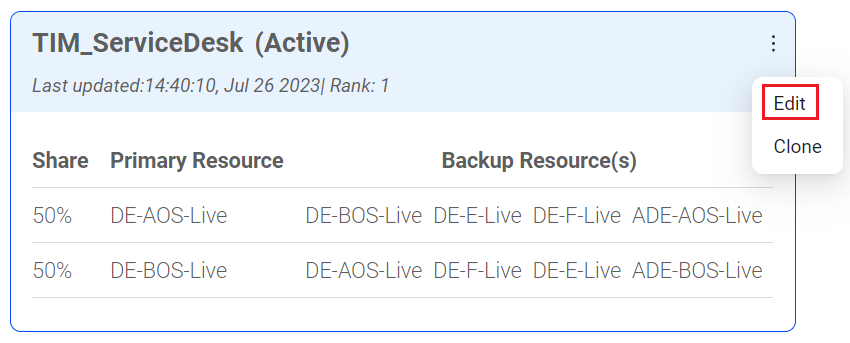
Each row represents one or more resources (one primary and others secondary) that Precision API recommends as a CDN resource on each API call. The sum of the Share percentages of each row must be 100%.
For a given row, an Administrator can edit both the list of resources as well as the share percentage. After all edits are completed, the Administrator should save the changes. The changes will take effect immediately.
Note: An Administrator cannot create new Distribution Policies nor configure new resources.
Editing Scheduled Policies
A scheduled policy can be edited after it is scheduled.
To edit a scheduled policy:
-
In the Policies dashboard, click View All Schedules. The Schedules page appears.
-
To edit the policy schedule, click the
 icon. The Activate Policy (Edit) dialog box appears.
-
Make the changes and click Update.
Editing Precision Filters
To edit the Precision filters,
Note: Both Admin and Staff users have the permissions to edit a policy.
-
Click the Edit button next to the precision filter

-
On the Filter Management Edit Filter screen, update the filter details as required and click Save.

Cloning Distribution Policies
Administrators can clone the Precision Distribution policies.
-
Click the kebab icon and select Clone to see the Confirm popup.
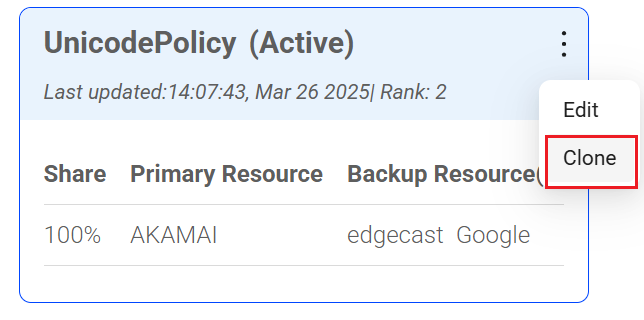
-
On the Confirm popup, click OK to see the cloned policy.

-
Edit the cloned policy according to the requirements by modifying the primary and backup resources, adjusting their respective percentage allocations, and activating the policy.
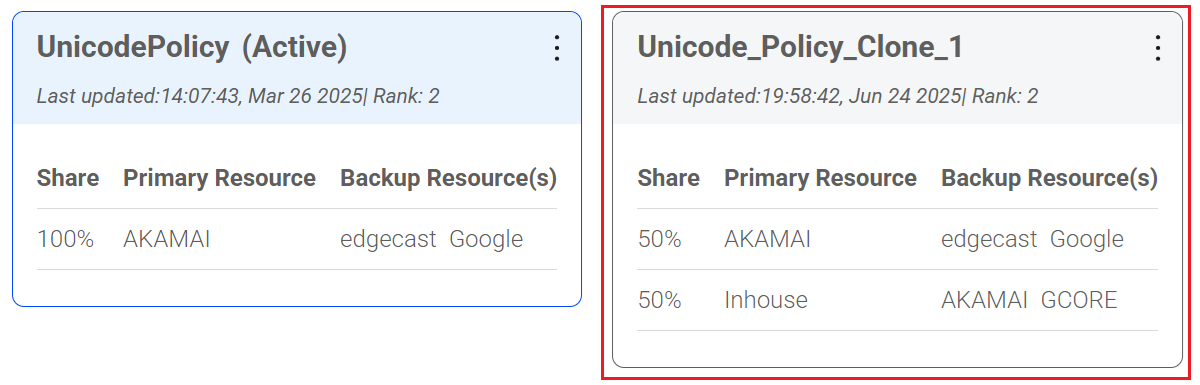
Each row represents one or more CDN resources (one primary and any number of secondary) recommended by Precision API on each API call. Administrators may update both the list of resources and their respective share percentages for any row. The share percentages within each row must total 100%. After completing all edits, the Administrator must save the changes. These changes take effect immediately.
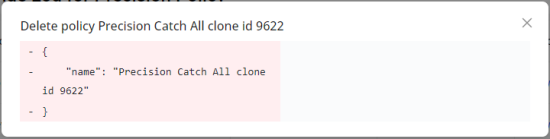
Viewing Policy Change Log
The Policy Change Log provides a record of all policy changes for update audits and regression.
To access the Change Log, from the Policy page click the kebab icon and select Change Log.
The Change Log page appears with a description of the updates along with the update creator and timestamp.
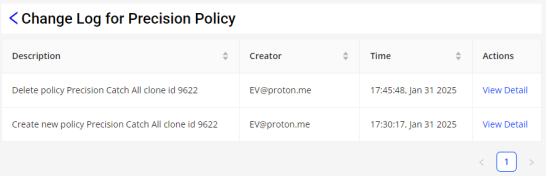
Click View Details to display the details of the policy changes.
Policy Tracking Policies Policies Activating Distribution Policies Policy Tracking Policy Tracking Activating Distribution Policies Activating Distribution Policies