Webhooks enable automated notifications to external systems when a manual or AI alert fires within Conviva. Webhooks push alert information via HTTP POST requests to a destination webhook URL that is a destination endpoint on the server.
Use webhooks to integrate Conviva alert events into external applications, such as displaying Conviva alerts in an alert aggregation system or triggering workflows in other applications, such as JIRA or other support ticket applications.
Note: There may be a potential delay of up to 6 to 10 minutes between issue occurrence and webhook notifications.
This topic helps in:
Adding Webhooks
Only Admins can add webhooks and customize alert payloads.
Prerequisites
Create a webhook destination URL on the server to start using webhooks. This URL receives webhook POST requests and must be a REST endpoint that returns an HTTP 2xx status code upon successful processing. The response payload might use content types such as application/json, XML, or other accepted formats.
To add a webhook
-
In the Settings menu, click Webhooks to see VSI Webhooks page.

-
Click the Add Webhook button.

-
Enter a name for the webhook.
The name must be 3 to 256 characters and begin with an alphanumeric character. The webhook name is displayed in the notification email when a failure occurs, so use names that can help identify the related alert.

-
Enter the email addresses to notify users when an issue occurs with the webhook notification.

-
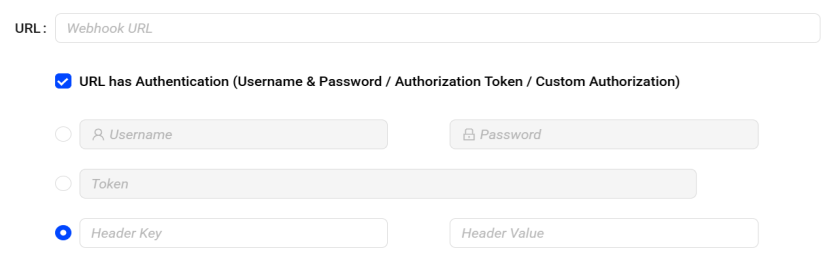
Enter the webhook URL to which Conviva will post data.
Optionally, select the URL authentication method and enter Username & Password / Authentication token / Custom Authorization (Header Key & Value).
Note: Username and password are encrypted in Conviva's system.
-
Select the alert type(s) to include in the webhook payload.
-
To include the AI alert payload, click the Include AI Alerts in the webhook checkbox.
-
Click View Standard Fields, to view the standard AI alert payload key/value pairs. For explanation of the JSON structure, see AI alert JSON payload. If AI alert severity is enabled, the severity level of the alert is passed in the payload.
-
To add custom key/value pairs, click Add Custom Field(s), and enter the custom key and value fields.

Manual Alert Payload Customization
-
To include the manual alert payload, click the Include Manual Alerts in the webhook checkbox.
-
To view the standard manual alert payload key/value pairs, click View Standard Fields. For an explanation of the JSON structure, see manual alert JSON payload.
-
Select the check boxes to include optional key/value pairs, and customize the key names.
-
Click Add Custom Field(s) to enter custom key/value pairs, and enter the custom key and value fields.

-
Click Test Webhook to send test payload data to the webhook URL.
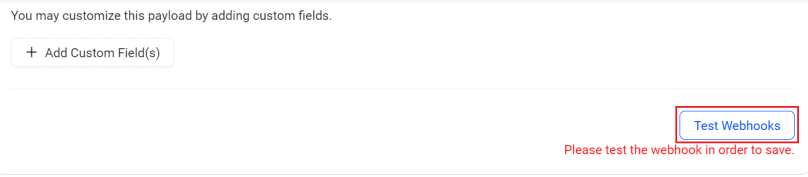
Note: Rerun the test whenever the webhook payload type or content changes.
Validation confirms that:
-
Webhook URL is reachable.
-
Webhook URL can receive the payload data.
-
A response with an HTTP 2xx status code is received.
-
A valid response indicates that the webhook URL is operational.
To display the sent request and received response
-
Click Test Webhooks. Verify that the configured custom key/value pairs and customized key names appear in the request and response.

If the test is not successful, an error response appears. Fix the error based on the status code and re-test the URL.
-
Status code 401: Re-enter the credentials. The entered credentials were not passed or invalid.
-
Status code 422: Contact Conviva. An invalid attribute or decoding exception occurred.
-
Status code 503: Check the webhook URL. The webhook connection failed to establish a new connection.
After testing a webhook, clear the webhook checkbox to make any additional changes to the payload settings.

-
Click Save to configure the webhook.

Managing Webhooks
Only Admin users can add, edit, disable, remove webhooks and customize alert payloads.
To manage webhooks:
-
Click the Kebab icon for a webhook on the Webhooks page:
-
Disable: Stop posting webhook data, while the webhook configuration is maintained in the system.
-
Enable: Re-activate a disabled webhook.
-
Edit: Modify the webhook settings or data.
-
Delete:Remove all webhook configuration from the system.
-
History: Display a change history log of the webhook modifications.

-
Note: Only Admins can modify the settings and configurations.
Displaying Webhooks
Users can view existing webhooks to monitor webhook status, check webhook settings, and display any error status information.
To display the current webhook
-
In the Settings menu click Webhooks.
The Feature Settings page is displayed with Webhooks.
-
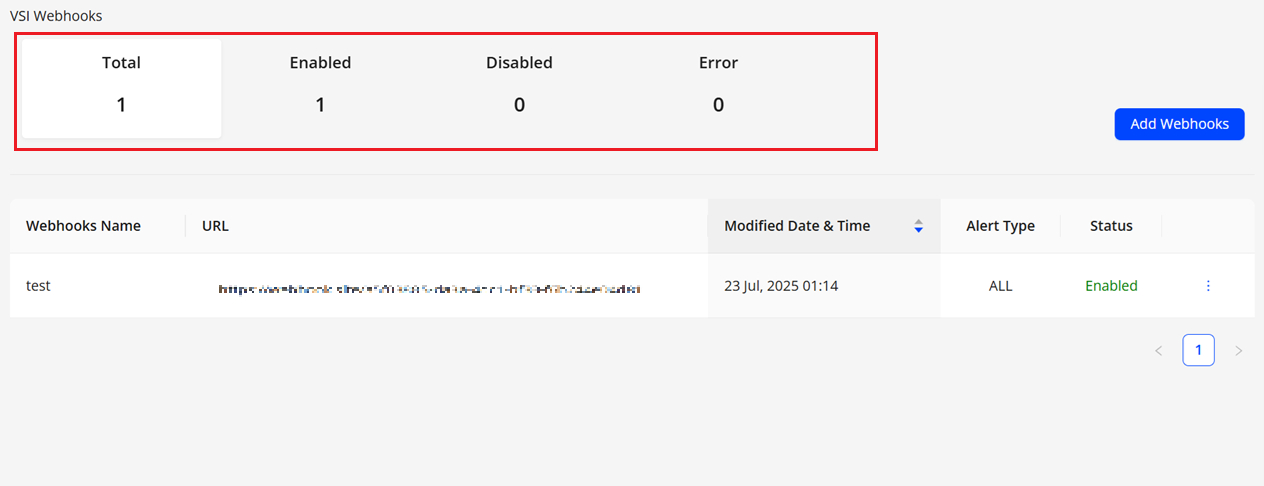
Check the current webhook counts for:
-
Total: Total number of configured webhooks.
-
Enabled: The number of webhooks configured in the system.
-
Disabled: The number of webhooks configured in the system, but not posting data.
-
Errors: The number of webhooks in an error state.
Click the Error link to display status information about the error.
From the error message, admin users can click Editto make changes to the webhook.
-
-
To filter the displayed webhooks, click a webhook count.
Troubleshooting Webhooks
Retry Behavior
If a webhook POST request does not return an HTTP 2xx Success code, the webhook follows this retry behavior and resends the POST until an HTTP 2xx Success response is received or the last retry is reached.
|
Attempt |
Approximate Timing |
|
1 |
As soon as possible after the original event |
|
2 |
10 seconds after most recent failure |
|
3 |
15 seconds after most recent failure |
|
4 |
90 seconds after most recent failure |
|
5 |
180 seconds after most recent failure. |
Troubleshooting
If a webhook stops working, use these troubleshooting tips to help fix the issue.
- Verify the webhook status on the Webhooks page. If an Error status is displayed, click the Error link to display more information about the error.
- For HTTP status code 401, verify that the username/password or token are valid. Authorization changes may have occurred on the server hosting the destination URL.
- For HTTP status code 422, an unexpected processing error occurred with the webhook. Contact Conviva Support for assistance.
- For HTTP status code 503, the server hosting the destination URL may be down or unreachable. Verify connectivity to the destination server.
If the initial webhook is unreachable, make sure the Conviva IP addresses are whitelisted to allow network and firewall access. Contact your Conviva representative for a list of the required Conviva IP addresses.
Example Webhook Payload Formats
Refer to these examples for Webhook payload formats for AI and alerts.
Example Webhook Format for VSI AI Alerts
Copy and paste this example, change the values for testing purposes. Use the "custom fields" value to customize the payload.
{
"source": "Conviva",
"version": "1.0.0",
"alert_source": "AI Alert",
"event_id": 1457888888,
"account_name": "Test",
"root_cause": "ISP and AppleTV",
"cumulative_impacted_unique_devices": 1,
"diagnostic_report_url": "http://127.20.10.1:8000/alerts4/1457888888",
"metric_name": "Rebuffering Ratio",
"active plays": 3,
"alert_time": "02:45 Jan 18, 1970 PST",
"severity": "info",
"custom_fields": {
"runbook url": "http://google.com" }
}Example Webhook Format for DPI AI Alerts
{
"source": "Conviva",
"version": "1.0.0",
"alert_source": "AI Alert",
"event_id": 1457888888,
"account_name": "Test",
"root_cause": "iOS Native Player and iOS",
"cumulative_impacted_unique_devices": 1,
"diagnostic_report_url": https://pulse.conviva.com/alerts/1457888888,
"metric_name": "Average Payload Time",
"alert_time": "02:45 Jan 18, 1970 PST",
"value": "15 sec",
"severity": "info",
"custom_fields": {
"runbook_url": http://test.com }
}| Key (listed alphabetically) | Editable | Availability | Description |
|---|---|---|---|
|
"account_name" |
No |
Always included. |
Indicates the name of the account for which this alert is firing. |
|
"active plays" |
No |
Only included for Rebuffering Ratio alerts. |
Indicates the number of sessions that started playback successfully and are not closed within the given time interval. For rebuffering ratio only. |
|
"alert_time" |
No |
Always included. |
Indicates the time at which the alert was detected by Conviva’s monitoring system. |
|
"alert_source" |
No |
Always included. |
Shows the alert source as either “AI Alerts” or “Manual Alerts” depending which Conviva alert monitoring system this alert was sent from. |
|
"attempts" |
No |
Only included for Exits Before Video Start & Video Start Failures. |
Indicates the number of attempts that occurred from the customer base when the alert was detected. Used for Exits Before Video Start (EBVS) and Video Start Failures (VSF) only. |
|
"cumulative_impacted_unique_devices" |
No |
Always included. |
Indicates the cumulative number of impacted unique devices at the time the alert fired. |
| "custom_fields" |
Yes |
Optional. Once set, it will always be included in the payload. |
Contains all the custom keys and custom values included during webhook setup. |
|
"diagnostic_report_url" |
No |
Always included. |
Indicates the URL through to further diagnose the alert. |
|
"event_id" |
No |
Always included. |
Shows the unique ID that identifies the specific event received for this AI alert. |
|
"metric_name" |
No |
Always included. |
Indicates the name of the Conviva metric that the Conviva monitoring system alerted on. |
|
"plays" |
No |
Only included for VST. |
Indicates the number of sessions that started playback successfully and are not closed within the given time interval. Used for Video Start Time (VST) only. |
|
"root_cause" |
No |
Always included. |
Indicates the root cause analysis that the Conviva Alert monitoring system identified for the specific alert condition. |
| "severity" | No | Always included. | Indicates the severity level (Info, Warning, Critical) of the AI alert. Configured in the AI alert sensitivity controls. |
|
"source" |
No |
Always included. |
Displays the fixed value as “Conviva”. This value specifies that the source of this webhook payload is from Conviva. |
|
"version" |
No |
Always included. |
Format: "Major.Minor.Revision" Indicates the version number of the webhook payload that Conviva is sending. Use this version number when writing the parsers in order to build the parser to be robust and future proof. |
Example Webhook Format for Manual Alerts
Copy and paste this example, be sure to change the values for testing purposes. Use the "custom fields" value to customize the payload.
{
"source": "Conviva",
"version": "1.0.0",
"alert_source": "Manual Alert",
"alert_id": 1,
"event_id": 30,
"priority": p1,
"filter_id": 56523,
"account_name": "c3.Publisher",
"metric_name": "Pods Started",
"filter_name": "All Traffic",
"condition": "9.4 < 3345.0",
"alert_time": "Oct 25 2017 12:22",
"diagnostic_report_url": " https://www.conviva.com/pulse/alerts4/123888888",
"sample_size": "1000 Minutes",
"alert_name": "Publisher Network Television",
"configured_samples": "200 Minutes",
"cool_down": "0"
"custom_fields": {
"runbook url": "http://google.com"
}
}
|
Key (listed alphabetically) |
Editable |
Availability |
Description |
|---|---|---|---|
|
"account_name" |
No |
Always included. |
Indicates the name of the account for which this alert is firing. |
|
"alert_source" |
No |
Always included. |
Shows the alert type as either “AI Alerts” or “Manual Alerts” depending on which Conviva alert monitoring system this alert was sent from. |
|
"alert_id" |
No |
Always included. |
Shows the unique ID that identifies the specific alert that is being alerted on. |
|
"alert_time" |
No |
Always included. |
Specifies the time at which the alert was detected by Conviva’s monitoring system. |
|
"alert_name" |
Yes |
Optional. |
Shows the name used to identify the manual alert when the alert was configured. |
|
"custom_fields" |
Yes |
Optional. But once set by customer it will always be there. |
Contains all the custom keys and custom values that were included during webhook configuration. |
|
"condition" |
No |
Always included. |
Identifies the condition that was triggered for the alert to have been detected. |
|
"configured_samples" |
Yes Note: Only the key name is editable. |
Optional. |
|
|
"cool_down" |
Yes Note: Only the key name is editable. |
Optional. |
Specifies the duration the system waits before sending another notification for a new event on the same alert. The system continues recording activity during the cooldown period but withholds new alert notifications until the period expires. |
|
"diagnostic_report_url" |
No |
Always included. |
Identifies the URL used to further diagnose the alert. |
|
"event_id" |
No |
Always included. |
Shows the unique ID that identifies the specific event received for this alert id. |
| "priority" | No | Always included. | Shows the priority (P1, P2, P3) configured for the alert. |
|
"filter_id" |
No |
Always included. |
Indicates the unique ID of the filter on which this alert is triggering. |
|
"filter_name " |
No |
Always included. |
Indicates the name of the filter on which this alert is triggering. |
|
"metric_name" |
No |
Always included. |
Indicates the name of the metric on which this alert is triggering. |
|
"sample_size" |
No Note: The key name is editable. |
Optional. |
The system triggers the alert when the data sample reaches a specific size. For example, if the alert monitors whether Video Start Failure (VSF) exceeds 10% of all attempts, it fires when the system detects 100 failures in a sample of 500 attempts. |
|
"source " |
No |
Always included. |
Fixed value defined as "Conviva". |
|
"version" |
No |
Always included. |
Format: "Major.Minor.Revision" Specify the version number of the webhook payload that Conviva sends. Use this version number when writing parsers to ensure a robust and future-proof implementation. |
Enable the flatten webhooks to place the custom fields at the same hierarchy level as the default alert fields.
Note: When flatten webhooks is enabled, the version sent in the Payload is 2.0.0.
{
"source": "Conviva",
"version": "2.0.0",
"alert_source": "Manual Alert",
"alert_id": 1,
"event_id": 30,
"priority": p1,
"filter_id": 56523,
"account_name": "c3.Publisher",
"metric_name": "Pods Started",
"filter_name": "All Traffic",
"condition": "9.4 < 3345.0",
"alert_time": "Oct 25 2017 12:22",
"diagnostic_report_url": " https://www.conviva.com/pulse/alerts4/123888888",
"sample_size": "1000 Minutes",
"alert_name": "Publisher Network Television",
"configured_samples": "200 Minutes",
"cool_down": "0",
"runbook url": "http://google.com"
}Disable the flatten webhooks to place the custom fields in their own nested level.
Note: When flatten webhooks is disabled, the version sent in the Payload is 1.0.0.
{
"source": "Conviva",
"version": "1.0.0",
"alert_source": "Manual Alert",
"alert_id": 1,
"event_id": 30,
"priority": p1,
"filter_id": 56523,
"account_name": "c3.Publisher",
"metric_name": "Pods Started",
"filter_name": "All Traffic",
"condition": "9.4 < 3345.0",
"alert_time": "Oct 25 2017 12:22",
"diagnostic_report_url": " https://www.conviva.com/pulse/alerts4/123888888",
"sample_size": "1000 Minutes",
"alert_name": "Publisher Network Television",
"configured_samples": "200 Minutes",
"cool_down": "0"
"custom_fields": {
"runbook url": "http://google.com"
}
}To enable or disable the flatten Webhooks, contact your Conviva representative.
Webhooks Webhooks Webhooks alert Payload