The Sensor Remote Control allows post-integration configuration of the DPI sensors to collect, block, or enable/disable data ingestion according to the business needs.
Note: Conviva strongly recommends updating the sensor to its latest version, which is more powerful with advanced features.
By default, the Blocked Events section is displayed.
Blocked Events
Block event allows preventing irrelevant or meaningless events from sensor collection, ensuring the accuracy and relevancy of data ingestion. The Blocked Events list shows the events that are blocked along with the block rule, blocked by user, and blocked date. Use this section to perform various actions, such as searching, modifying, and unblocking previously blocked events.

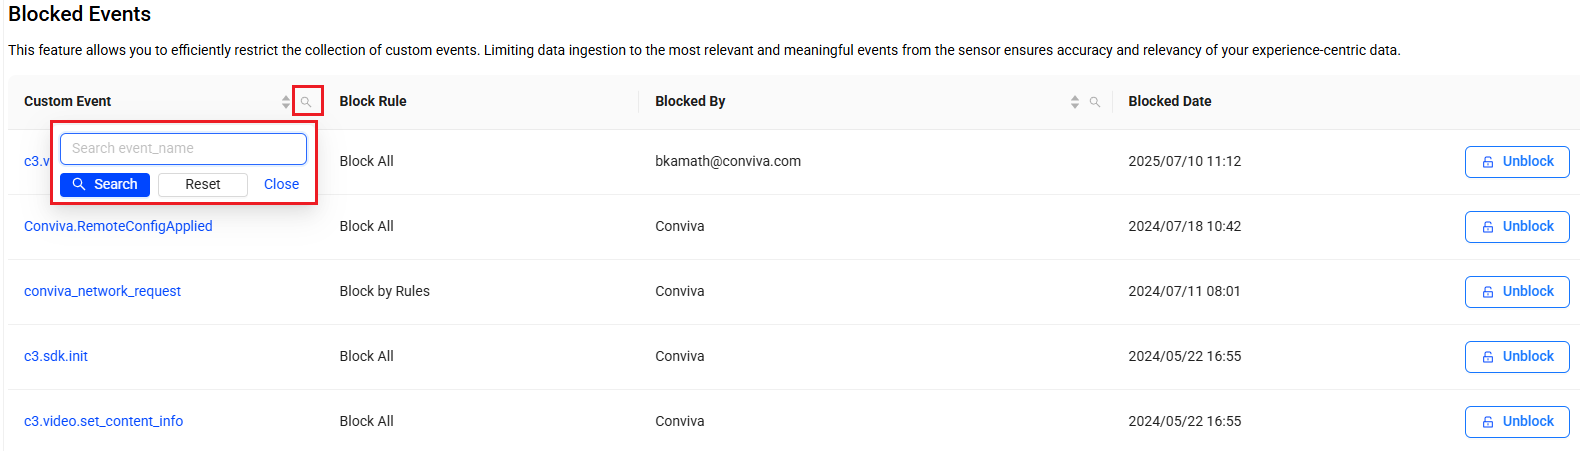
Searching Blocked Events
-
To find a blocked event, click the search icon adjacent to the Custom Event column, enter part of the event's name in the search window, and click Search.
-
To find a blocked event by the blocked by user, click the search icon adjacent to the Blocked By column, enter part of the user's name in the search window, and click Search.

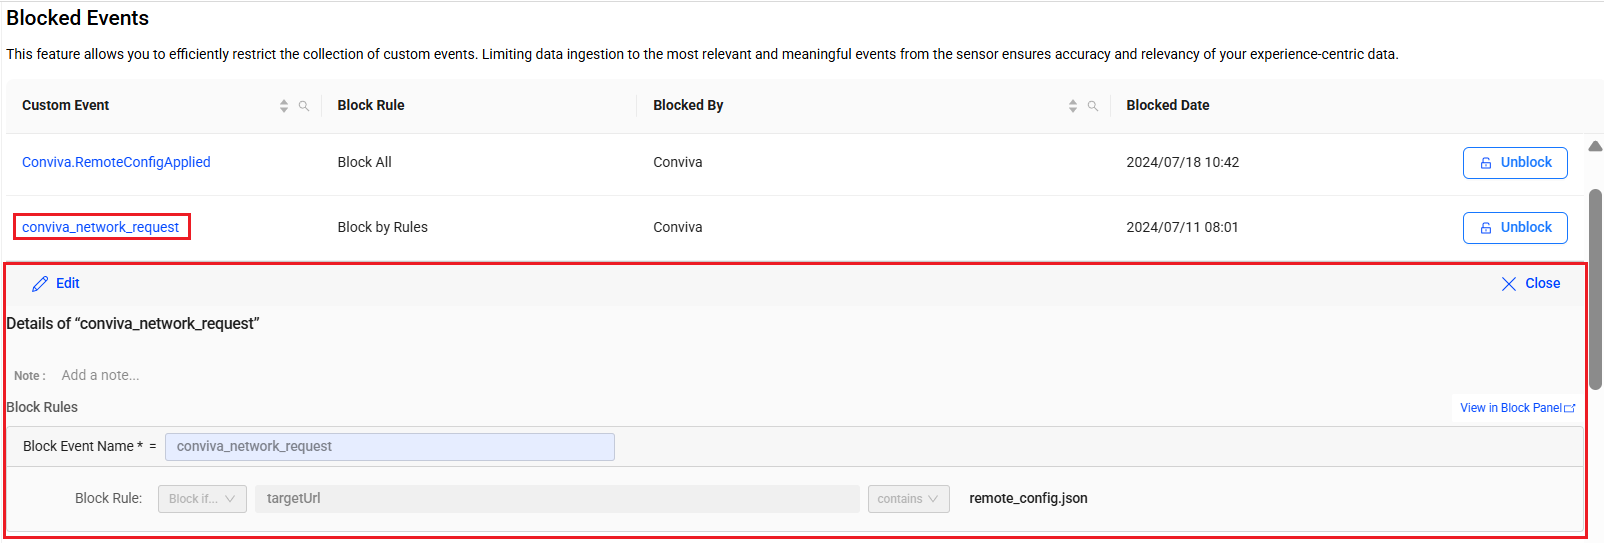
Editing Blocked Events
Change the block rule and note for an existing blocked event.
-
Click an event name under the Custom Event column to see details of the block events.
-
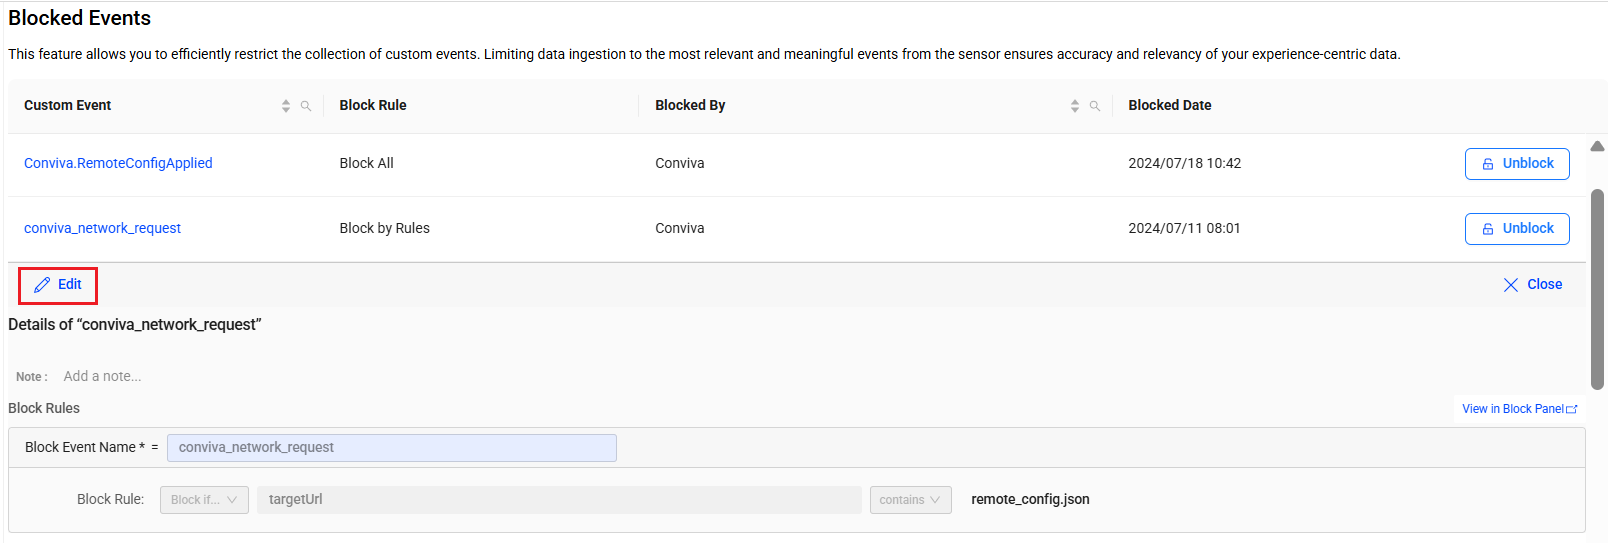
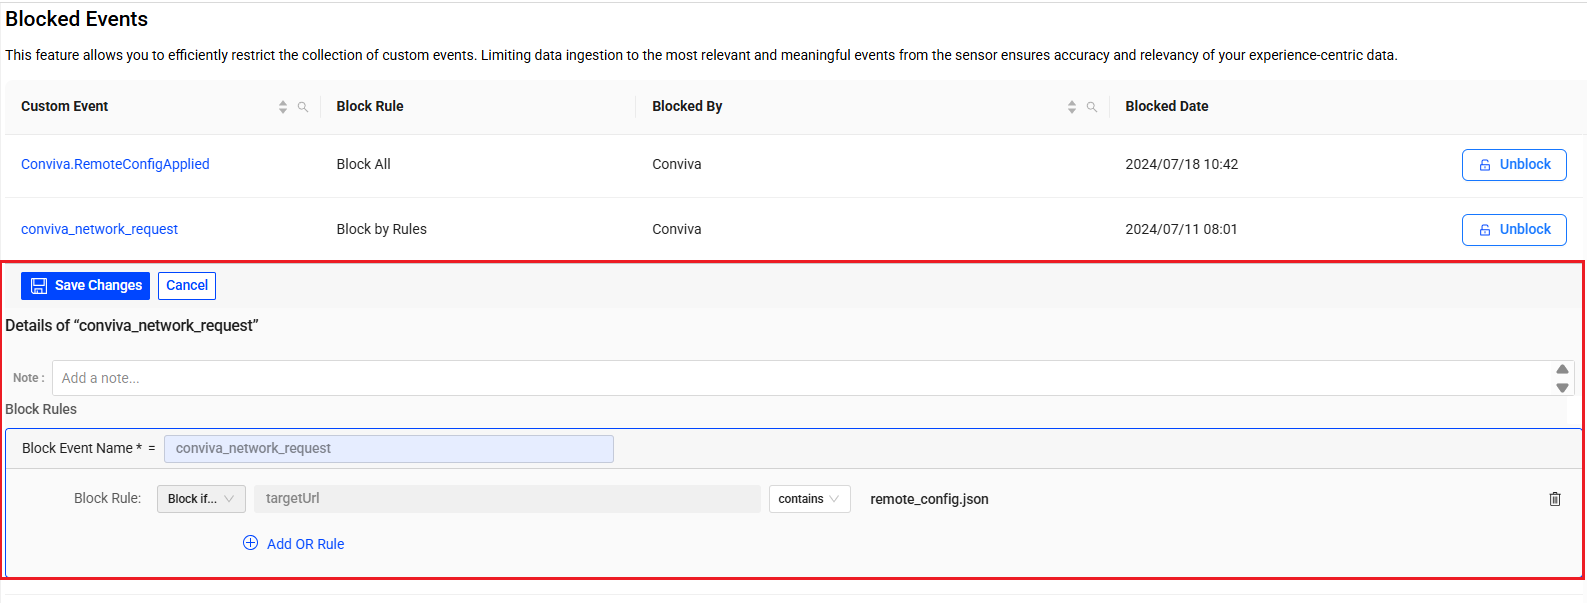
Click Edit in the event details section.
-
Change the block rule and/or update note, and click Save Changes.
Viewing Events in Block Panel
View a blocked event in Semantic Mapper page.
-
Click an event name under the Custom Event column to see details of the block event.
-
Click View in Block Panel in the event details section to see the blocked events related dimensions in the Semantic Mapper page.
Unblocking a Blocked Event
Unblock an existing blocked events to resume the event collection via Conviva DPI sensor.
-
Click the Unblock button corresponding to the blocked event, and click Yes on the confirmation message pop-up.
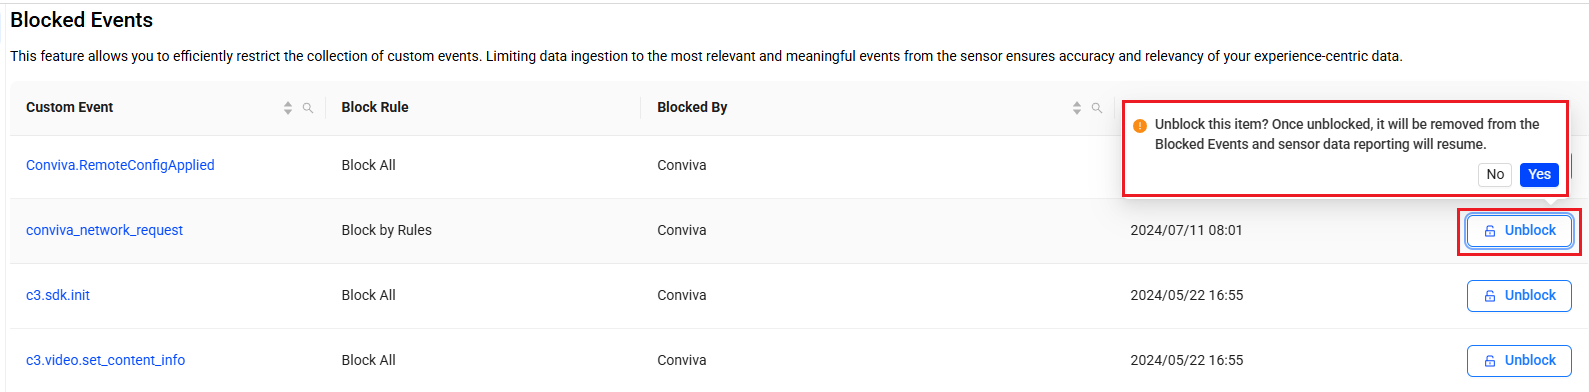
After unblocking an event, it is removed from the Blocked Events list and Conviva DPI sensor starts collecting the respective event data from the integrated app.
Configured Network Request
Configure Network Request allows defining the collection rules for conviva_network_request events. When the rules are configured, the Conviva sensor collects network request events accrding to the matched rules. Optionally, select the collected events as raw data for mapping.
Configure the network request data collection rules for multiple categories, such as metadata usage, EMP query fields, GraphQL, tag value, and metrics API.

Collection Rule Order
Network request collection rules are applied based on the most recently changed rules, and then rules following the displayed category order. If a network request does not meet any configured rules in a category, the collection rule matching process stops and that network request data is not passed to DPI.
There are two methods for collecting conviva_network_request events:
-
Blocked events: blocks events matching blocked event criteria and collects all other conviva_network_request events.
-
Collection rules: collects events matching allowed event criteria and blocks all other conviva_network_request events.
Note: Events matching the blocked events criteria are blocked even if they also match any collection rules.
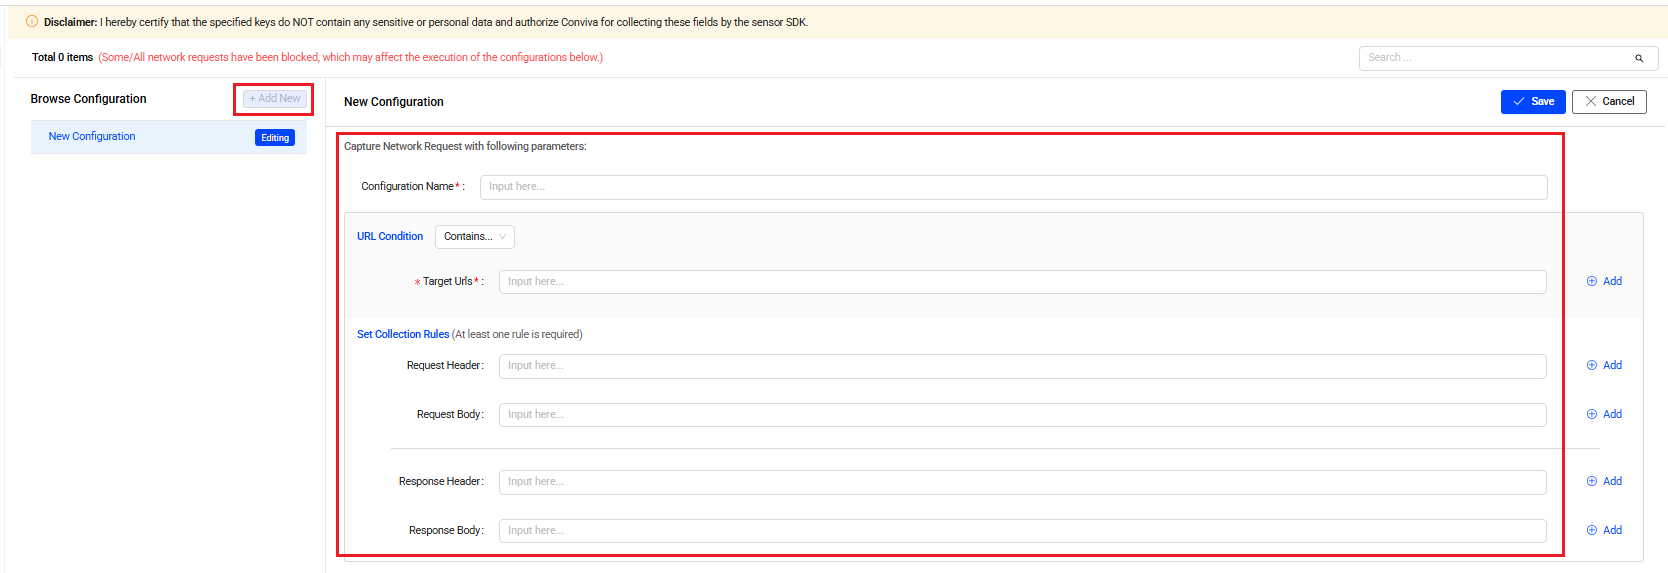
Creating Collection Rules
-
Click Add New in the Browse Configuration section, on the left pane.
-
Set the collection rule in the New Configuration secion, on the right pane:
-
Condition Name: Type a name for the collection condition.
-
Define the URL Conditions by selecting:
-
All: Enables rules to take effect on all conviva_network_request events.
-
Contains: Enables rules to take effect on events containing the Target Urls.
-
-
Set collection rules using Request Header, Request Body, Response Header, Response Body, separately.
Note: Click Add to include more rules if necessary.
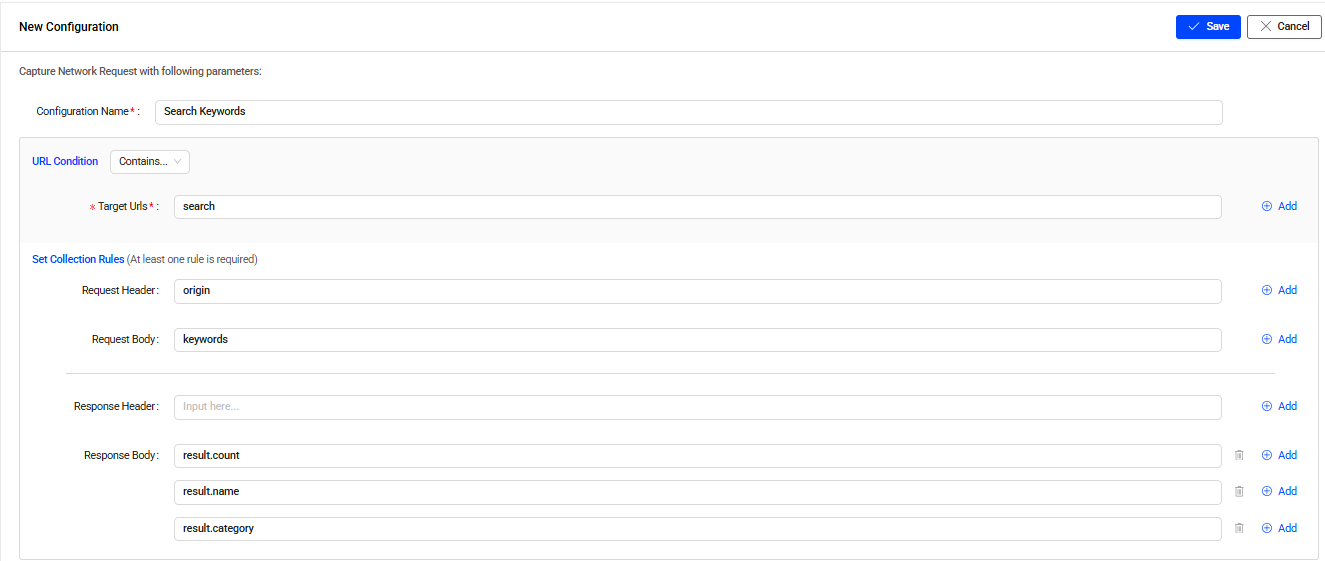
 Capture Network Request Data
To gather information about the keywords users searched for and conduct in-depth analysis based on that information, collect the relevant conviva_network_request events data.
-
Configuration Name: Search Keywords
-
URL Condition: Select Contains and type search in the Target Urls field. This is required.
-
Set Collection Rules with:
-
origin as Request Heade.
-
keywords as Request Body.
-
Leve the Response Header field empty.
-
result.count, result.name, and result.category as Response Body.
-
-
-
Click Save. Conviva DPI sensor starts collecting the conviva_network_request events that match the rules.
Auto Collection of Clicks
Customize the user-click tracking across the application, beyond tracking the click events for buttons and links. This section consists of two tabs, Collect Attributes and CSS Selectors. Use the default attributes and CSS selectors, and also create additional custom tags, CSS selectors, and attributes to track user clicks for various purposes, such as defining Out-of-Box (OOB) metrics, resolving UX issues, and even creating meaningful user Flows.
Note: This feature is available only for the DPI Web (JavaScript) Sensor version 1.1.15 and above. Conviva recommends updating the sensor to its latest version.
Use the toggle button at the section header to enable/disable this feature for the DPI sensor.
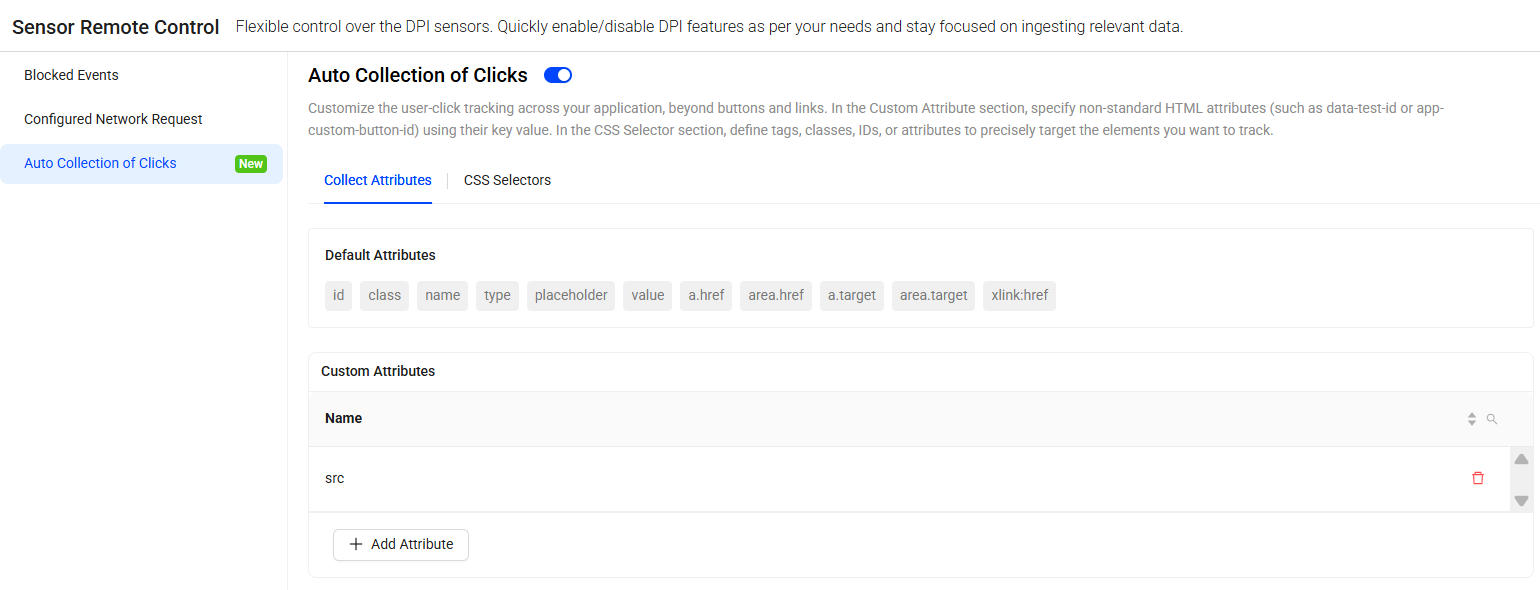
Collect Attributes
Specify the non-standard HTML attributes (such as data-test-id or app-custom-button-id) using their key value. By default, DPI sensors support collecting user-click events for certain attributes, such as, id, class, name, type, placeholder, value, a.href, area.href, a.target, area.target, and xlink:href.
In the Custom Attributes section, click the Add Attribute button to track user clicks on more custom attributes such as, src, title, alt. Click the Save button to deploy.
Note: Sensors may take 30 minutes to reflect the changes.
CSS Selectors
Define tags, classes, IDs, or attributes to precisely target the elements you want to track. By default, DPI sensors support collecting user-clicks for the native clickable selectors, such as button, a, select, textarea, input:not([type="hidden"]), summary, video, and audio.
In the Default Virtual Clickable Selectors section, use the toggle button to enable/disable the pre-defined click tracking for the virtual selectors.
In the Custom CSS Selectors section, click the Add CSS Selector button to specify the custom CSS Tag or custom CSS attribute for click tracking.
-
To define custom CSS tag:
-
Click the Add CSS Selector button.
-
Select the option Tag from the drop-down list.
-
Specify tag name in the adjacent field.
-
Click Save to deploy.
-
Note: Sensors may take 30 minutes to reflect the changes.
-
To define custom CSS attribute:
-
Click the Add CSS Selector button.
-
Select the option Attribute from the drop-down list.
-
Specify attribute name in the adjacent field.
-
Select a condition (Starts With, Ends With, Equals, and Contains) from the drop-down list.
-
Specify the value to match based on the selected condition.
-
Click Save to deploy.
-
Note: Sensors may take 30 minutes to reflect the changes.
Intelligent Collections of Network Requests
Intelligent Collection optimizes the volume of network request collection by overriding the default URL blocklist with the Collect/Block rules. Configure the rule using hostname, path, or scheme-based filters for collecting a specific set of network requests. If needed, use the response codes and duration-based filters for more granular-level collection.
This feature is applicable to the DPI sensor integration for:
-
Android 1.1.0 and above
-
Web (JavaScript) 1.1.1 and above
-
iOS 1.0.1 and above
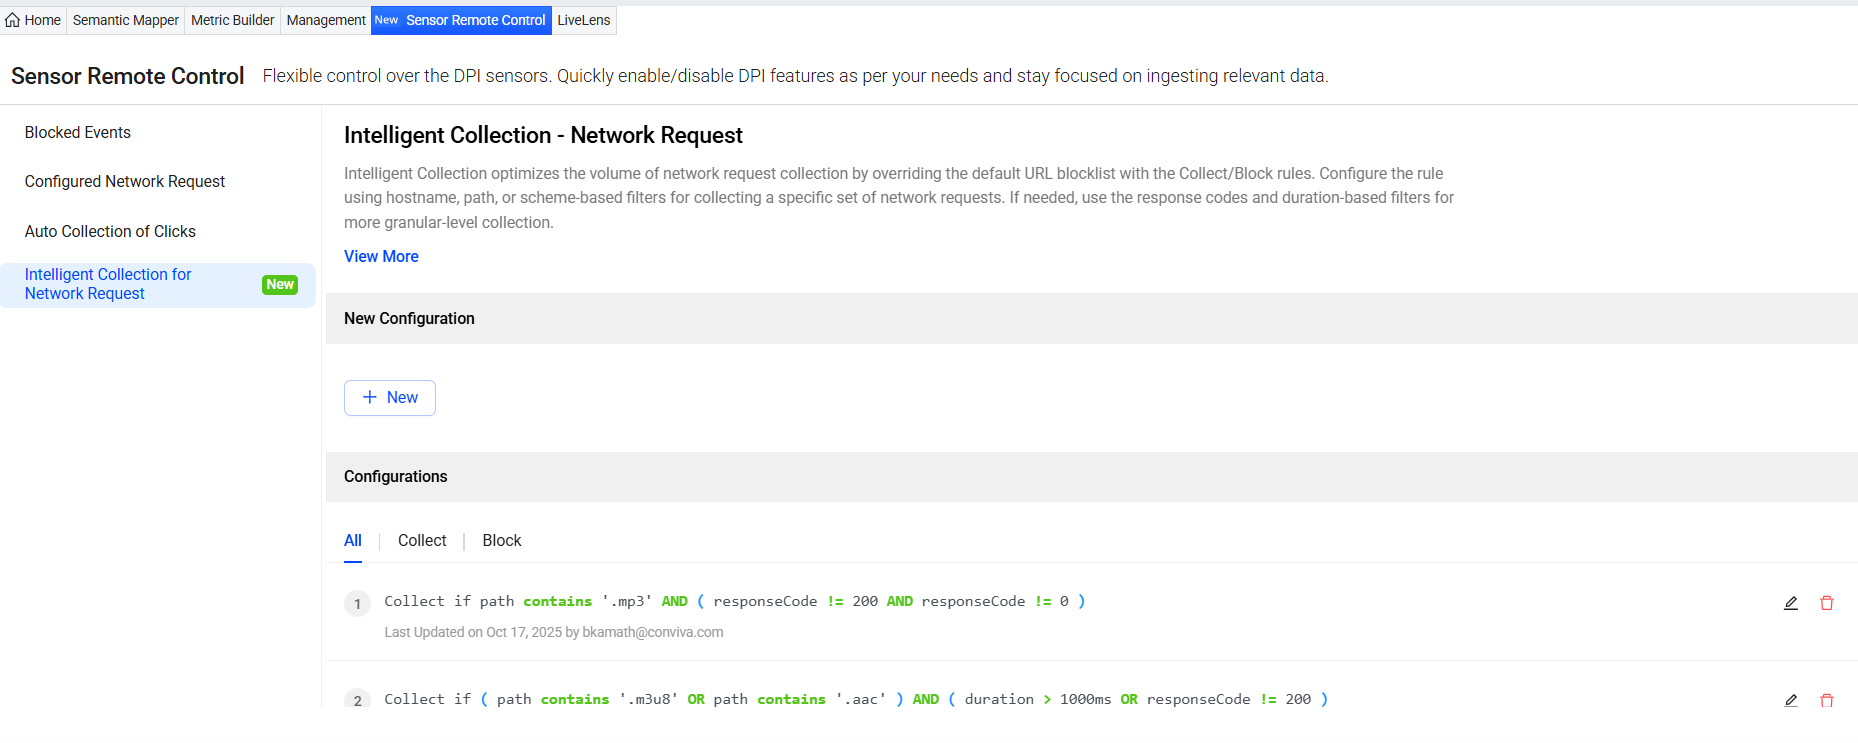
Configuring a New Rule for Specifis URL(s)
-
Click the + New button in the New Configuration sections.
-
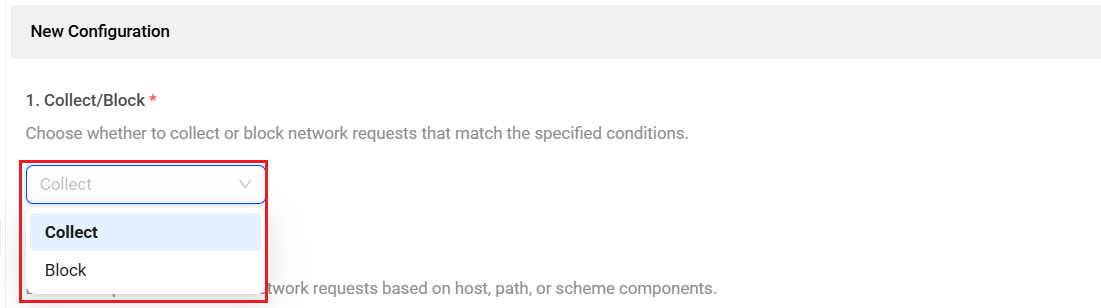
Select the Collect or Block option from the drop-down to collect/block network requests that match the rules.
-
Build the collect/block rule using the host, path, and/or scheme of the targeted URLs.
-
Select an URL component (Host, Path, or Scheme) from the drop-down list.
-
Host is the domain name or IP address of the target URL.
-
Path is the specific location or resource on the server.
-
Scheme is the protocol used for communication over the network.
-
-
Select an appropriate matching criteria (Starts with, Ends with, Equals, or Contains) from the adjacent drop-down list.
-
Enter an appropriate value in the adjacent field to match the URL component as per selected criteria.
-
Use the Logic options AND/OR operator to add more conditions.
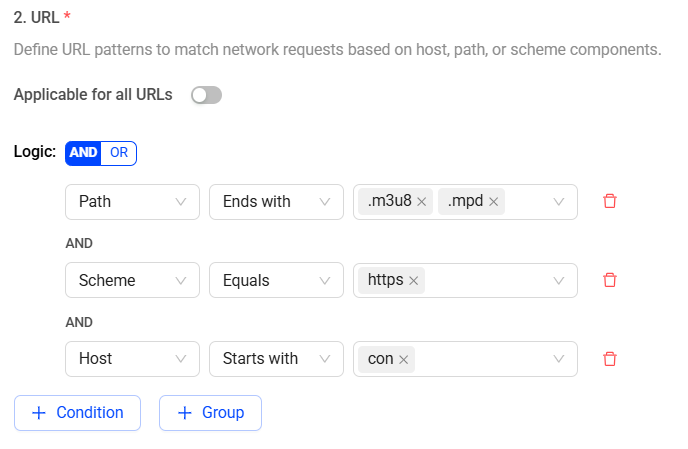
-
Click the + Condition button to add more conditions. This creates another row to select to add mode and + Group buttons to add more conditions and group multiple conditions together. This creates a new row to select host, path, or scheme with a matching criteria.
Note: Repeat the above steps to configure the collect/block logic using multiple Host, Path, and Scheme conditions joining with AND/OR operators.
For example, if a target URL is https://online-shop.com/department/electronics/phones, configure the rule based on its:
-
Host (online-shop.com)
-
Path (/department/electronics/phone)
-
Scheme (https or http)
Note: While configuring a new collect/block rule, the Preview section, on the right side, shows the rule definition on the fly. See the preview to verify the rule before saving, ensuring it behaves as intended.
-
-
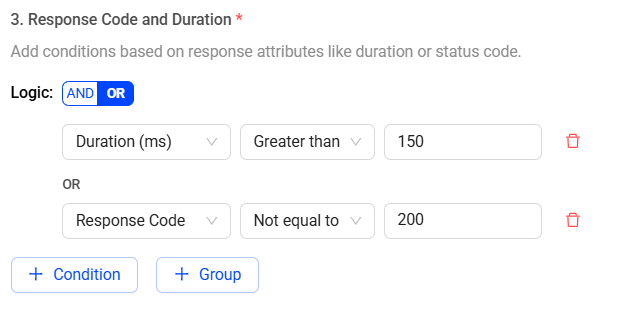
(Optional) Specify additional criteria based on the response duration and status code to collect/block network requests more precisely.
-
Select the option, Response Code or Duration (ms), from the drop-down list.
-
Duration (ms): Total time taken to complete the network request from the moment a request is sent to the moment of receiving full response. The duration is measured in terms of miliseconds. For example, apply the collect/block rule for requests that take more than (or less than) 150ms.
-
Response Code: The HTTP status code returned by the server indicating the result of a network request. For example, apply the collect/block rule for response code greater than 400 (Bad Request) and less than 404 (Not Found), or response code equals to 401 (Unauthorized), or not equals to 200 (Success).
-
-
Select an appropriate matching criteria from the adjacent drop-down list.
-
For Response Code, the available criteria are: Greater than, Less than, Equals to, and Not equal to.
-
For Duration (ms), the available criteria are Greater than and Less than.
-
-
Enter an appropriate value in the adjacent field to match the selected criteria.
-
Use the AND/OR toggle button to specify an operator for adding more conditions.
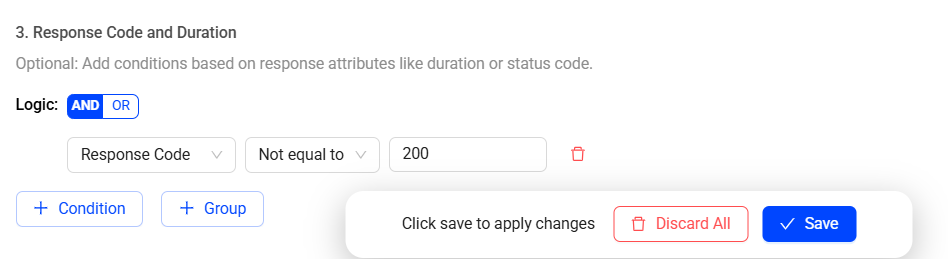
-
Click the + Condition button to add more conditions. This creates another row to select response code or duration with a matching criteria.
Also click the + Group button to group multiple conditions together.Note: Repeat the above steps to configure the collect/block logic using multiple response code and duration conditions joining with AND/OR operators.
-
-
Click Save.
Note: Conviva restricts identical collect and block rule creation by showing a message:
- "Rule with identical conditions already exists as 'block' type. Cannot create duplicate rule as 'collect' type." This message is displayed while configuring a new collect rule if any block rule already exits with identical conditions.
- " Rule with identical conditions already exists as 'collect' type. Cannot create duplicate rule as 'block' type." This message is displayed while configuring a new block rule if any collect rule already exits with identical conditions.Note: Conviva restricts duplicate rule creation by showing the message " Identical rule already exists".
Configuring a New Rule Applicable for All URLs
-
Click the + New button in the New Configuration sections.
-
Select the Collect or Block option from the drop-down to collect/block network requests that match the rules.
-
Select the Applicable for all URLs option. Accordingly, the URL section becomes disabled.

-
(Required) Specify the response duration and/or status code criteria applicable for all URLs to collect/block the network requests.
-
Select the option, Response Code or Duration (ms), from the drop-down list.
-
Duration (ms): Total time taken to complete the network request from the moment a request is sent to the moment of receiving full response. The duration is measured in terms of miliseconds. For example, apply the rule for requests that take more than (or less than) 150ms.
-
Response Code: The HTTP status code returned by the server indicating the result of a network request. For example, apply the collect/block rule for response code greater than 400 (Bad Request) and less than 404 (Not Found), or response code equals to 401 (Unauthorized), or not equals to 200 (Success).
-
-
Select an appropriate matching criteria from the adjacent drop-down list.
-
For Response Code, the available criteria are: Greater than, Less than, Equals to, and Not equal to.
-
For Duration (ms), the available criteria are Greater than and Less than.
-
-
Enter an appropriate value in the adjacent field to match the selected criteria.
-
Use the AND/OR toggle button to specify an operator for adding more conditions.
-
Click the + Condition button to add more conditions. This creates another row to select response code or duration with a matching criteria.
Also click the + Group button to group multiple conditions together.Note: Repeat the above steps to configure the collect/block logic using multiple response code and duration conditions joining with AND/OR operators.
-
-
Click Save.
Note: Conviva restricts identical collect and block rule creation by showing a message:
- "Rule with identical conditions already exists as 'block' type. Cannot create duplicate rule as 'collect' type." This message is displayed while configuring a new collect rule if any block rule already exits with identical conditions.
- " Rule with identical conditions already exists as 'collect' type. Cannot create duplicate rule as 'block' type." This message is displayed while configuring a new block rule if any collect rule already exits with identical conditions.Note: Conviva restricts duplicate rule creation by showing the message " Identical rule already exists".
Viewing the Existing Rules
In the Configurations section, see the list of existing rules under the tabs:
-
All tab shows the list of all rules configured to collect and block network requests. By default, the All tab is displayed.
-
Collect tab shows only the list of rules configured for allowing network requests collection.
-
Block tab shows only the list of rules configured for blocking network request cpllection.
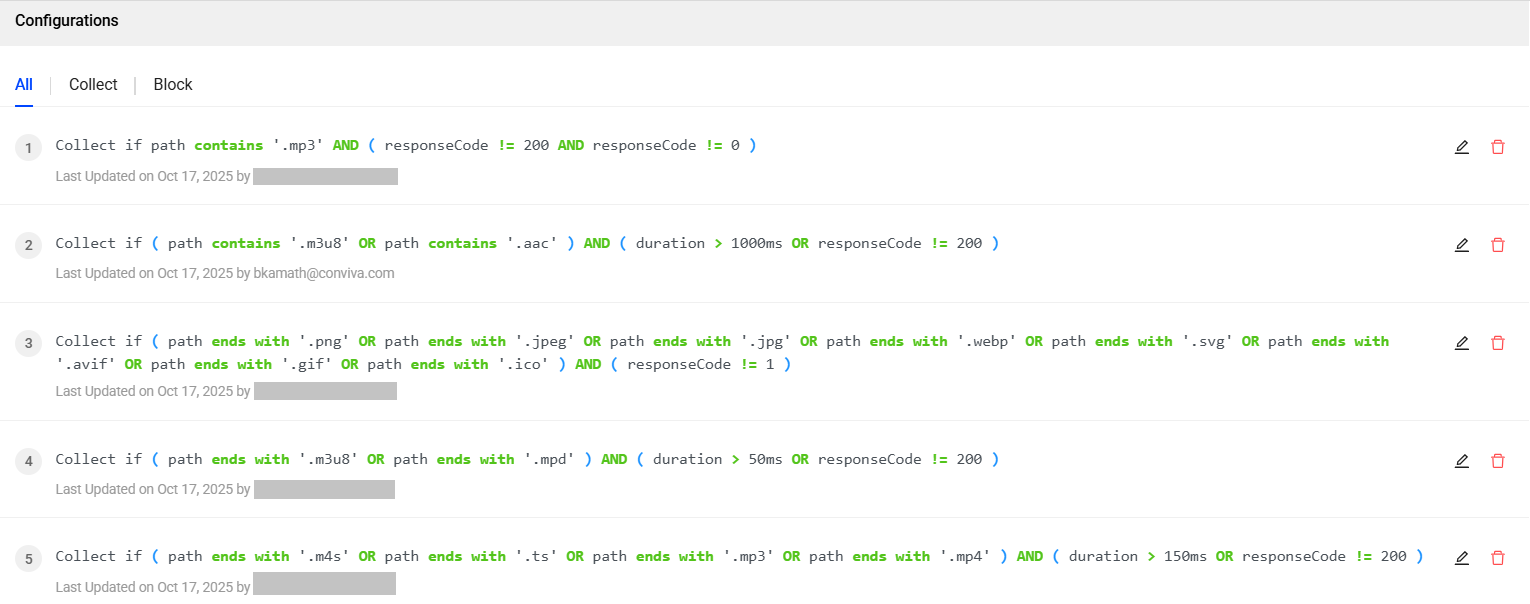
Note: By default, the list is sorted by creation or modification time. The most recently created or updated rule appears at the top.
Modifying an Existing Rule
-
In the Configurations section and navigate to the All, Collect, or Block tab.
-
Identify the rule to modify and click the adjcent edit icon.

-
In the Edit Configuration section make necessary changes in the rule using the:
-
Collect/Block drop-down
-
Host, Path, and Scheme of the URL
-
Response Code and Duration
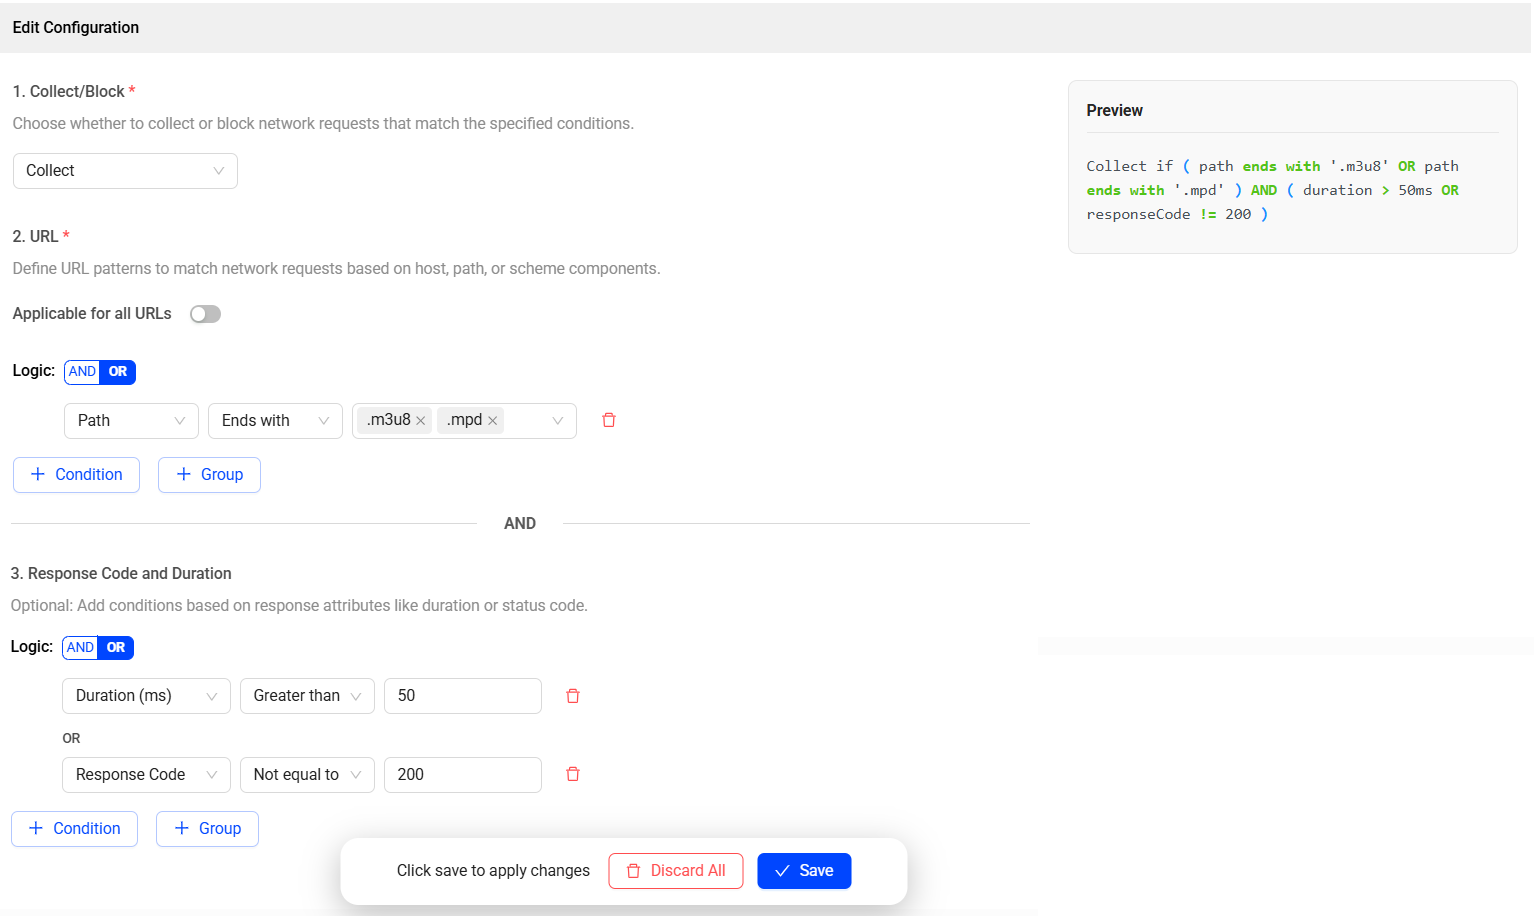
Note: The Preview section updates the rule definition in real time to reflect any changes while modifying a collect/block rule. Use it to verify the rule before saving, ensuring it behaves as intended.
-
-
Click Save.
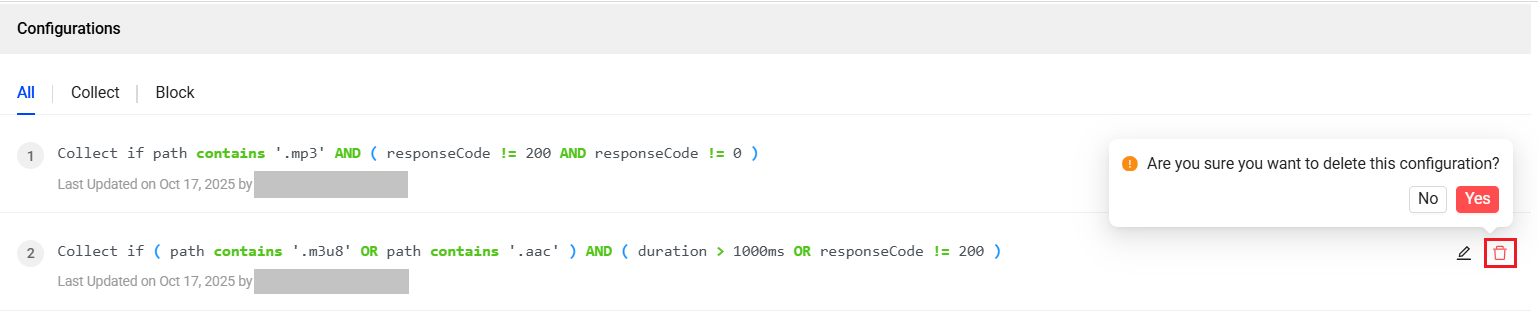
Deleting an Existing Rule
-
In the Configurations section and navigate to the All, Collect, or Block tab.
-
Identify the rule to delete and click the adjcent delete icon.
-
Click Yes in the confirmation message.
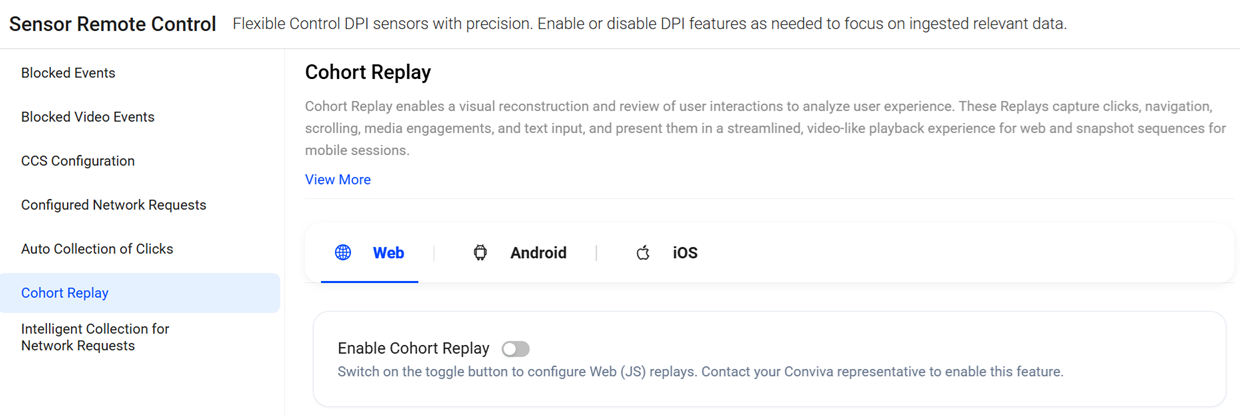
Cohort Replay
Cohort Replay enables the visual reconstruction and review of user navigations and actions within a customer's app. This feature captures how users interact with the app, including clicks, navigation, scrolling, media engagement, and text input, and then replays these interactions in a video-like experience. Cohort Replay provides direct visibility into how customers interact with digital platforms and user behaviors, based on a sampling percentage of user sessions. For data compliance, Conviva applies configurable masking levels (light, medium, or advanced) to protect Personally Linked/Locatable (PLL) data.
Supported Platforms and Versions: Web (JS) version 1.4.3 and above.
Configuring Cohort Replay
Enable Cohort Replay in the Sensor Remote Control tab. Cohort Replay options allow:
-
Set the sampling percentage to define the proportion of user sessions captured for Cohort Replay.
-
Configure the masking level to secure PII data.
Note: Cohort Replay configuration in Sensor Remote Control is restricted to Conviva Administrators due to sampling constraints. Only Conviva Admins can modify or update these settings. Contact your Conviva Administrator to request any changes to the configuration.
Web Cohort Replay
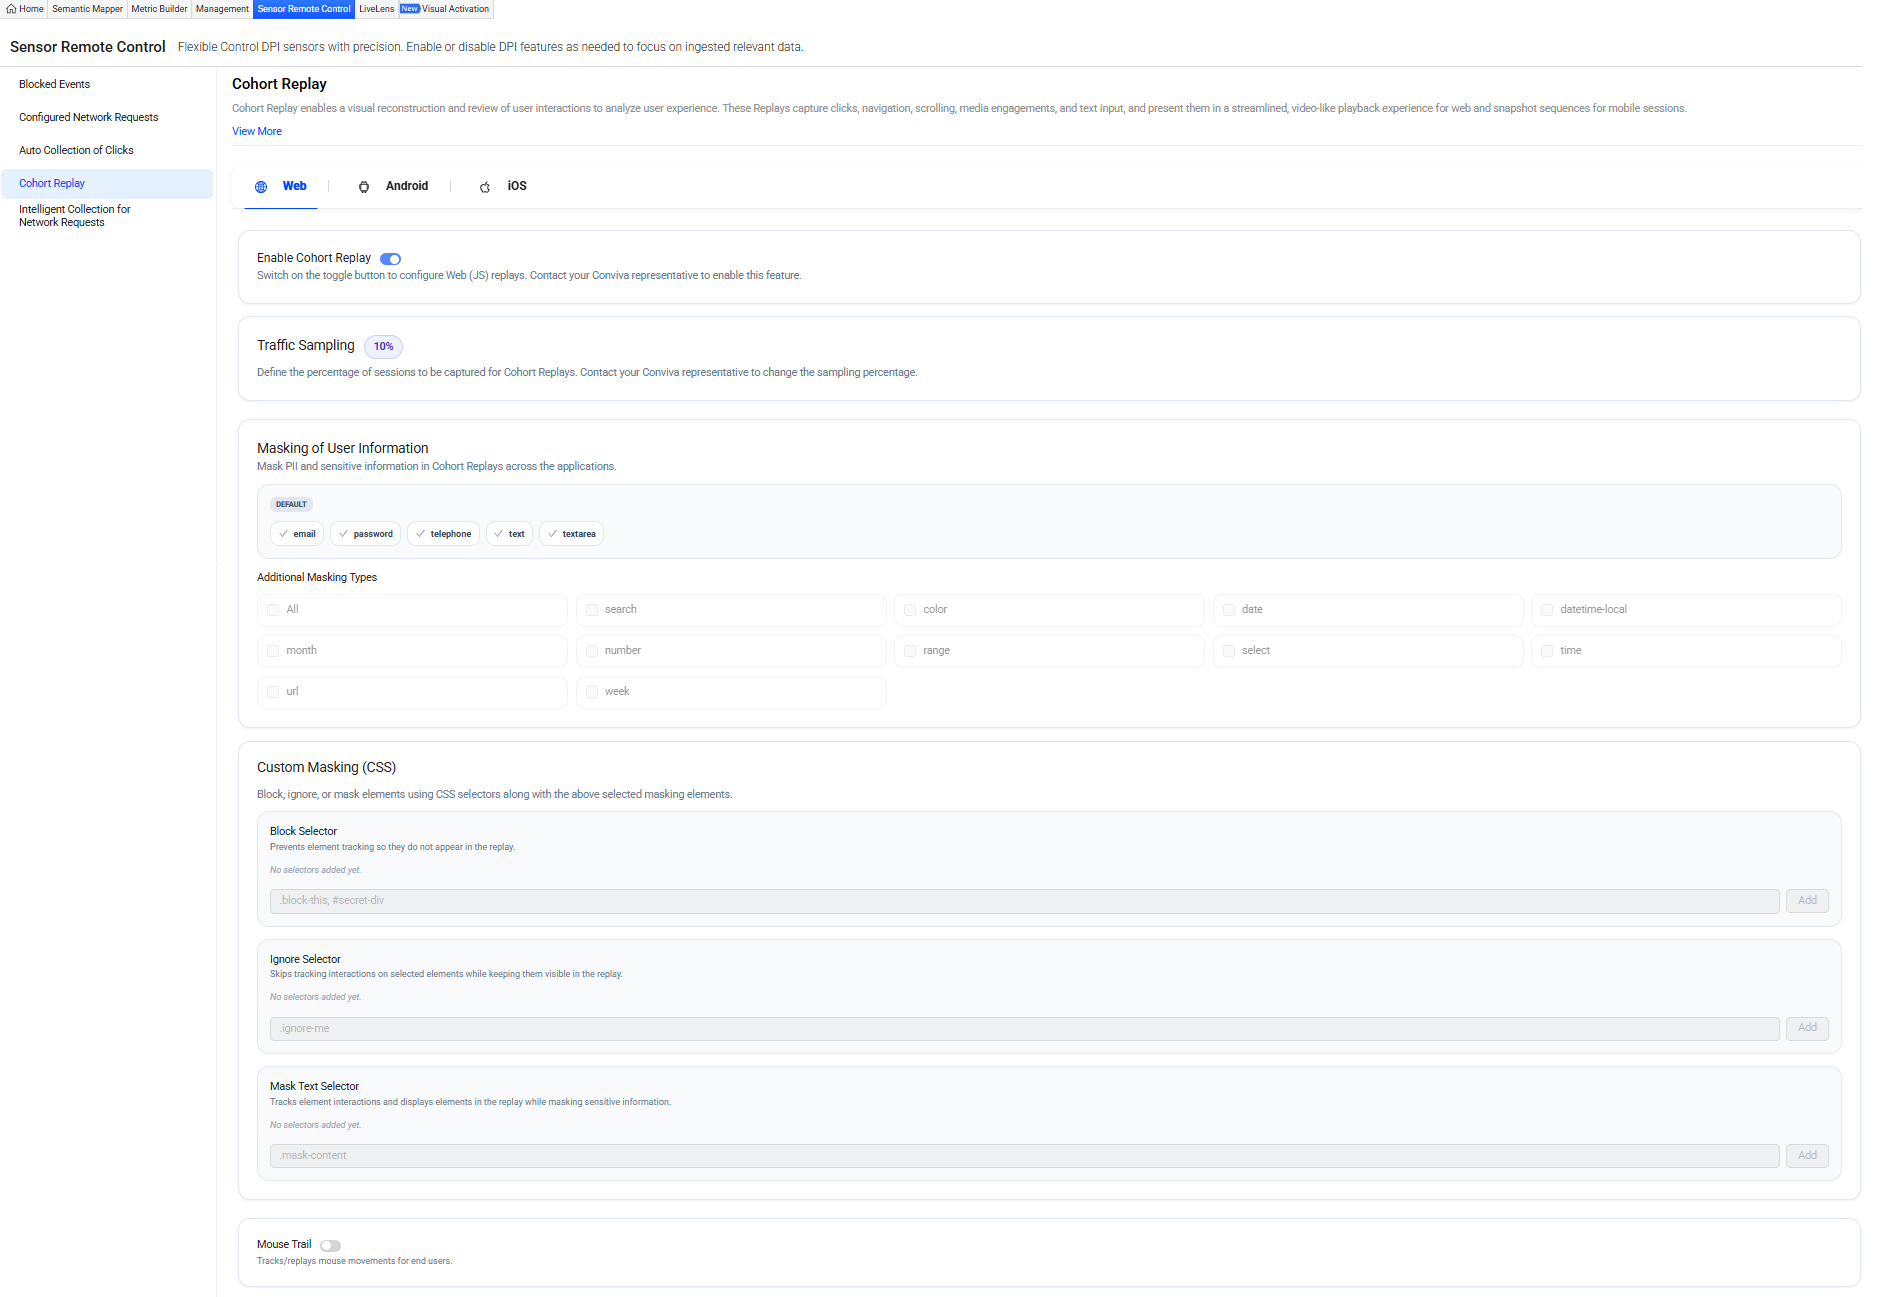
Note: Cohort Replay configuration in Sensor Remote Control is restricted to Conviva Administrators due to sampling constraints. Only Conviva Admins can modify or update these settings. Contact your Conviva Administrator to request any changes to the configuration.
-
Enable Cohort Replay: Switch the Enable Cohort Replay toggle to start recording user sessions at the specified sampling percentage and data masking.
-
Traffic Sampling: The sampling percentage specifies the proportion of the devices enabled for Cohort Replay. The value entered in the Sampling Percentage field determines the percentage of devices enabled for recording.
-
Masking: Conviva provides data masking features to protect Personally Linked/Locatable (PLL) data from being exposed during session recordings. This capability prevents sensitive user information from being captured, stored, or exposed in recorded sessions.
The masking configuration supports multiple categories of user information, enabling organizations to control how sensitive data is handled while maintaining operational visibility. Conviva, by default, masks common sensitive data, with the option to include additional UI elements for masking as required.
-
Default Masking – Commonly sensitive user information, such as email addresses, passwords, telephone numbers, text inputs, and text areas.
-
Additional Masking (Optional) – UI field categories such as search fields, colors, dates, datetime-local inputs, months, numbers, ranges, selections, times, URLs, and weeks.
Use these options to configure masking policies that meet security and compliance requirements while effectively analyzing session behavior.
-
-
Custom Masking (CSS): Conviva provides a Custom Masking (CSS) feature to protect additional sensitive or personally identifiable information (PII) during session recordings. Customers specify the elements to mask and define the masking level to maintain precise control over data visibility and data confidentiality.
Specify Block, Ignore, or Mask CSS selectors to mask specific elements.
-
Block Selector: Prevents selected elements from being tracked and displayed, ensuring they do not appear in the session replay.
-
Ignore Selector: Skips interaction tracking for selected elements while keeping them visible in the session replay.
-
Mask Text Selector: Tracks interactions and displays selected elements in session replay while masking sensitive information.
-
-
Mouse Trial: Enable the mouse trail setting to ensure that cursor movement is captured and rendered during session playback. When active, the system records the complete cursor path, enhancing clarity and making diagnostics easier during session analysis.
Android Cohort Replay (Beta)
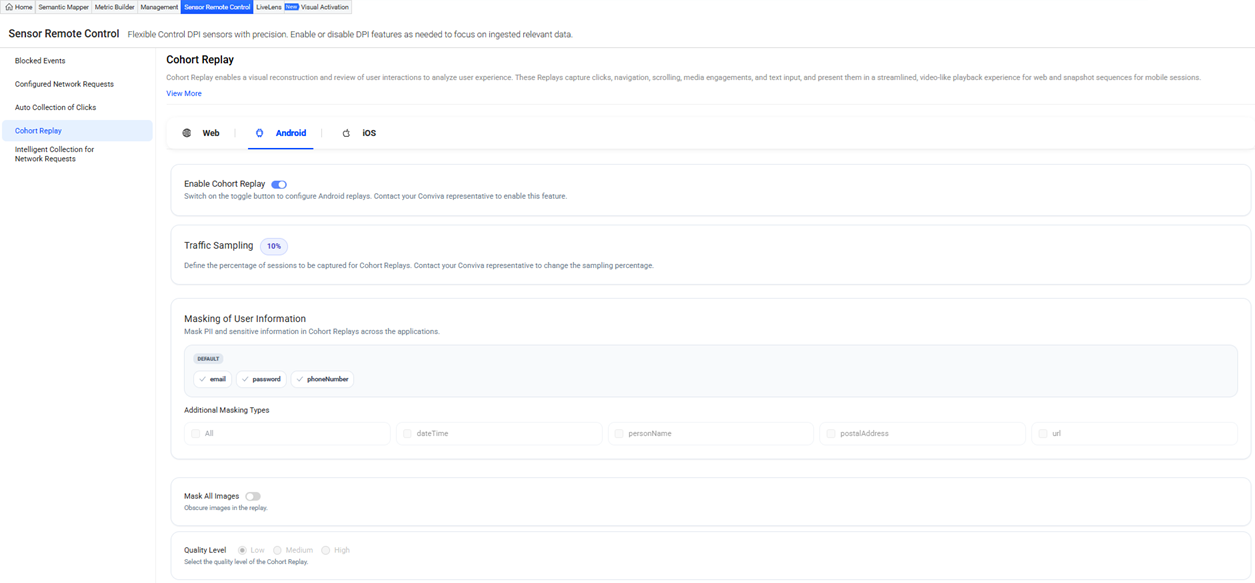
Note: Cohort Replay configuration in Sensor Remote Control is restricted to Conviva Administrators due to sampling constraints. Only Conviva Admins can modify or update these settings. Contact your Conviva Administrator to request any changes to the configuration.
-
Enable Cohort Replay: Switch the Enable Cohort Replay toggle to start recording user sessions at the specified sampling percentage and data masking.
-
Traffic Sampling: The sampling percentage specifies the proportion of the devices enabled for Cohort Replay. The value entered in the Sampling Percentage field determines the percentage of devices enabled for recording.
-
Masking: Conviva provides data masking features to protect Personally Linked/Locatable (PLL) data from being exposed during session recordings. This capability prevents sensitive user information from being captured, stored, or exposed in recorded sessions.
The masking configuration supports multiple categories of user information, enabling organizations to control how sensitive data is handled while maintaining operational visibility. Conviva, by default, masks common sensitive data, with the option to include additional UI elements for masking as required.
-
Default Masking – Commonly sensitive user information, such as email addresses, passwords, and numbers.
-
Additional Masking (Optional) – UI field categories such as Date Time, Person Name, and Postal Address.
Use these options to configure masking policies that meet security and compliance requirements while effectively analyzing session behavior.
-
-
Mask All Images: Switch on the toggle to obscure images during replay. This prevents exposure of sensitive visual information. When activated, all images appearing in the replay are masked to support data privacy and compliance.
-
Quality Level: Specify the rendering quality of the Cohort Replay. Options Low (default), Medium, and High allow adjustment of replay fidelity based on performance considerations, network conditions, or analysis needs. This setting provides flexibility in balancing visual clarity with system efficiency during cohort replays.
iOS Cohort Replay (Beta)
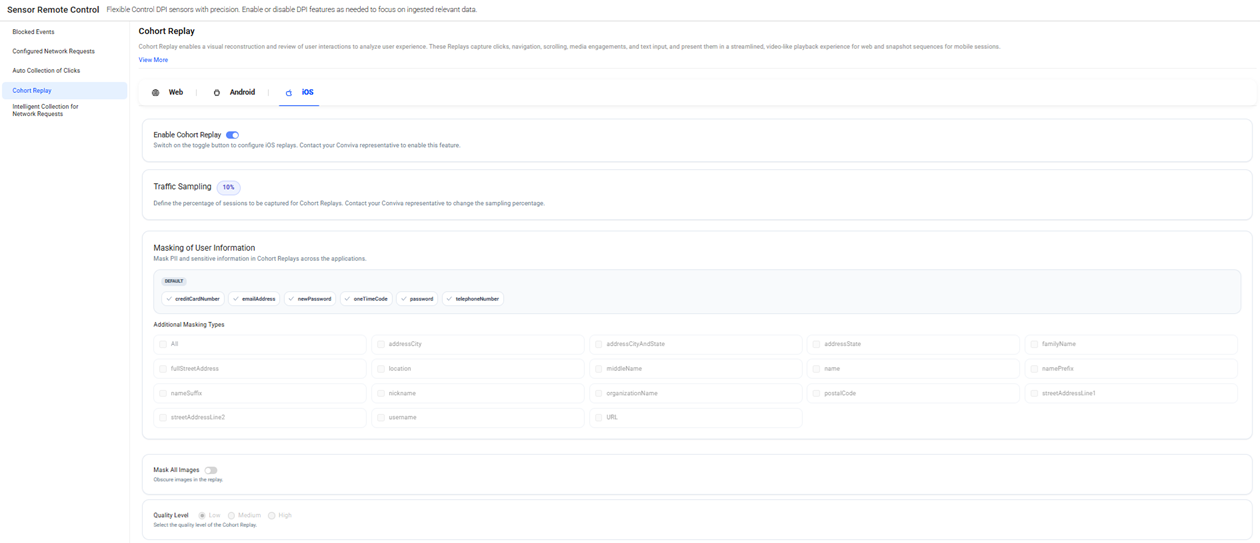
Note: Cohort Replay configuration in Sensor Remote Control is restricted to Conviva Administrators due to sampling constraints. Only Conviva Admins can modify or update these settings. Contact your Conviva Administrator to request any changes to the configuration.
-
Enable Cohort Replay: Switch the Enable Cohort Replay toggle to start recording user sessions at the specified sampling percentage and data masking.
-
Traffic Sampling: The sampling percentage specifies the proportion of the devices enabled for Cohort Replay. The value entered in the Sampling Percentage field determines the percentage of devices enabled for recording.
-
Masking: Conviva provides data masking features to protect Personally Linked/Locatable (PLL) data from being exposed during session recordings. This capability prevents sensitive user information from being captured, stored, or exposed in recorded sessions.
The masking configuration supports multiple categories of user information, enabling organizations to control how sensitive data is handled while maintaining operational visibility. Conviva, by default, masks common sensitive data, with the option to include additional UI elements for masking as required.
-
Default Masking – Commonly sensitive user information, such as credit card numbers, email addresses, passwords, one-time codes, and numbers.
-
Additional Masking (Optional) – Optional UI field categories such as Address Cities, Address State, Family Name, Location, Names, and others.
Use these options to configure masking policies that meet security and compliance requirements while effectively analyzing session behavior.
-
-
Mask All Images: Switch on the toggle to obscure images during replay. This prevents exposure of sensitive visual information. When activated, all images appearing in the replay are masked to support data privacy and compliance.
-
Quality Level: Specify the rendering quality of the Cohort Replay. Options Low (default), Medium, and High allow adjustment of replay fidelity based on performance considerations, network conditions, or analysis needs. This setting provides flexibility in balancing visual clarity with system efficiency during cohort replays.
Sensor Remote Control Sensor Remote Control Sensor Remote Control Configured Network Request Configured Network Request Configured Network Request Blocked Events Blocked Events Blocked Events Click Tracking Click Tracking Click Tracking Click Tracking Custom Attribute Custom Attribute Custom Attribute CSS Selector CSS Selector CSS Selector Auto Collection of Clicks Auto Collection of Clicks Auto Collection of Clicks Cohort Replay Cohort Replay Cohort Replay